XpertMart (mr) Autodistribution
Autodistribution can be used to replenish stores from one or more
warehouses or it can be used to balance inventory between various
stores and warehouses.
The Autodistribution
module's purpose is to distribute merchandise in the most optimum
quantities between two or more inventory locations. Optimum inventory
distribution is that which takes stock as close as possible to the
quantities established as minimums or ideal inventory. That is to avoid
as much as possible, that an item's on hand stock be either below or
above the established minimum stock quantity for that store or
warehouse.
The Autodistribution module can
also distribute merchandise in prepacks defined as a box containing a
single style and single color in varying quantities of various sizes.
Origen of the Distributed Merchandise
If you run Autodistribution from the main then you can specify
one, several or all of the warehouses and stores as sources of
merchandise to distribute.
If you run
Autodistribution from a warehouse or store remote then it is
automatically assumed that the store or warehouse will be the source of
the merchandise to distribute.
In any case
the merchandise in stock that is above the minimum established for that
particular warehouse(s) or store(s) is the merchandise that is
available for distribution. The autodistribution module will never
transfer away stock that is needed in the source location for it to
have up to the minimum stock specified.
Destination of the Distributed Merchandise
When you run Autodistribution from the main or any remote
warehouse or store, you can specify one, several or all of the stores
and warehouses as destinations for distributed merchandise.
Type of Merchandise to Distribute
You use the merchandise selector in XpertMart with XpertQuery to
determine if you want to automatically distribute all types of
merchandise or only certain types of merchandise.
Distribution Criteria
In order to assure the most optimum distribution, XpertMart
grades each possible transfer or each individual item from a warehouse
or store to another warehouse or store. The grade is made up of two
parts. First it grades how much a possible transfer would help lower
excess inventory (inventory above the minimum) if any at the origin.
Then it grades how much a possible transfer would help raise the
destinations inventory closer to or exactly to its minimum. The sum of
these two grades it the total grade for that possible transfer. If
there is more than one possible combination of origin and destination
for an identical item, then all possible combinations are graded and
the transfer is made for the option with the highest total grade.
When prepacks are to be distribuited, each item within the
prepack is graded and then the sum of the grades of all the items is
the grade of the prepack. Prepacks are graded against every possible
origin and destination as is done with individual items and the
transfer is made for the origin and destination with the highest grade.
Optionally the autodistribution process can recommend when it
would be most convenient to break a prepack and send individual items
to different stores or warehouses if that would give you the most
optimum distribution.
Further on we explain the grading process in detail and we will show an example of how it works.
Distribution Process
First of all, if any or the stores or warehouses to be used as a
source of merchandise to distribute has prepack stock, then a test is
made to see if any of the prepacks fills the distribution requirements
of any of the destination stores or warehouses. You can configure
Autodistribution to specify the minimum grade that a possible prepack
transfer must have to be sent. Every prepack transfer that meets
this minimum grade will be transferred.
After
distributing any prepacks that can be transferred, Autodistribution
then proceeds to distribute the single items.
Each item available for distribution is sent to the store or
warehouse that gets the highest grade above zero. It does this until
there are no more item available for distribution that are needed at
any store or warehouse.
Distribution Method
If the automatic distribution is run from the main then the
distribution will be done via proposed transfer slips that will be
synched to the warehouses or stores that would transfer out the
merchandise. At the remotes there is the option of processing the
autotransfers which would make an Out Slip for every Proposed Out Slip.
If Automatic Distribution is run from a remote then you can
decide if you want to generate Proposed Out Slips or directly make Out
Slips.
An Example of Grading and Automatic Distribution
To make sure that items are distributed from places where they
are in most excess to the place where they are most needed, XpertMart
grades each possible transfer giving it points so how much it is
overstocked at the point of origin and how much it is understocked at
the point of destination. This actually a very simple system. If the
place of origin the are three items more than the minimum then the
possible transfer is given three points for its origin. If at the
destination the item is four pieces below its minimum then the possible
transfer is given four point for its destination. In this case the
possible transfer has a score of seven points.
Here we show you a sheet that shows the example of a chain of
nine stores, with the stock and minimums of each. In the totals column
you can see that there is a total of twelve items understocked and a
total of six items overstocked. You can see in the case of the first
transfer that it gets a score of seven points.

On this second sheet we can see how the inventory is after the
first transfer and which is the second transfer that Autodistribution
would make. You will notice that the transfer gets two points for its
origin and three points for it destination which gives it a total grade
of five points.

On this third sheet we can see how inventory looks after the
second transfer and what would be the third transfer to be made. You
will notice that the transfer receives two points for its origin and
two points for its destination giving it a total score of four.

On this final sheet we can see how te inventory would be after
transferring all the excess inventory to the stores where it is most
needed.

The result of the automatic distribution is that there is no
longer any overage of stock left of this item and there are only six
pieces understocked instead of the original twelve pieces.
Consider that all of this is done just for one item of a certain
Style / Color / Size / Second Size. XpertMart will do this for the
thousands of articles that you normally handle in a chain of stores.
Prepack Grading
We grade prepacks in a similar fashion to see which origin and
destination is the best. In the case of prepacks it may be that one or
more or the items in the prepack may take the on hand stock over the
quantity established as a minimum or the item being transfered may
already be over the minimum. In these cases we give negative grades or
take away points. If a particular item in the prepack is already at its
minimum level then the item in the prepack will make it go over by one
so we give this item a grade of minus one (-1). If for example a
particular item in the prepack has on hand stock two above minimum then
this item will take the on hand stock to three over minimum so we give
this item a grade of minus three (-3)
The
total grade for the prepack is made up of the sum of the grades of each
of the items in the prepack. Negatives are added to positives. It may
be that several high grades of items will balance out one or more
negative grades.
The objective here is as
stated above: That is to avoid as much as possible, that an item's on
hand stock be either below or above the established minimum stock
quantity for that store or warehouse.
The
prepack transfer that has the highest grade is the prepack transfer
that will be made. In the same fashion as with single items,
Autodistribution will make the transfers of prepacks with the highest
grades until there are no more prepacks available for distribution, or
there are no more items needed at destinations or it only has prepacks
whose transfer would not reach the minimum grade specified in the
configuration as required to make transfer.
Grading to Break a Prepack
There may be cases in which the items contained in a prepack as a
group would so overstock any store it was sent to that it would always
have a low or even negative grade. After doing the automatic transfer
of single items (items not in prepacks) XpertMart Autodistribution
could test to see if it is best to break open a prepack and send
separate items to more than one store. In the same way Autodistribution
has graded possible single items and prepack transfers, in this step it
grades every item in the prepack box against all possible destinations
to see what is the highest grade it can get from every item in the
prepack box. If the prepack gets a high grade in this manner it means
that the needs of several locations would be best met by breaking the
prepack box and sending individual items to different destinations. If
you have configured your system to allow breaking prepacks then
Autodistribution will generate a Prepack Break Document. At the same
time it will include many of the items that are in the prepack box in
the single item transfer slips. (It will only transfer all the items in
the prepack box if they all would receive a positive grade. This is to
avoid overstocking.)
Configuration
There are some configurable options regarding Autodistribution.
To modify these configuration options you choose Configure /
Configure Station from the main menu as you can see in this screen shot.
Once Configure Station opens you need to select Autodistribution
on the left side as shown in this screen shot.
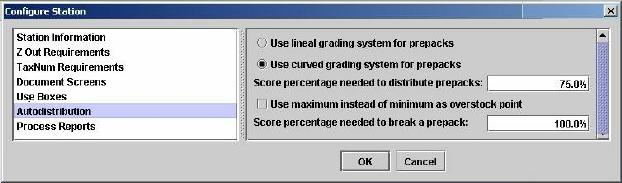
The first two options are to choose if you want to “Use lineal
grading system for prepacks” or “Grade prepacks on a curve”. We
strongly recommend that you use a curved grading system rather than a
lineal system. All the examples given above were given based on a
curved grading system. The curved system give plus or minus points
based on how much under or over stocked an item is. Thus in the
examples grades of 3 or -2. In a lineal grading system each item would
be either 1 or -1 irregardless of how much under or overstock there was
at a given location.
The third option is to
specify the minimum grade that a prepack must have for it to be
transferred. The grade is expressed as a percentage. If a prepack
has 12 items in it and gets a grade of 12 then it would have a 100%
grade. If a prepack has 12 items and gets a grade of 9 point then it
would have a 75% grade.
The fourth option
will be implemented in the future. In this case you will not subtract
points from a transfer unless the transfer would go over the maximum
defined for the item en this store.
The last
option is the percentage grade the a potential prepack break should
receive before it breaks the prepack to send the loose items to the
stores. If the items that are in the prepack do not get at least this
grade, then XpertMart will not recommend breaking the prepack.
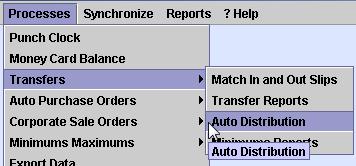
Operation
To run Autodistribution you select the option from the main menu
under Processes / Transfers / Autodistribution as can be seen in this
image.
The options that will be displayed are
going to vary depending on whether you run Autodistribution at the Main
or at a Remote. The options will also vary depending on whether you
have configured your system to handle prepacks or not. In this first
screen shot we will see the options presented at the Main when you have
configured to use Prepacks.
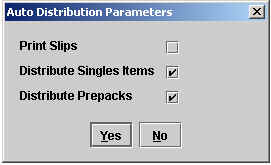
In the sample
above you only need to select whether you want to print the transfer or
proposed transfer slips as they are generated or not. Then you select
whether you want to distribute single items or not and in the same
fashion whether you want to distribute perpacks or not. You will get
the most optimum distribution if you choose to distribute both prepacks
and single items at the same time, that is if you are using prepacks in
your company. If you select both single items and prepacks then
Autodistribution will first seek to distribute prepacks and then single
items. (If single items are distributed first there will be less need
for merchandise and it will be harder to find a prepack that can be
transferred that will fill stock needed in the store without going over
the minimum stock specified.)
In this second
dialog window we can see what options will be available if
Autodistribution is run from a remote and the system is configured to
handle prepacks.
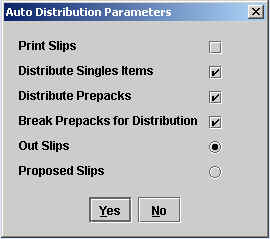
The first three options
are the same as we explained above. The fourth option allows us to
select whether we want to break prepacks to distribute the single items
in the prepack or not. This option will only be available on
remotes that are configured to track inventory by prepacks. At a remote
we can select whether we want to generate Proposed Out Slips or actual
Out Slips. (At the main you cannot generate Out Slips that is why at
the main Proposed Out Slips will always be generated.)
Once you have answered this initial dialog, you will be presented
with the Merchandise Selector so that you can choose what merchandise
to select. The Merchandise Selector looks like this:
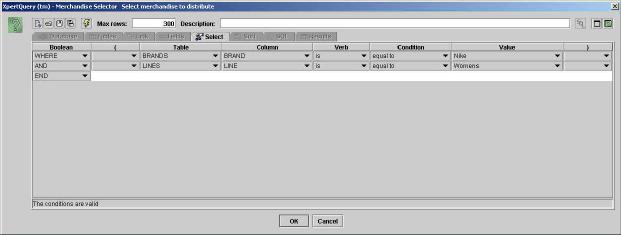
With the Merchandise Selector you can choose the merchandise
based on Vendor, Department, Lines, Season or any combination of the
tables of characteristics of the merchandise. If you want to distribute
all kinds of merchandise then all you have to do is click on the Ok
button. Remember, in any case only the merchandise whose on hand stock
is less than the minimum at a destination is going to be transferred.
No merchandise will be distributed that is not above the minimum at the
source location and below minimum at the destination location.
If you run Autodistribution from the main then the merchandise
can come from one or more of the warehouses or stores. If you run this
from the main then you will see the Store Selector so that you can
choose which warehouses or stores will be sources for the merchandise
to distribute.
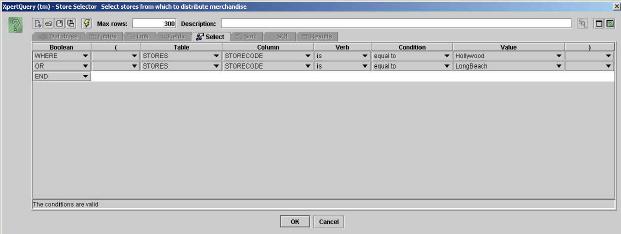
You can use any of the
characteristics of the stores to choose which stores will be sources
from which to supply merchandise for the distribution. If you want to
send merchandise from all the stores (for example to balance inventory
in all the stores) then all you have to do is click Ok.
Both at the main or a remote you can choose the stores to which
the merchandise will be distributed. In order to do this the next
window will display a Store Selector to choose to which stores the
merchandise will be sent to. You can see the store selector here:
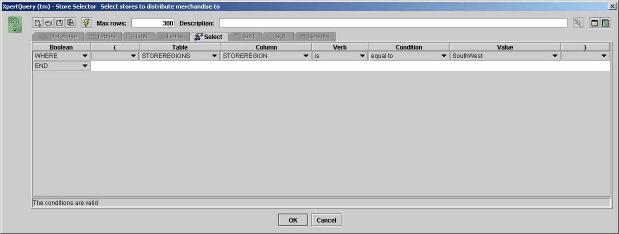
If you wish to send merchandise to all the stores then all you
have to do is click on Ok. If you only want to send merchandise to some
stores then you use the store selector to choose to which stores. It is
important to note that you will get a more optimum distribution if you
distribute to several stores at a time because Autodistribution can
then decide which is the store that most requires the
merchandise.
The
Autodistribution process generates Slips as an output be they Out Slips
or Proposed Out Slips. If you directly make Out Slips then all you have
to do is gather up actual merchandise and send it with the Out Slips to
the stores specified in the Out Slips.
If
Autodistribution generated Proposed Out Slips at the main then these
Proposed Out Slips will be synchronized out to each store. If the
process created Proposed Out Slips at a remote then they are right
there in the database at the store.
You can
look at the Proposed Out Slips under Documents / Transfers / Proposed
Slips (or Proposed Prepack Slips). There you can also run reports to
see what Proposed Slips you have.
To make a
transfer based on a Proposed Out Slip we open Transactions / Transfers
/ Out Slips. On the left top part we see the field Proposed Out Slip
Number as can be seen in this screen shot.
Once you write the Proposed Slip number in this field the system
is going to look for this proposed slip. If the systems finds the
Proposed Slip then it is doing to fill in the Out Slip on the screen
with all the items and information from the Proposed Slip. Then you
will be able to edit quantities, erase or add lines as you wish.
Ideally you would just gather exactly what is specified on the
Out Slip to transfer it and only make a change if you cannot find an
item specified on the Out Slip. Why? Remember that Auto Distribution
has taken into account a lot more information than you may have at hand
to decide to make this transfer.
End.