Chapter Topics
Introduction
Colors Catalog
Sizes Catalog
Second Sizes Catalog
Sizes Matrix
Second Sizes Matrix
Creating an XpertMatrix™
Creating an XpertMatrix™ with Second Sizes
Modifying the XpertMatrix™ from the Items Catalog
Introduction
This chapter explains how you can quickly create an XpertMatrix™ using the XpertMatrixAdd™ tool. When you consider that the typcial retailer can
have around 800 styles in a clothing or shoe store and each style has its
own Size/Color matrix, knowing how to use this tool will save you lots
of tedious data entry.
Before you can use the XpertMatrixAdd™ tool you
need to first enter colors into you Colors Catalog and Sizes into your
Sizes Catalog (along with entering Second Sizes into the Second Sizes Catalog
if you plan on using them). The next step after that is to define any size
"runs" or Size Matrices (and Second Size Matrices) you will want to
use. After you've done this initial setup, you can create a new matrix for
a Style in a matter of minutes.
Colors Catalog
Begin by entering the colors your merchandise comes in into the Colors
Catalog. (If you are not familiar with the basic layout of a catalog, read
the Catalog topic before continuing). Entering
colors should take very little time since all you really need is the name
of the color (though you can also include a sample of the color as an image if you are going to be using many similar
colors with subtle differences). The names of the colors can be as long
as you need them to be. Don't worry if you need to add more colors later
on as you receive new merchandise.
IMPORTANT NOTE: Take care not to duplicate existing colors. At the moment, XpertMart™ will allow you to, for example, add two "Black" colors to the catalog. If you have any doubts, do a query to make sure the color you want to add is not already in the catalog.
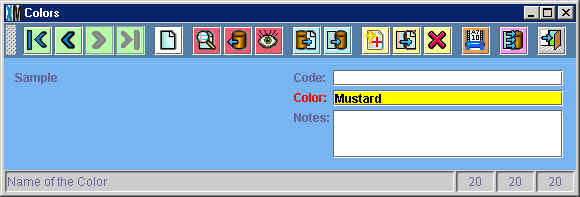
If you try to delete a color that has already been used by an Item, you
will see this error message and XpertMart™ will not
allow you to remove the color from the Colors Catalog.
If you really need to eliminate the color, you can always rename it with
the name of a new color. Be aware that all Items that refrence this color
will not use the new color.
Sizes Catalog
The next step is to enter the sizes that your merchandise is
available in into the Sizes Catalog. The order in which you enter the sizes
into the catalog does not matter. However, when building a matrix, XpertMart™ takes the alphanumeric value of the names of the sizes
you enter when ordering the matrix. Therefore, if you enter the following
sizes: "5", "6", "7", "8", "9" and "10", they would be ordered this way:

To get the sizes to be ordered in the desired way, you need to type a "0" before each size less than than 10 as shown below:
Similarly, if you enter the following sizes, "X-Small", "Small", "Medium",
"Large", and "X-Large" they would be ordered this way:

This is because alphabetically "Large" comes before "Small". To order these
sizes the right way, you need to enter blank spaces (which are first in any
alphanumeric list) in front of certain sizes. If you want X-Small to be the
first size in the matrix, you would type three blank spaces before the size
name like this:
You would then type two blank spaces before Small (" Small") and one blank space before Medium (" Medium"). The number of blank spaces depends, of course, on the sizes that must be rearranged this way and their desired order in the matrix. The new alphanumeric order would look like this:
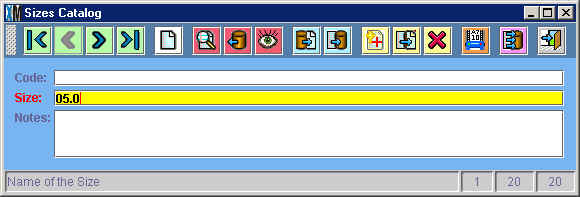
The Sizes Catalog is one of the few cases where you might want to fill
in the Code field, depending on the design of your bar code labels. Some
retailers prefer to have the size code appear on the bar code label instead
of the complete size name. If you want to use the size code in your bar code
labels, talk to your XpertMart™ dealer to make sure
you are using the correct printer
driver.
Second Sizes Catalog
If you plan on using Second Sizes, for example for the sleeve
length in men's suites or for the width of shoes, then you will also need
to fill in the Second Sizes Catalog.
The Second Sizes Catalog is very similar to the Sizes Catalog. Once again
you need to pay attention to the alphanumeric ordering of second sizes you
enter into the Second Sizes Catalog. If, for example, you want to use Narrow,
Regular and Wide as your second sizes, you should put a space before the
word Narrow to makes ure " Narrow" is displayed before "Regular" in the Second
Size Matrix.

Entering a Code for the Second Size is optional. In most cases, you will
not need to use a code, unless you want to print the Code on the bar code
label.
Sizes Matrix
Once you have entered all of your sizes into the Sizes Catalog,
the next step is to creat size runs or size matrices. Having pre-defined
Size Matrices will save you a lot of time if multiple styles use the same
run of sizes. You can use a pre-defined Size Matrix instead of having to
assign the sizes you will use every time you create a new Style in the Styles
Catalog.
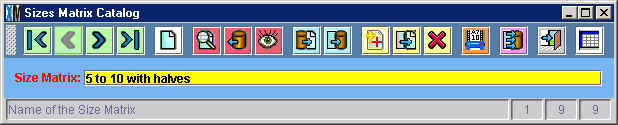
To begin, open the Sizes Matrix Catalog:
Once you've entered the Sizes Matrix Catalog, you can create a new Size
Matrix by clicking the New Record button
in the toolbar. You will will need to name the Size Matrix you are creating.
Using descriptive names that specify the actual sizes being uses is highly
recommended since you will end up adding as many as doznes of Size Matrices
and it might be difficult later on to remember which sizes they contain.
In the example below, the user is creating the "5 to 10 with halves" Size
Matrix.
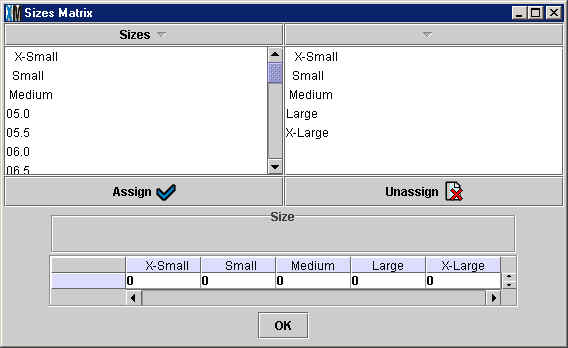
Once you have named the Size Matrix, click on the Matrix button ![]() in the toolbar. This will open a new window (shown below) where you can
create the Size Matrix by assigning the sizes you want to the new matrix.
On the left side of the window you will see every size you have entered
into the Sizes Catalog listed in alphanumeric order. To add a size to the
matrix, select the size from the list (it will appear highlighted in blue)
and click the Assign button
in the toolbar. This will open a new window (shown below) where you can
create the Size Matrix by assigning the sizes you want to the new matrix.
On the left side of the window you will see every size you have entered
into the Sizes Catalog listed in alphanumeric order. To add a size to the
matrix, select the size from the list (it will appear highlighted in blue)
and click the Assign button ![]() . As you add sizes, these will appear on the right side of the window.
At the bottom of the window, the Size Matrix is automatically built and
modified every time you add a size.
. As you add sizes, these will appear on the right side of the window.
At the bottom of the window, the Size Matrix is automatically built and
modified every time you add a size.
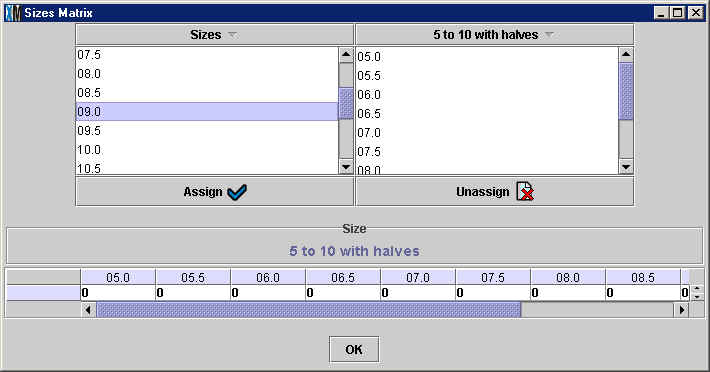
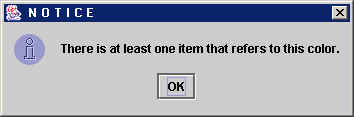
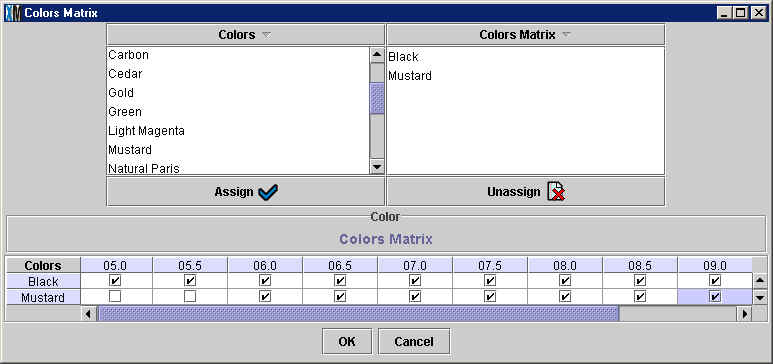
In the example above, the user has added sizes 05.0, 05.5, 06.0, 06.5,
0.70, 07.5, 08.0 and 08.5 to the Size Matrix and is in the process of assigning
size 09.0 to the "5 to 10 with halves" Size Matrix.
To remove a size from the Size Matrix, select the size from the right
side of the window and click the Unassign button ![]() . When you are finished assigning sizes to the Size Matrix, click <OK>.
. When you are finished assigning sizes to the Size Matrix, click <OK>.
After you click <OK> the window will close and you will return
to the Sizes Matrix Catalog. Be sure to click save before exiting or creating
a new Size Matrix.
If midway through creating a new Size Matrix you discover that you need
to add a size to the Size Catalog or need to modify an existing size, you
can always press <OK> to close the matrix window and the work
that you have done on the matrix is automatically saved. You can then enter
the Sizes Catalog to add or modify sizes (for example, if you need to add
spaces to the name of a size to change the order it will appear in). At
any point you can return to the Sizes Matrix Catalog to add or remove sizes
to an existing Size Matrix. However, you should be careful not to modify
a Size Matrix once it is being used by a Style.
Second Sizes Matrix
If you are using Second Sizes, then you will also want to create
Second Sizes Matrices. The process is the same as creating
a Sizes Matrix. You will first need to name the Second Sizes Matrix. Once
again, using descriptive names is recommended. Next, press the Matrix button
in the toolbar and assign the Second Sizes you want to the Second Size matrix.
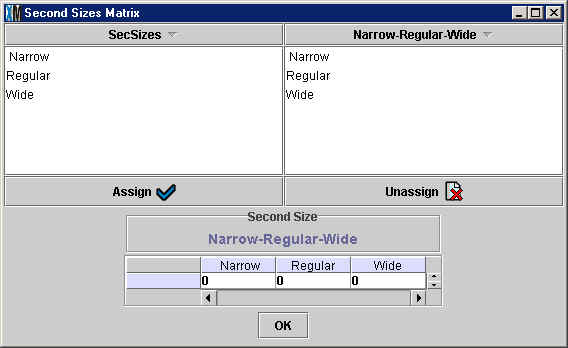
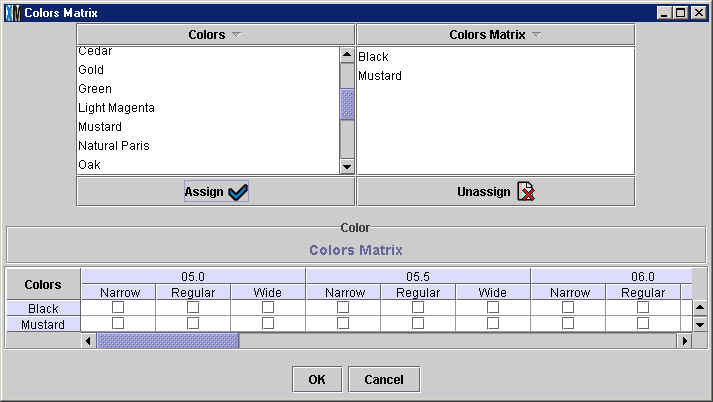
In the example above, the user has assigned " Narrow", "Regular" and "Wide"
to the Second Size Matrix. Notice that only Second Sizes appear on the left
side of the window. If you need to use the same size for both the Sizes Matrix
and the Second Sizes Matrix, you will need to enter it into both catalogs.
For example, if you want to use "Unisize" in both places, you need to enter
"Unisize" into both the Sizes Catalog and the Second Sizes Catalog.
Creating an XpertMatrix™
Once you are done with the preliminary work of entering your
Sizes and Second Sizes and setting up your Sizes Matrices and Second Sizes
Matrices, you are ready to create a complete Style/Size/Color matrix or XpertMatrix™.
You can create a new XpertMatrix™ every time you
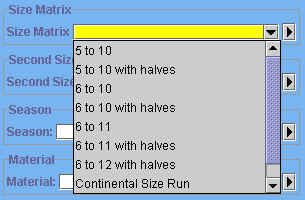
are creating a new Style. In the Styles Catalog you will see a Lookup by Example Menu for the Size Matrix.
When you click on this menu, every Size Matrix you
have previously created will appear in the drop down menu. Select the Size
Matrix you would like to use based on those sizes that the Style is available
in. For example, if the new style of sandal you are creating in the Style
Catalog comes in sizes 5 to 10 and includes half sizes, you will want to
select the "5 to 10 with halves" Size Matrix. If the new style has a size
run that is different from any of the Size Matrices you see in the menu,
then you will need to create a new Size Matrix before
you continue. Once you create the new Size Matrix, it will appear in the
drop-down menu the next time you click on it.
Once you have selected the Size Matrix you are going to use, click on the
Matrix Add button ![]() to create a new XpertMatrix™. This will open a new
window where you can select the colors you want to include in the matrix.
to create a new XpertMatrix™. This will open a new
window where you can select the colors you want to include in the matrix.
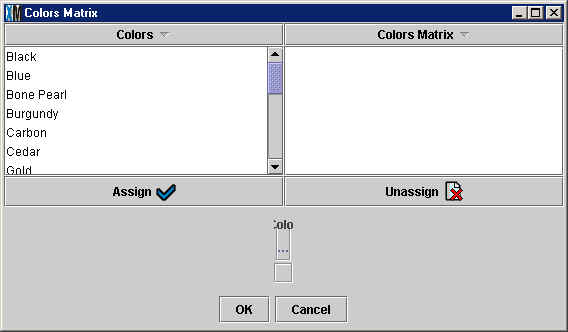
In this window you will see every color that you have entered into the
Colors Catalog listed on the left side in alphabetical
order. (To see them in reverse order, click on the "Colors" bar at the
top. You will see the faint gray triangle to the right of the word "Colors"
pointing up and the order of the colors reversed). You can add colors to the
matrix by selecting on the desired color to the left and clicking the <Assign>
button. When you have added your first color, the XpertMatrix™ will automatically appear at the bottom of the window
with sizes along the horizontal axis and the colors along the vertical axis.
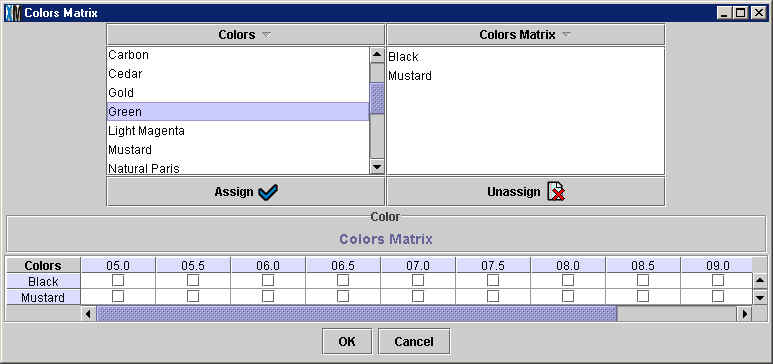
Notice in the example above that the sizes run from "05.0" and "05.5" to
"10.0"-- exactly the sizes that were specified in the "5 to 10 with halves"
Size Matrix. The user has added the colors "Black"
and "Mustard" to the matrix. Recall that the color "Mustard" was added to
the Colors Catalog earlier in the example. You can removed
colors from the matrix by selecting them from the right side of the screen
and clicking on the <Unassign> button.
Every cell in the matrix is a size/color combination and contains an empty
checkbox. This means that the size/color combination exists in theory but
will not be created until you check the individual checkbox. This is because
some sizes may not be available for certain colors. In the example below,
sizes "05.0" and "05.5" are not available from the vendor in Mustard, only
in Black, so the appropriate checkboxes have been left unchecked.
Every cell in the matrix is in fact an Item. When you press the <OK>
button, you are in fact creating an entry in the Items Catalog for every size/color
combination you have checked. In this case, the user is creating 20 new records
in the Items Catalog. There are 11 Black items, in sizes 05.0, 05.5, 06.0,
06.5, 07.0, 07.5, 08.0, 08.5, 09.0, 09,5 and 10.0; and 9 Mustard items in
sizes 06.0, 06.5, 07.0, 07.5, 08.0, 08.5, 09.0, 09,5 and 10.0. You can verify
this by opening the Items Catalog and doing a Query by Example for the new
Style you have created. When you click <OK> to close this window,
you might experience a brief dealy since at that moment XpertMart™ is literally creating the new records in the Items Catalog.
When you exit the window and return to the Styles Catalog you can click
on the Matrix button ![]() to view the XpertMatrix™ you have just created.
to view the XpertMatrix™ you have just created.
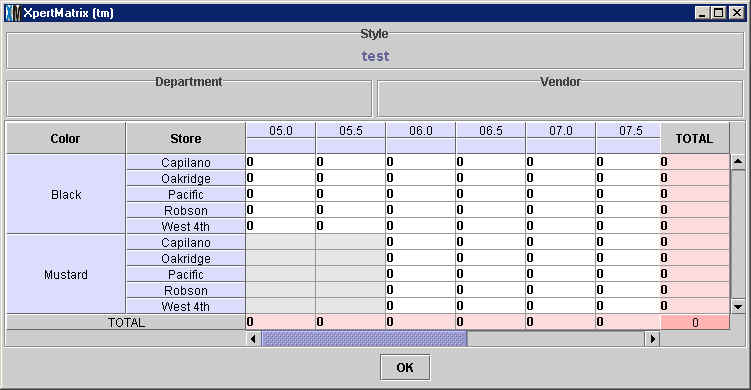
Notice that the stores appear in the XpertMatrix™ even though you did not add them yourself. This is
because XpertMart™ automatically "reads" how many stores
are in the Stores Catalog and displays them in the XpertMatrix™. All of the cells appear with 0s in them because
you haven't received merchandise yet; you have only created the Items that
make up the Style. To actually add stock to your inventory you need to create
a Receipt.
Those cells that appear in gray with no number in them indicate that the
Item does not exist in the Items Catalog. In this case, sizes 05.0 and 05.5
do not exist in the Mustard color because they were not selected when the
matrix was created. The 0 in the cell indicates that you can receive that
Item and add stock to your inventory. The gray cell indicates that you cannot
receive that Item as it does not exist.
You can always edit the XpertMatrix™ by clicking
on the Matrix Add button ![]() and adding the colors and sizes you wish. However, be careful not to remove
a color or size once you have begun using that specific size/color combination
(for example, you have already created a Receipt for those Items and
have them in stock).
and adding the colors and sizes you wish. However, be careful not to remove
a color or size once you have begun using that specific size/color combination
(for example, you have already created a Receipt for those Items and
have them in stock).
Creating an XpertMatrix™ with Second Sizes
If you want to create an XpertMatrix™ that includes Second Sizes, be sure to select a Second Size Matrix in addition to selecting a Size Matrix from the drop-down menu in the Styles
Catalog before clicking on the Matrix Add button in the toolbar.
The procedure for creating the matrix is the same,
only this time as you add colors you will see both Sizes and Second Sizes
along the horizontal axis of the XpertMatrix™.
Now instead of one checkbox for every size/color combination there are
three since the Second Size Matrix that was selected includes three Second
Sizes. Once again, be sure to only select those checkboxes that represent
actual Items that your vendors offer.
Modifying the XpertMatrix™
from the Items Catalog
While creating an XpertMatrix™ using
the Matrix Add tool is the fastest way to create Items in the Items Catalog,
it is not the only way. You can create Items directly in the Items Catalog.
When you do, you are creating the XpertMatrix™ from
the "bottom up" instead of from "the top down".
When you crate a new Item in the Items Catalog, you are adding that particualr
size/color combination to the matrix for the Style that Item belongs
to. Returning to the example used previously, if you were to enter the Items
Catalog and add a new Item for the same style in size 05.0 and color Blue,
the matrix that was created before would now look like this:
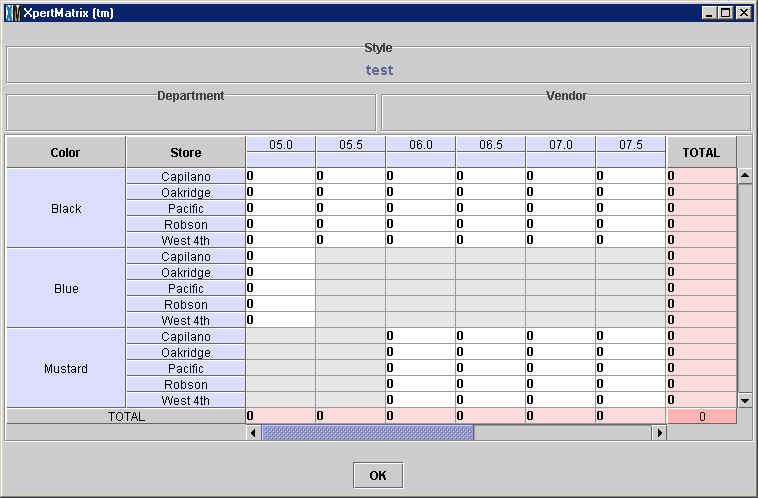
Notice that by adding just one new Item, the matrix now looks markedly
different than it did before. A row for Blue Items has been added to the matrix.
Of these, the cells corresponding to Size 05.0 have 0s in them, showing that
the Item exists in the Items Catalog even though there is currently none
in stock. The rest of the cells of those sizes appear in gray because those
Items do not exist in the Items catalog yet. You can add those items
in one of two ways: a) by opening the Matrix Add tool from the Styles Catalog
and selecting the checkboxes for those size/color combinations you want to
add to the Items Catalog; or b) add the Items individually in the Items Catalog.
As you do, each cell in the matrix will go from being gray to having a 0
in it.
Copyright © 2002 XpertMart