XpertMart
(tm) Amazon (tm) Interface
In order to use XpertMart's Amazon (tm) Live server
you must configure the interface under the Web Store configuration
options. This configuration determines what information will be
exported from XpertMart (tm) to the Amazon (tm) web store.
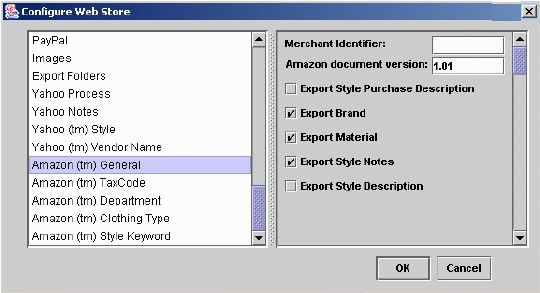
The first option to configure is Amazon (tm) General
section as show in this screen shot:
The first option on the right is the Merchant
Identifier. Amazon (tm) will assign you this identifier. You must type
this identifier in exactly in order for the interface to work.
The second option on the right is the Amazon
document version. This will be "1.01" until Amazon changes its document
version.
The third option is a check box in which you
indicate whether you want to export the Style´s purchase
description to Amazon. Checking the box will export the purchase
description as detail information for the Style.
The fourth option is another check box by which you
indicate whether you want o export the Brand (if it exists) to Amazon.
Again checkmark means you will export the Brand, no checkmark will not
export the brand.
Likewise the fifth option is a check box by which
you indicate
whether you want o export the Material (if it exists) to Amazon.
Checkmark means you will export the Material, else it will not export
the brand.
The sixth option is a check box by which you
indicate
whether you want o export the Style Notes (if they exists) to Amazon. A
checkmark means you will export the Style Notes, no checkmark will not
export
the style notes.
The last option in this section is a check box by
which you indicate
whether you want o export the Style Description (if it exists) to
Amazon. A
checkmark means you will export the Style Description, no checkmark
will not export
the style description. NOTE: Amazon does not permit HTML code to be
used. So if you choose to export the Style Description make sure it is
only simple text and not HTML code.
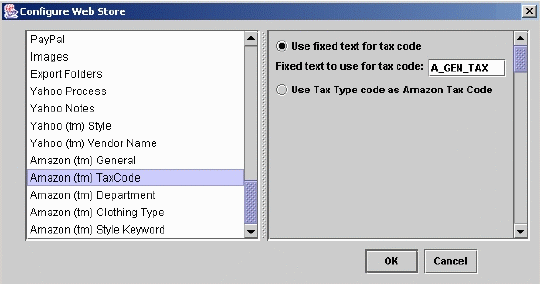
The next section in the Amazon (tm) configuration
has to do with the Tax Code. This screen shot shows the options
available:
There are just two options for the tax code. The
first option is to use a fixed tax code for all the items you will
export to Amazon (tm). If you wish to use a fixed text for the tax code
then you check the first check box and enter the fixed text to us in
the box on the second line. The default text of "A_GEN_TAX" will
normally work for taxed items on Amazon.
If you sell items or services that would be tax
exempt then you click on the third option which is Use Tax Types codes
as Amazon Tax Code. This would allow different styles to be subject to
different taxes. You would then need to enter in the code field
of the Tax Types catalog the correct text for Amazon (tm) to recognize
the Tax Code. You would need to get these texts from Amazon (tm).
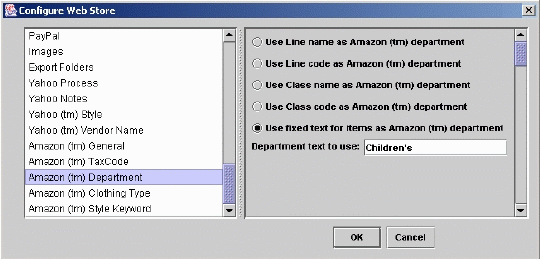
The next section deals with the Amazon (tm)
Department. To select the options for Department you select the option
on the left as seen in this screen shot.
Amazon has predefined Departments which could be
called the "user" of the item. For example Children´s. You can
select between five options where Amazon will get its Department name
from. The first option is to use XpertMart's line as the Amazon
Department to do this you check the first option.
It may be that while your XpertMart line is
basically the same as Amazon's Department yet the name you have chosen
for your line is not the same thing Amazon uses. In that case you can
put Amazon's name for the Department in the XpertMart line code field.
To do this you select the second option.
The third option is to use XpertMart's class field
as the Amazon Department to do this you check the third option.
Again it may be that while your XpertMart class is
basically the same as
Amazon's Department yet the name you have chosen for your line is not
the
same thing Amazon uses. In that case you can put Amazon's name for the
Department in the XpertMart line code field. You select the fourth
option to do this.
It may be that all of your merchandise fits under
one Amazon Department. In that case you have probably used all of
XpertMart classifications to further classify your merchandise. In this
case you can check the fifth option that says "Use fixed text for items
as Amazon (tm) department. If you check this option then you need to
type in the text to use for Amazon Department in the final field.
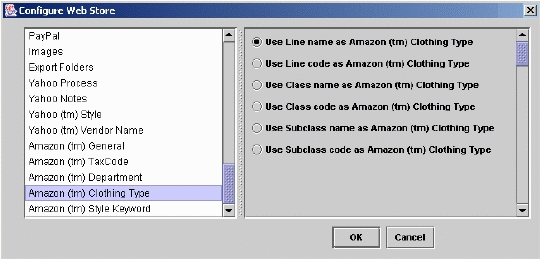
The next configuration option for Amazon has to do
with what is exported as the Clothing Type. To set this configuration
you choose Clothing Type on the left side of the panel as can be seen
in this image:
Choose the first option if you wish to use the
XpertMart Line as the Amazon clothing Type.
Choose the second option if you wish to use the
XpertMart Line Code as the Amazon clothing Type.
Choose the third option if you wish to use the
XpertMart Class as the Amazon clothing Type.
Choose the fourth option if you wish to use the
XpertMart Class Code as the Amazon clothing Type.
Choose the fifth option if you wish to use the
XpertMart Subclass as the Amazon clothing Type.
Choose the sixth option if you wish to use the
XpertMart Subclass Code as the Amazon clothing Type.
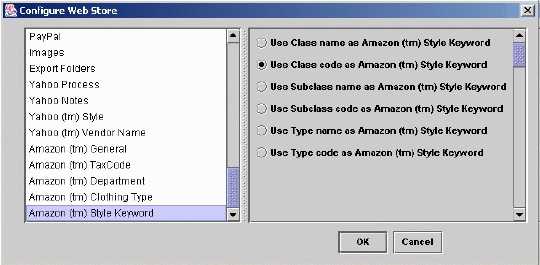
Amazon also uses a Style Keyword. To set the
configuration for what is to be exported as the Amazon Style Keyword
you select the Stlye Keyword option on the left pane as can be seen in
this screen shot:
Choose the first option if you wish to use the
XpertMart Class as the Amazon clothing Type.
Choose the second option if you wish to use the
XpertMart Class Code as the Amazon clothing Type.
Choose the third option if you wish to use the
XpertMart Subclass as the Amazon clothing Type.
Choose the fourth option if you wish to use the
XpertMart Subclass Code as the Amazon clothing Type.
Choose the fifth option if you wish to use the
XpertMart Type as the Amazon clothing Type.
Choose the sixth option if you wish to use the
XpertMart Type Code as the Amazon clothing Type.
End.