Chapter Topics
The Invoice Header
Invoice Type
Price List
Sales Person
Customers
Items & Discounts
Payments
Checks
Credit Cards
Split Tenders
XpertChange™
If you haven't already, be sure you read the Transactions topic before reading this chapter
to learn the basics behind making a transaction. This chapter will only
discuss the parts of the transaction screen that are uinque to Invoicing.
The Invoice Header
There are three fields in the Header
that are unique to the Invoice: the Invoice Type field, the Price List
field and the Sales Person field. Most of the time you will not need to
change any of these fields and you can just skip them when ringing up an
Invoice.
![]()
Invoice Type
The options appearing in the Invoice Type drop-down menu are
defined are defined at the Main,
in the Catalogs>Documents>Invoices Types Catalog.

Generally, you will only need to have one Invoice
Type, the sales ticket you issue to your customers. However, your store
may be in a jurisdiction that
requires you to be able to issue different types of invoices. For example,
countries that use a Value-Added Tax require that you be able to issue at
least two kinds of invoices: one that breaks out the tax component of the
sale and one that does not. Therefore, you can assign different printing
formats to these Invoice Types so that, depending on the one you select,
the format (and in some cases even the printer) of the invoice changes. (These
different printing formats are written into the printer driver you are using
and are activated according to the Invoice Type you select. If you need to
make changes to your printer driver, contact your XpertMart™ Authorized Dealer for assistance).
You can also run a report that shows your sales by Invoice
Type, so that you can break-down your sales by Sales Ticket vs. Fiscal
Invoice, for example.
Price List
The Price List drop-down menu in the Invoice Header lets you
manually switch from one price list to another. The price lists are defined
at the Main in the Prices>Price List Catalog.
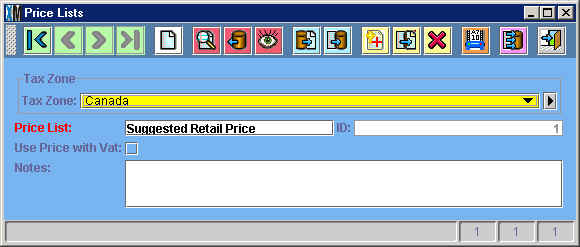
In most cases, XpertMart™; will automatically switch from one price list to another
depending on: the store you are in, the customer who is buying the merchandise
or, if there has been a previously scheduled price change using the Dated
Prices function. (To learn more about price lists, refer to the Prices
topic). However, you always have the option to switch from one Price List
to another at the Point of Sale and this is where you would do it.
Sales Person
This field is used to keep track of commissions. In this drop-down
menu you will see every Employee Number in the Employee Catalog. The employee
you select in this field will receive credit for the sale, i.e. this sale
will be included in the commission calculation. (To learn more about how
commissions work, refer to the Commissions topic).
You can configure XpertMart™ to require that the Sales Person be filled. You can also
configure XpertMart™ so that takes the
employee logged in and using the system as the default entry in the Sales
Person field.
Customers
If your business is a high-volume low-cost operation, you probably
have little use for entering customer information in the Invoice. However,
when in doubt, it is generally better to enter a customer than to leave
the Customer Subform blank. Not
only does entering a customer into the system at the point of sale give you
the power to offer that specific customer better service, it also feeds data
into the system that can be analyzed in the aggregate to better understand
the demographics of your customers. This kind of information can in turn
help you make better decisions about how to target your marketing budget.
To learn more about this, refer to the Customer Data and Marketing topic.
Items & Discounts
The next step is for you to enter the items that the customer
is purchasing using any one of the five
methods discussed in the Transactions
chapter. Use the <F6> key to move to the Quantity field and
enter the number of pieces the customer is buying, for each individual item.
There are two kinds
of disocunts you can give. The Item Discount (reached by pressing <F7>)
applies only to the specific item being discounted. The Global Discount
(reached by pressing <F9>) applies to all items in the
Invoice and is cumulative, i.e. it is in addition to the Item Discount.
In the example below, the customer is buying 2 Rosy, Size 8.0 Natural Paris
sandals. Each of these normally sells for $69.95 ( the List Price) but has
a discount of 10%, which rounds up to $7.00. The 10% discount applies to
each of the two Rosy sandals. The Net Price is the price of the sandals after
the discount is applied, in this case, $62.96. The Extended Price is the
Net Price ($62.96) multiplied by the Item Quantity (2) and in this case yields
$125.91. The Verona boot does not have a discount and the Kalanda sandal
has a 15% discount. The subtotal for these four pieces of merchandise is
$230.10.
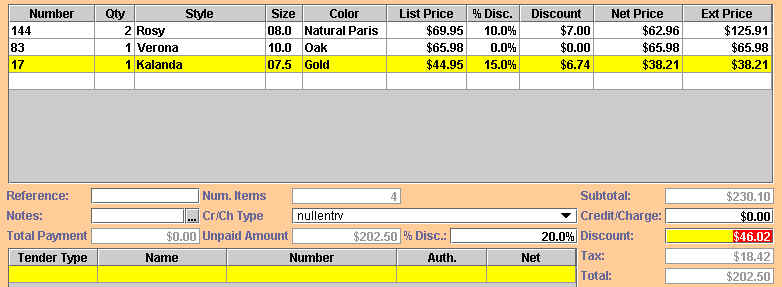
On top of these Item Discounts, we see that the customer is receiving a Global Discount of 20% which is equal to $46.02 in this case. The Global Discount of 20% was applied to the Subtotal of $230.10. The Total amount ($202.50) is the Subtotal ($230.10) minus the Global Discount ($46.02) plus the Tax ($18.42). The printer driver can be designed to show any and all of these values on the Invoice that is printed. (See your XpertMart™ Authorized Dealer for help if you need to make any changes to your current printer driver).
You can restrict the
Maximum Item Discount
and the Maximum Global Discount
allowed and you can also require that the user select a Discount Reason from
a drop-down menu defined at the Main station so that you
can keep track of why discounts are being given.
Payments
Once you have entered entered a Customer,
if any, and the Items that the customer is buying into the Items Area of
the Invoice along with any applicable discounts, you are ready to accept payment
for the merchandise. To do this, press <F10> or move the cursor
to the Tender Type field and press the <Space Bar>. A menu will
appear (shown below) with the different Payment Types that you can accept
at the Point of Sale. The contents of this menu are defined in the POS>Payment
Types Catalogue at the Main station.
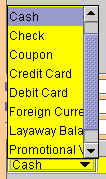
When you select an option, XpertMart™ will automatically fill-in the total amount due (which
appears in the Unpaid Amount field just above the Payment Area) in the Net
field. In the example below, the total amount due is $202.50 and this is
the amount that appears in the Net field once the user selects Cash as the
Payment Type:

The same will happen with the other Tender Types you select, with three
exceptions: checks, credit cards, layaway balances and store credits. Checks
and credit cards are covered below; layaway balances are covered in the
Sale Orders topic; store credits are covered in the Tracking Return Credits for Customers topic.
You can configure XpertMart™ in the Station
Configure>POS menu so that the default Tender Type is Cash. If you
select this option, then XpertMart™ will automatically
fill Cash in the Tender Type field. Since most sales are usually paid for
in cash, this speeds the payment process up considerably. When a customer
wants to use a different payment method, you just need to move the cursor
to the Tender Type field, press <Delete>, press the <Space
Bar> to open the Tender Type menu and then select the appropriate Tender
Type.
Note: if after you've entered a payment you make a change to the Invoice
such as adding/deleting an Item or entering a Global Discount, XpertMart™ will not adjust the payment amount. You will need
to delete the amount appearing in the Net field and enter the correct Total
amount.
Once you've entered the correct payment, you are ready to press <F12>
and print the Invoice.
Checks
If instead of Cash you select Checks as the Payment Type, a window
will appear (shown below) with a drop-down menu of Banks you can choose
from. These banks are defined in the POS>Banks Catalog at the Main station.
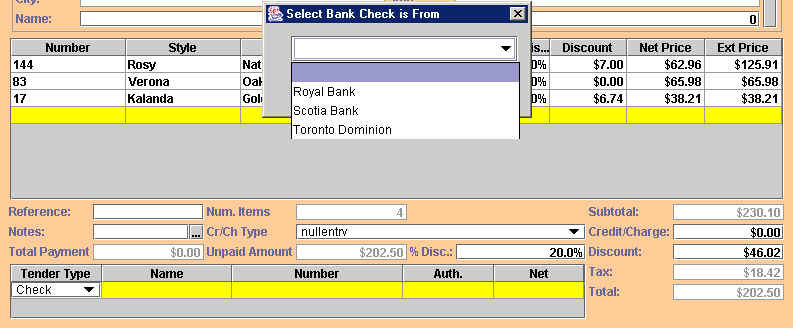
Once you've selected a bank and pressed <OK>, the name of
the bank will apear in the Name field and the Unpaid Amount will appear in
the Net field:

You are free to enter the check number in the Number field or leave it
blank. You can also configure XpertMart™ so that you are not required to select a bank when using
Check as your Tender Type.
Credit Cards
If you select Credit Card as the Tender Type, the Credit Cards
Catalog will open up:
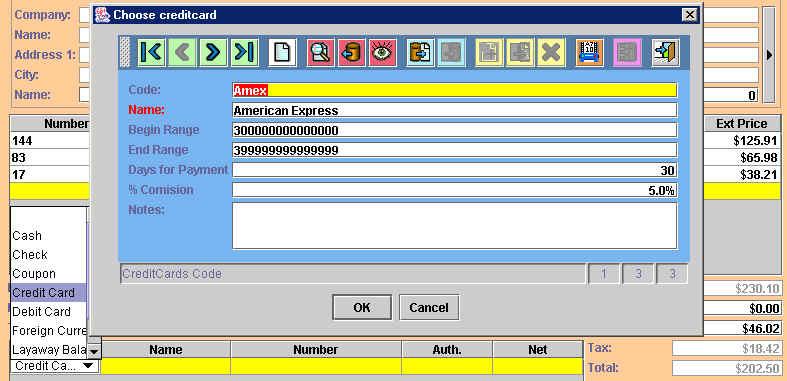
Once you've selected the credit card the customer is using and press <OK>,
the credit card will appear in the Name field and the amount due will
appear in the Net field, as shown below. You are then free to enter the
credit card number into the Number field and the authorization code into
the Authorization field.
![]()
Alternatively, you can configure XpertMart™ in the Station Configure>POS menu so that the system automatically detects the credit card being used when you enter the credit card number. If you select this option in the configuration, then the Credit Cards Catalog will not appear when you select Credit Cards as the Tender Type. Instead, Credit Card will appear in the Tender Type field and the amount due will appear in the Net field. When you enter a credit card number into the Number field, XpertMart™ will automatically fill in the credit card name in the Name field, assuming the number that you've entered is in one of the number ranges you've defined in the Credit Card Catalog.
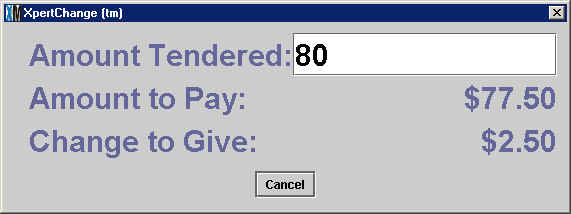
Split Tenders
If the customer wants to use more than one payment type, it's
easy to accept split tenders at the point of sale. Suppose the customer
wants to pay $100 of her $202.50 balance due using a credit card. Select
Credit Card as the tender type. Notice that the balance due of $202.50 appears
in the Net field. Move the cursor to the Net field and delete the $202.50
and enter "$100.00" instead.


Copyright © 2002 XpertMart