Automating Synchronization with the
Scheduler
Chapter Topics
Scheduler
Sequencing the Synchronization Tasks
Purge Old Data
Scheduler
The Synchronization
Cycle described in the Synchronization
chapter can be programmed so that it ocurrs automatically at
regularly scheduled times. To automate the synchronization process,
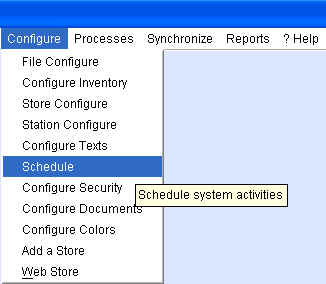
open the XpertScheduler ™ tool by going
to Configure>Schedule:
The XpertScheduler™ tool lets you pick a
task you want the system to perform and the frequency with which you
want the system to perform it.
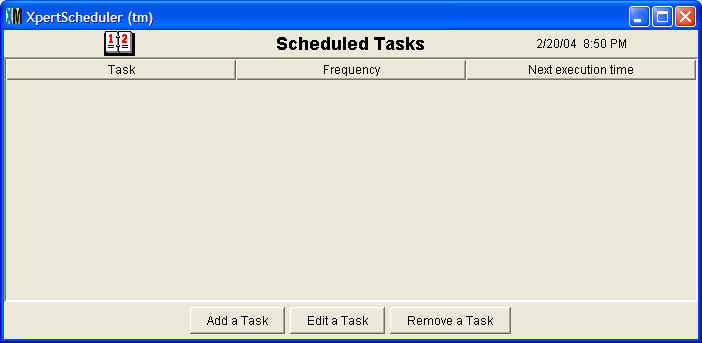
To schedule a new task, click on the <Add a Task> button.
This will open a new window with three drop-down menus. Click on the
first drop-down menu, Task Selection, to see a list of system processes
that can be scheduled.
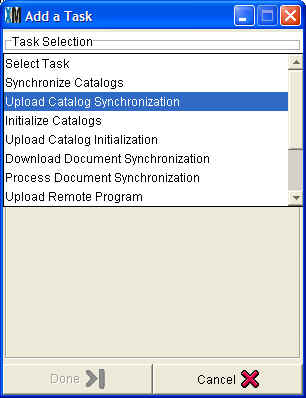
You will notice that every one of the 8 processes that make up the
complete Synchronization Cycle
appear as options. Select the task you want to schedule from the menu
and click on the <Done> button when you are finished. If
you make a mistake you can click on the <Cancel> button
and pick a new task.
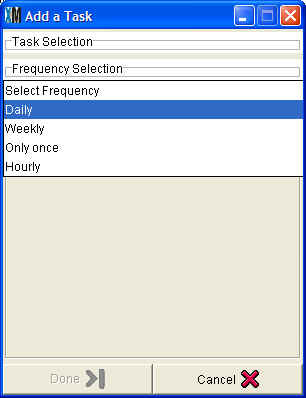
Once you have chosen a task, click on the "Frequncey Selection" field
to open a drop-down menu. Tasks can be scheduled to occur hourly,
daily,
weekly, or only once. Synchronization tasks will likely need to be
scheduled
daily if not hourly while other tasks such as
Updating Prices may only need to be scheduled intermittently.
When you have chosen the frequency, click <Done>. The
final step is to define the date and time you want XpertMart™
to begin carrying out these tasks. If you selected a daily frequency,
then a Start time and Start date will apear in the window under Edit
Frequency.
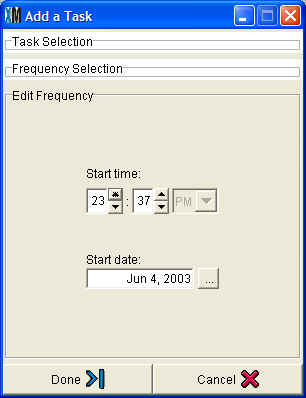
Select the time you want the task carried out by using the arrow keys
to the right of the hour field and minute field. Next, select the day
you want the task to first be carried out. Click on the browse button
to the right of the date field to open the XpertDate
™ tool . You may not want the synchronization to
actual take begin taking place for another week, for example. If you
select an hour that is earlier to the current time (for example, if you
select the early morning such as 2 a.m.), be sure to move the Start
date one day further. Otherwise you have defined a start time and date
that has already passed. (2 a.m. today already happened.)
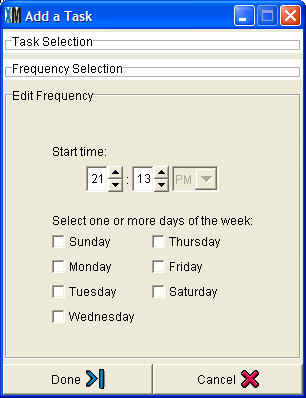
If the chose a weekly frequency for the task, you will be able to
select the day of the week you want the task to occur:
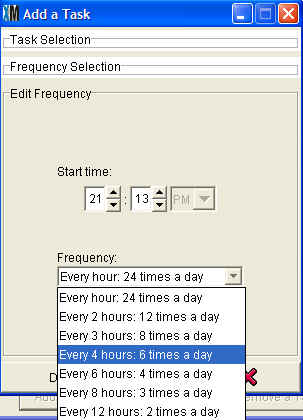
If you select an hourly frequency you will be able to define if you
want XpertScheduler™ to perform the task,
every hour, every two hours, and so on:
When you have finished editing the frequency of the task, click on
<Done> . The Add a Task window will close and the task you
just
defined will appear in the Scheduler.
IMPORTANT NOTE: For the scheduled task to take place, the computer must
be on and XpertMart™ must be open.
You can be doing other tasks when the pre-scheduled task is
automatically performed by the system, but if XpertMart™
is not open, the pre-scheduled task will not take place.
Sequencing the Synchronization Tasks
When you are adding tasks to the Scheduler
you need to be careful to follow the correct sequencing so that the Synchronization Cycle is
completed properly. For exmaple, you cannot have a Remote Station
download catalog synchronization files if the Main hasn't uploaded them
yet!
The diagram below is a sample synchronization schedule that
demonstrates proper sequencing:
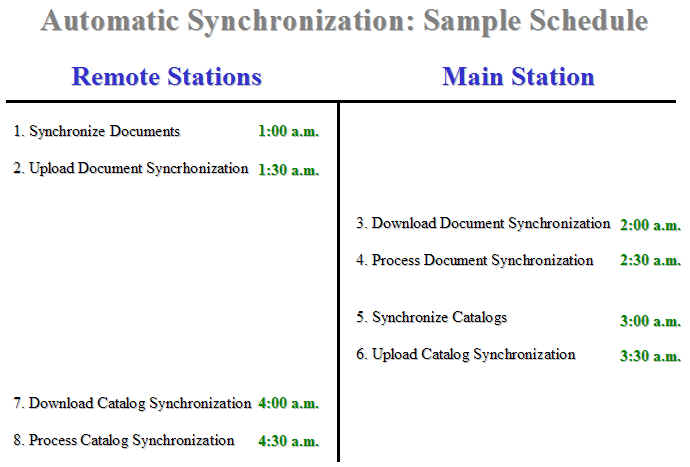
The sample schedule spaces each task 30 minutes apart; it begins as
1:00 a.m. and is done beofre 5:00 a.m. You are free to design your own
schedule. Plan on alloting at least ten minutes to every task. While
most tasks are done in a few minutes, you want to leave yourself a
margin of error.
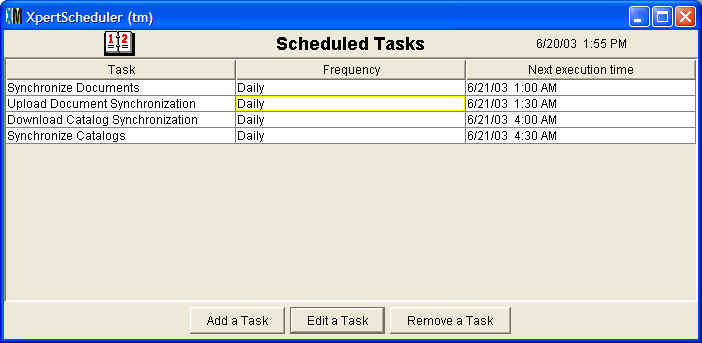
This is what the sample synchronization schedule would look like in the
XpertScheduler ™ screen at the Remote
station once all the tasks have been added:
Because you are using an FTP Server
, more than one Remote can be uploading and downloading files at once.
So there is no need to space your stores apart: all can be
synchronizing at the same time.
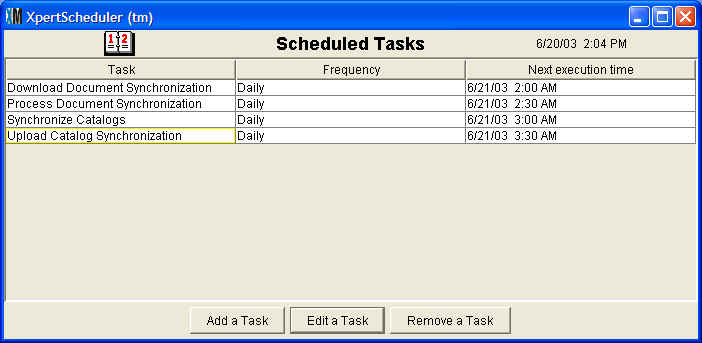
This is what the sample synchronization schedule would look like in the
XpertScheduler ™ screen at the Main
station once all the tasks have been added:
You can schedule more than one complete Synchronization cycle to take
place over night. If the system synchronizes twice in one night it will
not duplicate your transactions. Duirng the synchornization
process
XpertMart ™ is checking for new
data.
If the syncronization was successful the first time around it will know
that there is no new data to add the second tme around. However, if the
synchronization was interrupted the first time around the data will be
processed
during the second cycle.
If everything is configure properly, the synchronization process should
be invisible to users at the stores. The next chapter explains
how to monitor the synchronization on an ongoing basis and troubleshoot
any problems that may arise.
Purge Old Data
Every time pertMart™
synchronizes data it creates new synchronization files in the C:/Main/In and C:/Main/Out
folders as well as on the FTP
Server . Over time as the number of these files builds up they can
slow down
the synchronization process as the system checkes every file to see if
the
file date is after the last synchronization
date . To make sure the synchronization process runs at optimal
speed, you
should periodically delete the files in the In and Out folder on your
hard
drive.
You should also delete the files on the FTP Server. The easiest way to
do this is by running the Purge Old Data process:
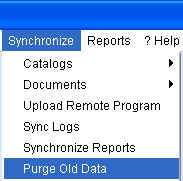
When you run this process the system will delete all synchronization
files on the FTP Server. A window will appear showing the system's
progress:

The Purge Old Data process can be automated using
Scheduler . A weekly purging of data on the FTP Server is suggested.
Copyright © 2004 Dinari Systems LLC