
Chapter Topics
Hardware Requirements
Installing Java
Installing InterBase
Installing InterClient
Installing XpertMart™
Finding your way around the installed
files
Registering the database in InterBase
Installing the HASP key
Installation Troubleshooting
Testing the Installation
Creating a desktop shortcut
Before you begin the installation process, you should check to make sure the computers you are installing XpertMart on comply with our minimum hardware requirements. Installing XpertMart™ on a computer that does not meet our memory or processor standards will cause the software to run slowly and may even create errors. We cannot give you adequate technical support if you do not meet our hardware requirements.
Before inserting the Installation CD in the drive and beginning the installation process, make sure you have closed out of all programs. When you open the Installation CD, it should contain the following four folders:
Each of these folders represents one step in the installation process.
Installing Java
Since XpertMart™ was written in the Java programming
language, we begin by installing the JRE or Java Runtime Environment which
allows us to run Java applications on our computer. Note that it is very important
that you only use the JRE version currently being used by XpertMart™ which is found on the Installation CD. If a newer version
of the JRE becomes available and you download it before we have released
a version of our software that is compatible with it, you will experience
some technical difficulties such as not being able to print images. As of
the writing of this User's Manual, we are using version 1.3.1_03 of the JRE.
If you have any doubts about what version of JRE you should be using, contact
your XpertMart™ dealer.
To install the JRE, double-click on the "1-Java" folder and you will find the following file:

If you double-click on this auto-executable file, it will begin to unpack itself. Once the file has unpacked itself, you will see a Setup screen that will flash before you as it prepares an install wizard. At this point you do not have to do anything but watch. When the install wizard launches, the first screen you will see is the Software License Agreement from Sun Microsystems, the maker of Java. Be sure to read the License Agreement carefully and Click <Yes> to continue the installation.
The next screen that comes up asks us to choose a destination folder:

Here it is very important that you not choose the default folder but instead create a new one. You do this by clicking on the <Browse> button which will open the Choose Folder window. In the Path field you will need to type "C:\Java" and press <OK>. Now that we've defined the location, click <Next> and the wizard will proceed to install the JRE in the new folder you have created. Once again, all you have to do is watch as the wizard finishes the installation. When it is complete, you should see a window that says "Installation Completed."
Click here to see how you can test to make sure Java was installed properly.
Installing InterBase
Once we have installed the JRE, the next step is to install the database manager
InterBase. (If you prefer to use a different database manager, contact your
XpertMart™ dealer for help with the installation).
InterBase is the program that will actually manage the storage of all of your
data.
To install InterBase, double-click on the "2-InterBase" folder and find the following file:

If you double-click on this auto-executable file, it will begin to unpack itself. Once the file has unpacked itself, the first screen of the Install Wizard will open up. This first screen (InterBase Server setup) and the next screen (Important installation information) are merely informative. Once you have read the information, click <Next> until you get to the third screen which contains the Software License Agreement. InterBase is made by Borland but is open-source, so it can be distributed free of charge. Read the agreement carefully and when you are finished click <Yes>.
The next screen that comes up lets us select the components we want to install and asks us to choose a destination folder for InterBase:
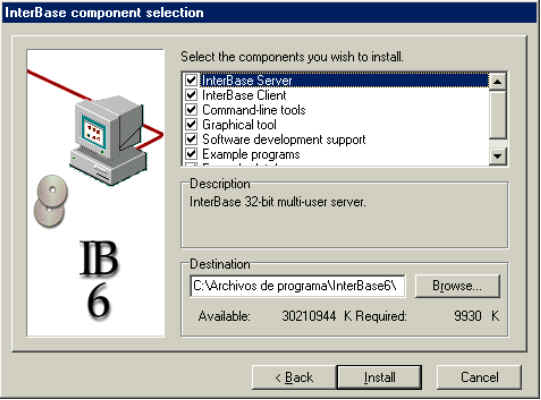
Be sure to keep all of the components selected. However, once again we want to change the destination folder. We do this by going into the Destination field directly and typing "C:\InterBase". Press <Install> when you are done. This will created a new folder and begin the installation. A window will appear showing the progress of the installation. When the installation is done, a new window will appear called "InterBase Server setup complete". Press <Finish>.
Installing InterClient
InterClient is a program that allows Java to communicate with InterBase. When
you query the database, XpertMart™ communicates with
InterBase through InterClient. Note that before we can install InterClient
we need to have first installed the JRE and InterBase.
To install InterClient, double-click on the "3-InterClient" folder where you will find the following file:

When you double-click on this file, a window will appear saying "This will install InterClient 1.60.01 for Java 2. Do you wish to continue?" When you click <Yes>, you will launch the installation wizard. At this point all you have to do is watch as the wizard begins to extract itself. The first screen you will see, InterClient Installation, is a warning to make sure you have exited all other programs before proceding. If you have, click <Next> and the following screen will the Software License Agreement. Once again, be sure to read it carefully and when you have finished, click <Yes>. After we have agreed to the license agreement, we will see two informative screen where all we have to do is click <Next>.
After that, the next screen that comes up lets us select the components we want to install and asks us to choose a destination folder for InterBase:
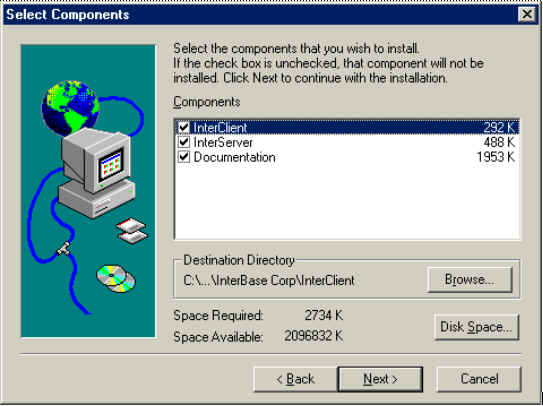
Make sure that all of the components are selected. However, once again we do not want to choose the default folder but instead want to create a new one. You do this by clicking on the <Browse> button which will open the Choose Folder window. In the Path field you will need to type "C:\InterClient" and press <OK>. The next screen will ask you to confirm that you want to install InterServer (which is a component of InterClient). Click <Next> and the folowing screen will ask you to review the installation settings. When you've reviewed the settings, click <Install> and the wizard will copy the program into the new folder you created.
When the copying is complete, a new window will open up asking if you wish to configure InterServer. We recommend you select the Configure InterServer option and click <Next>. Doing so allows us to configure InterServer to run automatically every time Windows starts-up.
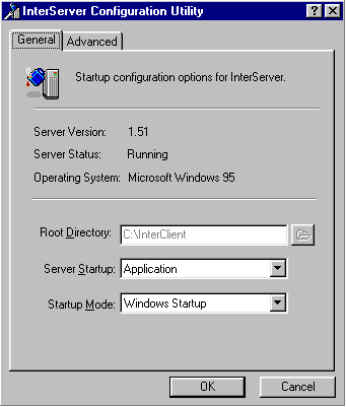
Make sure that Windows Startup is selected in the Startup Mode field and press <OK>. The InterClient installation is complete. You will see a screen asking you if you want to restart your computer. We recommend that you do.
Installing XpertMart™
Once Java, InterBase and InterClient are instaled, installing XpertMart™ rather simple. Double-click on the "4-Copy" folder
and you will find the following three directories:

Copy these three directoies and paste them into the C:\ drive. The Java and Windows folder contain the drivers needed to run peripherals from XpertMart™ while the Main folder contains the actual application. When you paste these folders into C:\ the files will automatically be stored in their appropriate directory. If you get a message saying that one or more of these files already exists in the C:\ drive, go ahead and paste them as there is no harm in overwriting the same file. When you are finished copying the three folders you can go to the C:\Main directory and double-click on it to see its contents.
Registering the database in InterBase
Before you can begin using XpertMart™ you must first
register the database with the database manager which is usually InterBase.
(If you prefer to use a different database manager, contact your XpertMart™ dealer for help registering the database). However, before
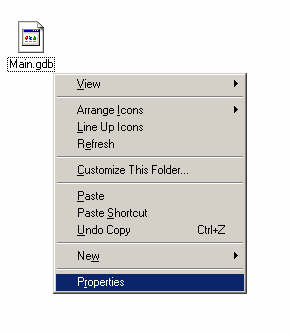
you register the database, you must first make sure that the database file
is not write-protected. To do this, go to the C:\Main directory, right-click
on the Main.gdb file and select properties at the bottom of the menu as shown
below:
In the Properties
window make sure the Read Only checkbox at the bottom left next to Attributes
is not selected. If the Read Only checkbox is selected, you will not be able
to run XpertMart™ as it cannot write to the database
file.
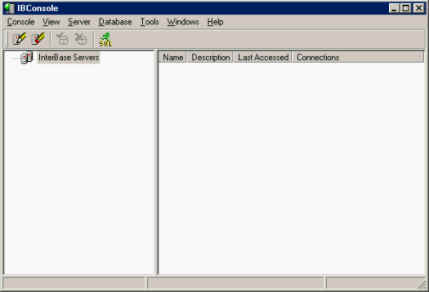
To register the database, launch the IBConsole program found by clicking on the Start button and going into the Programs>InterBase menu. IBConsole is an InterBase utility that lets you do maintenance to the database. When you launch IBConsole, you will see the following screen:
The first step is to register the server that you wil be using. Unless
you are on a network, you will be
using a local server. To register the server, click on Server in the main
menu and select Register, or you can just click on this button: ![]()
A new window will open up where you must be sure to select the Local Server option. You can choose whichever User Name and Password you'd like, but we recommend using the following standard: "SYSDBA" for User Name and "masterkey" for password. This way if you never need any help with any database maintenance, an XpertMart™ tech support engineer will know how to acess your database. Otherwise, be sure to write down your user name and password because if you forget them you will not be able to access your database file down the road.
Once you have resgistered the server, a new icon will appear on the IBConsole screen called Local Server with a green checkmark next to it. If the registration was not successful, you would see a red X and you would have to try the registration again.
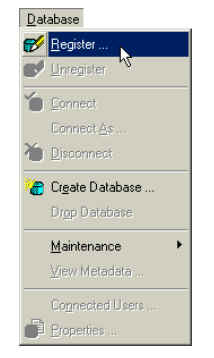
The next step is to register the database. To do this, click on Database in the main menu and select register as shown below:
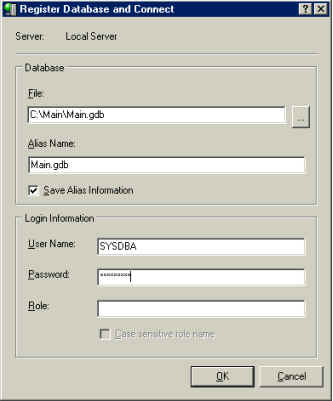
A new window will open up very similar to the one you used to register the server. The database you want to register is the Main.gdb database found in the C:\Main directory. Therefore, in the File field, type in the following: "C:\Main\Main.gdb" or you can use the browse button on the right to select the database from the directories on your computer. You can enter whatver Alias for the database you would like, but we recommend using the same name as shown in the example below so that it is easy to remember. Once again you need to enter a user name and password and we recommend using "SYSDBA" and "masterkey". Be sure you use the same user name and password you used to register the server.
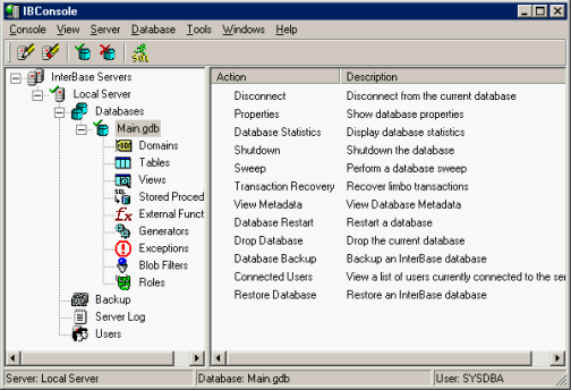
When you press <OK>, the database will appear below the Local Server icon in the main IBConsole screen. If the database was registered correctly, you will see a green checkmark next to the Main.gdb icon as shown below:
Click here to see how you can test to make sure InterBase was installed properly and the database is functioning correctly.
The HASP key is a hardware device that plugs into the computer and forms part of XpertMart™'s security. The HASP key protects the user against the unauthorized use of the software and guards against piracy. The HASP key must be installed or the software will not run.
There are two kinds of HASP keys, those that plug into the USB port and those that plug into the serial port.
Installing the USB Port HASP
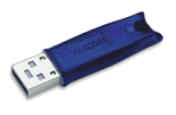
The USB port HASP is a "Plug and Play" device and requires no special software
to install. When you insert the HASP into the USB port your computer should
detect the HASP automatically. You know the HASP was detected and is working
when a green light comes at the end of the key. If for any reason the light
does not turn on, try restarting your computer and plugging the key in again.
You can also follow the instructions for installing the HASP software used
when installing a serial port HASP. Also, be sure to check the key to make
sure it is not damaged. USB keys are very fragile and can malfunction even
if bent slightly.
Installing the Serial Port HASP
This HASP key plugs into the serial port on your computer which is usually
the same port you use to plug in the printer. When you plug this key in to
your computer, be sure to tighten the screws to secure a firm grip. Note
that you can still use the serial port for your printer since you can plug
the printer cable directly into the back of the HASP key.
Once you have plugged the HASP into the serial port you need to install the software driver so that your computer can recognize the key. To do this open a DOS window and change the directory to C:\Main. You do this by typing "chdir c:\Main". Once the prompt shows that you are in C:\Main, type in the following command: "HINSTALL -i" as shown below:
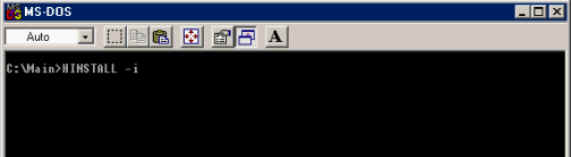
This command launches a small program that installs the software driver automatically. Once the installation is complete a window will appaer saying the operation was completed successfully. If instead you receive an error in the DOS window, check to make sure the hinstall program is in your C:\Main directory. If problems persist, you may not be using a version of the hinstall program that is compatible with your operating system. Contact your XpertMart™ dealer for help.
Troubleshooting the Installation
If you have followed all of the steps of the installation process and successfully
installed the Jave Runtime Environment, InterBase, InterClient, XpertMart™ and the HASP, then you are ready to use the system. To
launch XpertMart™, go to the C:\Main directory and
double-click the XpertMart.jar file. If a Login Window appears asking you
for your user name and password, you have successfully completed the installation
process. You can click <OK> without entering a user name nad
password and you will enter XpertMart™ 's main screen.
If you double-click on the XpertMart.jar file and do not see the Login Window, then there are three possibilities possibilities:
1) There is no HASP or the driver for the HASP is not working. You know this is the problem is you see this window. If this is the case, go back and check to make sure the HASP was installed correctly.
2) XpertMart™ cannot read the database. The Login Window appears on the screen, but after you click <OK> nothing happens and you do not see XpertMart™ 's main screen. This means that XpertMart™ cannot read or write to the database. You must remove the database's write protection.
3) XpertMart™ cannot run because there was a problem
with either Java, InterBase or InterClient. You know this is the case if after
double-clicking on the XpertMart.jar file the Login Window never even pops up.
If this is the case, refer to the Testing
the Installation topic.
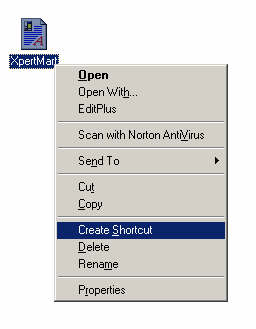
Creating a desktop shortcut
Finally, you may find it convenient to create a desktop shortcut to XpertMart™ for faster access to the program. To do this, go into
the C:\Main directory and right-click on the XpertMart.jar file and select
Create Shortcut as shown below:
Now you need to cut the Shortcut and paste it on the desktop. When you have
done that, right-click on the Shortcut icon and select Properties.
In the Properties window, click on the Change Icon button and a new window
will open up with a field title File name. In this field enter "C:\Main\XM.bmp"
as shown below.
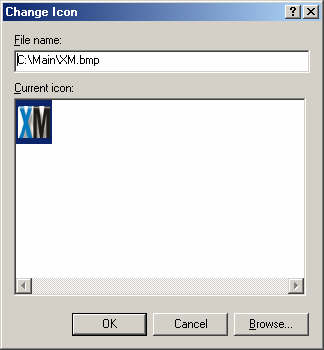
When you click <OK> and exit the Properties window, it will take a few seconds for the new icon to appear.
Congratulations, you have finished the installation.
Copyright © 2002 XpertMart