XpertMart™ lets you print sheets of bar code labels on a laser printer. Using a
laser printer to print bar code labels offers several advantages: 1)
you do not have to invest in a specialized bar code printer; 2) you can
include photos or other graphic images on the label; 3) you can print
the labels at a faster rate (depending on the laser printer you use);
4) you can include your logo on the labels; and 5) you can print colors
on your labels. The major drawback of using a laser printer is that,
unlike a dedicated bar code printer that lets you print one label at a
time, you always use up a full sheet of lables even when you only have
a few to print.
To print bar code labels on a laser printer you need to modify the
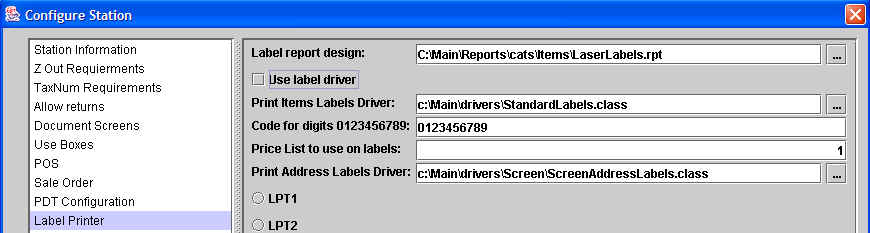
configuration in Configure>Station Configure>Label Printer.
Make sure the "Use label driver" box is not checked. On the first
field at the top called "Label report design" you need to select a
valid report format for printing on a laser printer. In this case the
LaserLabels.rpt format is being used. This is all you need to
configure. Once you uncheck the "Use label driver" the system ignores
all other configuration options as they only apply to label printers.
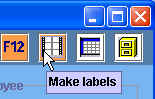
Printing bar code labels is very easy. In any Documents Catalog find
the transaction you want to print labels for. Once you've done a query
and found the transaction of interest, press the Make labels button on
the toolbar.
Tecnical Notes
1) If the Document does not include any items then XpertMart™ logically does not print any labels.
2) When you click on the Make labels button, XpertMart™
checks if the LABELLIST table already exists in the database. If it
does not, it creates it at that time.
3) XpertMart™ erases the contents of the
LABELLIST table in the database since it contains the item data from
the previous print job.
4) XpertMart™ then creates an entry for every
item in the Document being used in the LABELLIST table. Once this is
done, the system proceeds with the print job.
5) The LABELLIST table only creates the ITEMS_ID entry of the item
to be printed. All other data is derived from the relational links to
the other tables in the database.
6) The same ITEMS_ID is repeated once for every label to be printed.
7) Before you try to modify the standard report format
(LaserLabels.rpt), try printing labels to your laser print first. This
way the LABELLIST table will be created and you can then modify the
design using the Report Designer.
8) The page header and footer margins will vary depending on the
label sheets you use. You will probably have to compensate for these
margins in the report format. This can be done using the Report
Designer.
Copyright © 2005 XpertMart