
Chapter Topics
Introduction
Tracking the Actions of Employees
Restricting Access to the System
Activating Security
Creating Employees in the Employee Catalog
Creating Security Groups
Assigning Employees to Security Groups
Assigning Permissions to the Security Groups
How the Security Works
Deactivating Security
Introduction
There are two fundamental aspects to any good security system. The first
one is keeping track of which users have access to the system, at what time,
and to do which transactions. The second one is being able to restrict certain
parts of the system to certain users. XpertMart™
covers both of these aspects. Security is configured exclusively at the
Main and is synchronized out to the
Remote stations. Security settings
cannot be modified at the stores.
Tracking the Actions of Employees
The best inventory control system can not prevent mistakes or fraud,
but it can uncover these in a timely fashion and accurately identify those
responsible. To do this, it is imperative that the system know at all times
which user is operating the system. Therefore XpertMart™ requires a user to Login
before he or she can make any kind of transaction. While you can launch XpertMart™ (assuming the security system has not yet been activated)
and even browse the catalogs XpertMart™ will
not let you open a transactions
screen until you have logged in. Therefore, before making your first transaction,
you must create a minimum of one employee in the Employee
Catalog, although obviously creating an entry for every employee in
the company is highly recommended.
Any time a new document is created, XpertMart™ automatically records the date and time of its creation
and the user who was logged on at that date and time. If questions should
arise about a specific transaction the document in question can be looked
up and the employee responsible can be determined, so that management can
take appropiate action. In the example below, Invoice #10000008 was created
by Employee Number 123 on November 9, 2001. Note that the Audit Table records
the time in addition to the date.
The security system built into XpertMart™
will only work as intended if complimented by management policies. Being
able to accurately track the actions of employees depends on each employee
having a unique and randomly generated (hard to guess) password and never
sharing that password with other employees. Therefore strong penalties are
recommended for employees found sharing their password and even stronger
penalties for any employees using another employee's password.
Restricting Access to the System
There are 4 steps to setting up the Security System in XpertMart™:
1. Creating Employees
2. Creating Security Groups
3. Assigning Employees to Security
Groups
4. Assigning Permissions to
the Security Groups
Activating Security
IMPORTANT NOTE: The security system becomes activated the moment you
create your first security group. Once the security
is activated there is no turning back, i.e. it can not be deactivated.
The security system is exclusive, meaning it does not let you access a module
unless you have specifically been granted permission to do so (By contrast,
an inclusive security system assumes you have permission unless specifically
denied). Since XpertMart™'s security system
is exclusive, it is very important to carefully assign the desired permissions
to the security groups, because the default option is for each group to
have NO PERMISSION.
Creating Employees in the Employee Catalog
The first step in setting up the security system is to add
every employee in the company to the Employee Catalog. If you are not already
familiar with the basic layout of a catalog, you should read the Catalogs topic before reading further.
There needs to be one entry in the Employee Catalog for every user who
is going to be accessing the system. At a bare minimum, the record needs
to have the Number, Password, Name and Last Name fields filled out so that
the employee can do a Login to the system
and be identified.
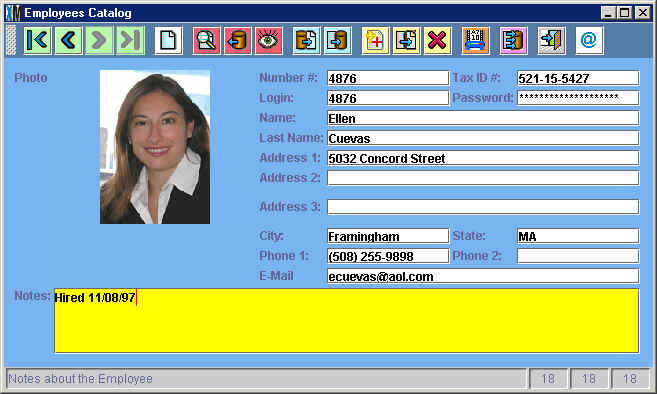
IMPORTANT NOTE: The Login window asks for the Employee Number and not what has been entered in the "Login" field. Therefore, you should either repeat the Employee Number in the Login field (4876 in the example above) or keep it blank.
Both the Employee Number and the Password can be alphanumeric entries
with no limit to the number of characters. The information you enter in the
password field is encrypted and you will see a string of asterisks displayed
instead of what you entered. Note that there is no way to retrieve a password
in XpertMart™ so be sure to keep an external record
of your password if you think you might need it later.
The other fields in the Employee Catalog or optional and allow you to
capture the employee's Tax Number (such as the Social Security number in
the U.S.), address, telephone number as well as a photo which could be useful
in large companies. There are no restrictions in the number or type of characters
entered into these fields. There is an open Notes text area at the bottom
of the catalog that can be used to capture information on an ongoing basis.
If you capture an employee's email address you can send an email to that
employee directly from the Employee Catalog by pressing the email button
on the toolbar. For more information, see the Email topic.
Creating Security Groups
Once you are done entering employees into the Employee Catalog you are
ready to create Security Groups. A Security Group is used to assign the
same permissions to employees with a similar role. For example cashiers
typically enjoy one level of access, while store managers usually have
additional access. All employees in a Security Group have the same level
of access and permissions. An employee can be added or subtracted to a Security
Group without affecting the permissions that the group enjoys. There is
no limit to the number of Security Groups you can create.
Before you begin creating Security Groups, you should map out what groups
you require and what permissions they will need. Think about the current
departments in your organization and all the different employees to make sure
you have all the relevant functions covered. Consider consolidating groups
wherever you can to keep the number of groups manageable.
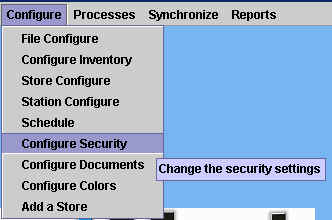
To create a security group, open the Configure Security Menu found in the
Configure Menu in the Main Menu as shown
below:
This will launch the XpertSecurityManager™ module:
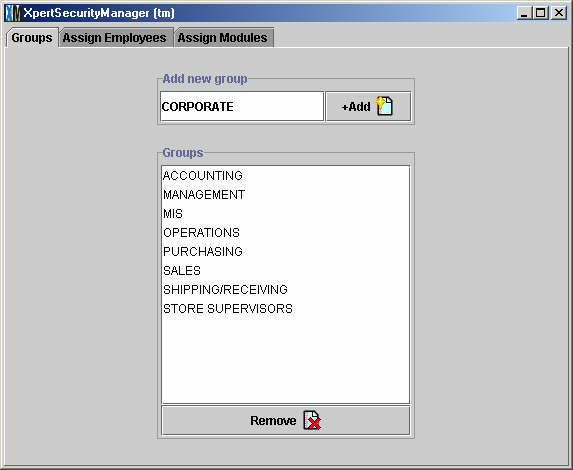
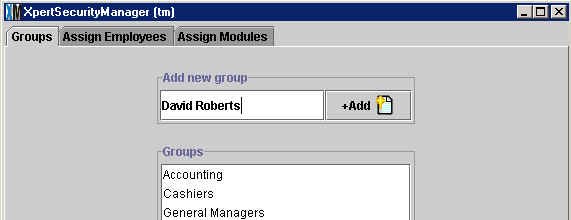
In the Groups tab, type the name of the security group you wish to create
in the Add New Group Field and click the Add button on the right ![]() . Once you create a group it will automatically appear in the list below
this field. In the example above, the user is adding the "Corporate" security
group. All groups are listed in alphabetical order. (XpertMart™ does not come with any pre-created list of groups).
. Once you create a group it will automatically appear in the list below
this field. In the example above, the user is adding the "Corporate" security
group. All groups are listed in alphabetical order. (XpertMart™ does not come with any pre-created list of groups).
To remove a group simply select it from the list and click on the Remove
Button ![]() . Before you remove a group, you must make sure that there are no employees
assigned to that group. If you try to remove a Security
Group that still has employees assigned to it, you will see an error message
like this one:
. Before you remove a group, you must make sure that there are no employees
assigned to that group. If you try to remove a Security
Group that still has employees assigned to it, you will see an error message
like this one:
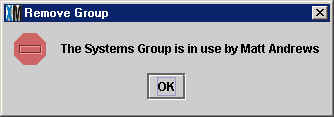
The error message displays the name of one employee (though there may be
more) using the the Security Group you are trying to eliminate. You must go
to the Assign Employee tab and make sure no employees
are assigned to the Security Group you wish to remove.
Assigning Employees to Security Groups
When you click on the Assign Employees tab (shown below) you will see
a list of all employees on the left, and a list
of all Security Groups available on the right. If you
add a new employee, or create a new security group, while using the XpertSecurityManager™ you may need to click the Update view button for these
lists to be refreshed.
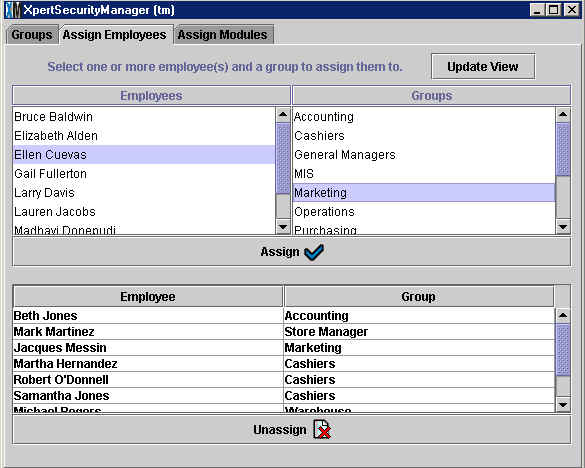
To assign an employee to a security group, click on the employee from the
list on the left and click on the group from the list on the right. The employee
and group you selected will appear shaded in blue. If the selection is corrent,
click the assign button ![]() . The employee will dissappear from the Employees list and appear at
the bottom of the window along with the Group he o she belongs to now. In
the example above, the user is about to assign Ellen Cuevas to the Marketing
group. You can select multiple employees at once by holding down the control
key.
. The employee will dissappear from the Employees list and appear at
the bottom of the window along with the Group he o she belongs to now. In
the example above, the user is about to assign Ellen Cuevas to the Marketing
group. You can select multiple employees at once by holding down the control
key.
When an employee has been assigned to a security group, he or she appears
at the bottom of the screen, along with the security group he or she now
belongs to. To unassign an employee from a security group, select the employee
from the list appearing on the bottom of the window and click the unassign
button ![]() . The employee will reappear in the Employees list in the left-hand side
of the window. Again, excercise caution when unassigning an employee as you
are momentarily denying them access to the system until you reassign them
to a new group. Making these changes during off peak hours, when other users
are out of the system, is highly recommended.
. The employee will reappear in the Employees list in the left-hand side
of the window. Again, excercise caution when unassigning an employee as you
are momentarily denying them access to the system until you reassign them
to a new group. Making these changes during off peak hours, when other users
are out of the system, is highly recommended.
To change the group an employee belongs to, you must first Unassign the
employee from their existing group. The employee will then be listed in the
Employees list on the left-hand side of the screen and you are free to assign
that employee to any new group.
Note that an employee can only belong to only one Security Group. However, since there are no limits to the number of groups you can create, and employee can belong to a security group of his own when necessary. For example, if David Roberts needs to belong to both the Accounting and the Marketing Security Groups you would need to create the “David Roberts” Security Group which would have the same permissions as do both groups.
Assigning Permissions to the Security
Groups
The final step is to assign permissions to the Security Groups you have
created. To do this, click on the Assign Modules tab and you will see a
drop-down menu of Security Groups on the left and a list of every module
in the system on the right. At the bottom of the window is are eight Permissions
the Security group can be granted or denied. The eight Permissions are explained
below:
Can use: Members of the Security Group can enter the module
and use all functions not specifically denied.
Can add: If the user is in a Catalog, he or she can add new records.
Can make global changes: Allows members of the Security Group
to use the Replace Where tool to make
mass changes in a Catalog.
Can see costs: Allows the user to see costs in any Catalog or report tha might include costs.
Can edit: Allows the user to make modifications to Catalogs, configurations and processes.
Can delete: If the user is in a Catalog, he or she can delete existing
records.
Can discount: Allows the user to make discounts when making
transactions or when modifying prices.
Can run reports: Allows the user to run reports within the module being used. If the user is in a Catalog, he or she can use the reports button on the tool bar.
To begin, select a group from the Groups drop down menu and you will see
the list of Modules on the right side of the window become active. Select
a module and choose those permissions you wish to grant within that module
by clicking on the checkbox next to each of the eight permissions. Those
Permissions you do not select will be denied to the members of the Security
Group. When you are finished, click the Apply button ![]() . As you work on the different Modules, you can click the Apply button
as many times as you want as way of "saving" the permissions you have assigned
so far.
. As you work on the different Modules, you can click the Apply button
as many times as you want as way of "saving" the permissions you have assigned
so far.
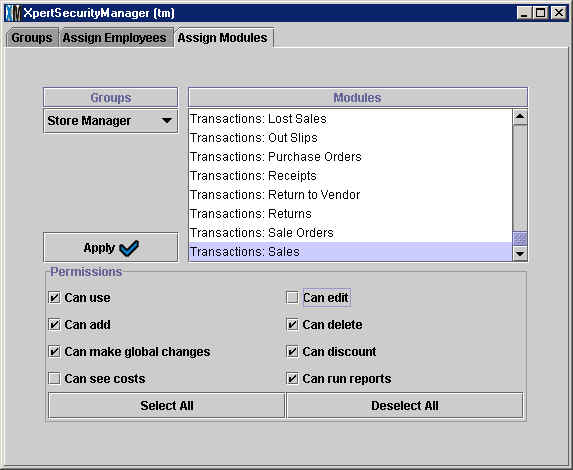
In the example below, the user has selected the Store Manager group and
is assigning Permissions in the Transactions: Sales module. The Store Manger
group will have permission to use the Sales module, as well as: add, make
global changes, delete, discount and run reports in the Sales module. The
Store Manager group will not have permission to see costs or edit when using
the Sales module.
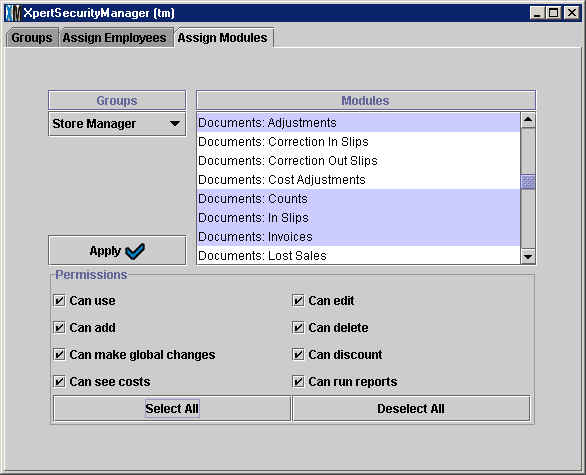
There are over 160 modules listed in the XpertSecurityManager™, which can make assigning permissions a long process.
However, you can select more than one module at a time as shown below by
holding down the <Ctrl> key while you click on the module, or
you can select an entire block of modules (for example, all Transactions),
by holding down the <Shift> key. You can use the Select All button
![]() at the bottom of the screen to quickly assign all eight permissions at
once.
at the bottom of the screen to quickly assign all eight permissions at
once.
For those Security Groups that will have access to the entire system such
as MIS and General Managers, you can select every module at once holding down
the <Shift> key and click on the Select All button to very quickly
give them full access. For other Security Groups with a very limited role,
such as Cashiers, you only need to concentrate on the handful of modules they
will be using such as Transactions, Documents and Reports and not worry about
the other modules.
In spite of these time savers, setting up a robust security system is a
time consuming process. However, it is worth the initial investment to carefully
map out the permissions the different Security Groups will be needing. Once
the security sytem is up and running, it will require little maintenance,
namely adding and removing employees as the situtation arises.
How the Security Works
Once the security system has been activated,
all users will have to Login to be able
to use the system. When a user enters an incorrect password when logging
in, XpertMart™ will not give an
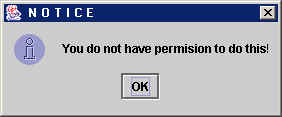
error message. However, if the user then tries to access any module they
will see the same error message you see when a user does not have permission
to access the module:
Every time the Login window is opened it erases the security access the prior user enjoyed, even if nothing is entered in the Employee Number and Password fields and the Login window is closed. If the store manager wanted to make sure the cashier would not be able to use the system under his security clearance, all he would have to do is launch the Login window once and access would once again be restricted. So in a sense launching the Login window functions as an "off switch" of the current user.
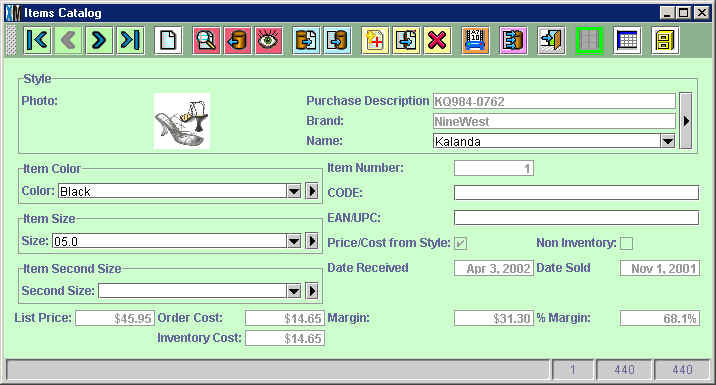
If a user has permission to use a module but does not have other permissions, the graphical user interface (GUI)
will change to reflect those restrictions. Take the Items Catalog as an example.
A user with every permission activated, would see the Items Catalog as follows:
However, if a user did not have permission to see costs nor to use reports, then the Items Catalog would look as follows:
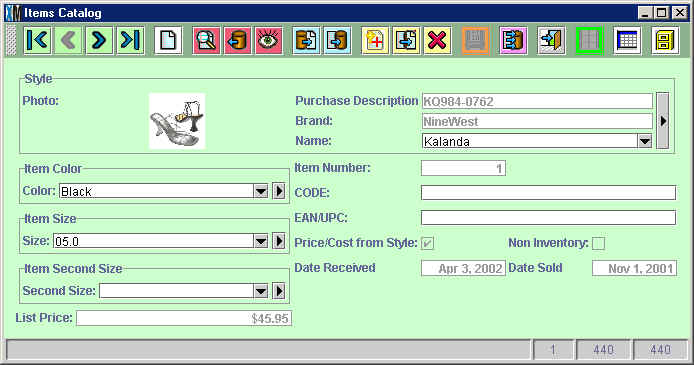
Notice that only the List Price field appears; the Order Cost, Inventory
Cost, Margin and % Margin fields do not appear as they would reveal the
cost. The reports button on the tool
bar appears grayed-out since the user does not have permission to run reports.
Deactivating Security
There is no easy way to deactivate the security system if you forget your
password or accidentally unassign yourself permissions. If you have "locked
the keys in the car" so to speak, the best thing you can do is borrow somebody
else's password (in fact, it makes sense to set up a pair of dummy employees
for exactly this purpose) and either enter the Employee
Catalog to change your own password or enter the XpertSecurityManager™ to assign yourself new permissions
as the case may be.
If it is impossible to recuperate anybody's password which will
allow you to enter the XpertSecurityManager™ to
then there is an extreme measure that you can take but it requires deleting
the entire Employee Catalog and the
Security Groups you've created. This action is irreversible
and you will have to begin from scratch when you setup the security system
again. Obviously, this action should be your last resort.
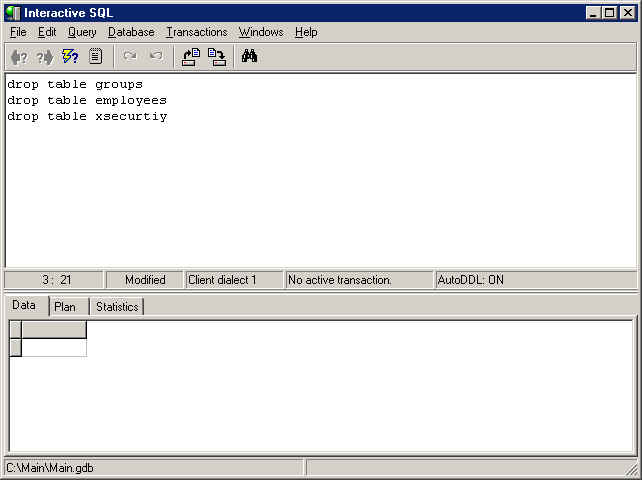
The delete the security system, you need to enter IB Console and go to the Interactive SQL screen. In the SQL screen,
you need to enter the following SQL statements:
"drop table employees"
"drop table groups"
"drop table xsecurity"
When you are done, press the execute button ![]() :
:
When you reenter XpertMart™ the Employees Catalog
will be blank and you will not be able to do a transaction until you create
an employee.
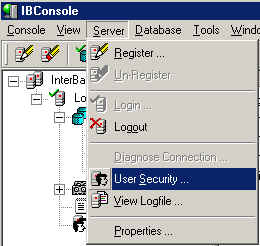
If you are worried about somebody being able to use the IB Console "back
door" to eliminate your security, you can periodically change the password for the user you setup in
InterBase. To do this, go to User
Security under the Server menu (shown below) and enter the new password.
Copyright © 2002 XpertMart