Transactions
Chapter
Topics
Transaction Types
Transaction Toolbar
Transaction Header
Customer/Vendor Subform
Items Area
Payment Footer
Documents
Transaction Types
Transactions are the way that inventory is changed in XpertMart; i.e. it is only by way of a transaction that quantities
are added or subtracted to the stock level of a store or warehouse. If
Catalogs can be thought of as the heart of the Main
station, then Transactions are the heart of the Remote
Station. In fact, except for a couple of exceptions, transactions
can only be done at the Remote station. (Purchase Orders can be
made at both the Main and the Remote while Cost Adjustments can only be
made at the Main.) To learn why, read more about our Philosophy
of Control.
There are twelve possible transactions that can be done at a Remote: Sale, Lost Sale, Sale Order (layaway), Return, Receipt, Return Receipt, Purchase Order, In Slip, Out Slip, In Slip Correction, Out Slip Correction, Adjustment, Cost Adjustment and Count. Each one of these affects inventory in a different way. To learn more, read the How Transactions Affect Inventory topic.
To begin a Transaction, simply select the desired option from the Transactions Menu in the Main Menu:
![]()
Though each transaction differs somewhat in appearance, every transaction screen is remarkably similar. This is because the Object-Oriented design behind XpertMart means that the software is very modular: if you know your way around one transaction (such as an Invoice) then you will quickly find your way around any other transaction (such as Purchase Orders, Returns and Out Slips). This chapter will discuss the basic design behind all transactions. Subsequent chapters will treat each transaction individually.
A transaction screen has five principal elements: the Toolbar
at the top that is the same in every transaction; a Header
that contains information about the transaction; a Customer/Vendor
Subform; the Items Area where the items being
added or subtracted to inventory are listed; and the Footer
with item totals, aggregate cost or price and any payment information.
Transaction Toolbar
The toolbar at the top of every transaction screen is standardized: you
will see the same 12 buttons appearing in the same order at the top of
every transaction screen. Each of these buttons launches a specific function.
You can either move the mouse over one of these buttons and click, or
you can press the equivalent function key on your keyboard. The function
of each button is explained below:
![]() Help: Pressing this button launches the online
Help feature. This is feature contains the User's Manual and can be browsed
or searched by topic.
Help: Pressing this button launches the online
Help feature. This is feature contains the User's Manual and can be browsed
or searched by topic.
![]() Exit: Press this button to exit the transaction
and close the screen. Think of this as the "cancel" button when
you need to terminate a transaction. Note that while you can always end
a transaction by closing the screen (pressing the x in the upper right
hand corner) doing so sometimes records a blank transaction in the system.
The safest bet is to use the F2 button.
Exit: Press this button to exit the transaction
and close the screen. Think of this as the "cancel" button when
you need to terminate a transaction. Note that while you can always end
a transaction by closing the screen (pressing the x in the upper right
hand corner) doing so sometimes records a blank transaction in the system.
The safest bet is to use the F2 button.
![]() Customer: Pressing this button moves the cursor
to the beginning of the Customer/Vendor subform,
where you have the option of entering a Customer or Vendor, depending
on the type of transaction.
Customer: Pressing this button moves the cursor
to the beginning of the Customer/Vendor subform,
where you have the option of entering a Customer or Vendor, depending
on the type of transaction.
![]() Matrix: Use this button when
you are entering items into the Items Area in the
transaction screen. Once you have entered an item into the transaction,
if you move the cursor over that item and press F4 a matrix with all of
the size and color options for that particular Style will open up. Use
the mouse or arrow keys on the keyboard to move to the appropriate cell(s)
in the matrix to input item quantities, as shown below:
Matrix: Use this button when
you are entering items into the Items Area in the
transaction screen. Once you have entered an item into the transaction,
if you move the cursor over that item and press F4 a matrix with all of
the size and color options for that particular Style will open up. Use
the mouse or arrow keys on the keyboard to move to the appropriate cell(s)
in the matrix to input item quantities, as shown below:
![]()
When you are finished, press <OK> and the items you have selected will appear in the Items Area of the transaction screen, as shown below:
![]()
Using the matrix is particularly useful for transactions that involve a large number of quantities such as Purchase Orders, Receipts, Out Slips and In Slips. Entering item quantities through this matrix can save you a lot of data entry time.
![]() Items: Pressing this button moves
the cursor to the first line (or next available line) in the Items Area.
Use this button if you want to move through a transaction quickly
and skip straight to the entry of item data.
Items: Pressing this button moves
the cursor to the first line (or next available line) in the Items Area.
Use this button if you want to move through a transaction quickly
and skip straight to the entry of item data.
![]() Quantity: Pressing this button moves the cursor
to the Quantity column in the Items Area where you
can enter the quantity of a specific item being entered in the transaction.
Quantity: Pressing this button moves the cursor
to the Quantity column in the Items Area where you
can enter the quantity of a specific item being entered in the transaction.
![]() Item Discount: Pressing this button moves the
cursor to the % Discount column in the Items Area
where you can enter the discount, if any, applicable to the item being
entered.
Item Discount: Pressing this button moves the
cursor to the % Discount column in the Items Area
where you can enter the discount, if any, applicable to the item being
entered.
![]() Item Lookup: Pressing this button opens the Items
Catalog. You can browse the Items Catalog or do a Query
if you are looking for a specific item. When you press <OK>
to close the Items Catalog, the item you have selected will appear in
the Items Area of the transaction screen. This function
is particulary useful when you need to enter an item into the transaction
and cannot remember the item number and a bar code is not available for
scanning.
Item Lookup: Pressing this button opens the Items
Catalog. You can browse the Items Catalog or do a Query
if you are looking for a specific item. When you press <OK>
to close the Items Catalog, the item you have selected will appear in
the Items Area of the transaction screen. This function
is particulary useful when you need to enter an item into the transaction
and cannot remember the item number and a bar code is not available for
scanning.
![]() Global Discount: Pressing this button moves
the cursor to the Global Discount field where you can enter the global
discount (if any) applied to the items in the transaction. The Global
Discount is expressed as a percentage. Whereas the Item Discount (F7)
applies only to a particular item, the Global Discount is a discount that
applies to the total, or sum of all of the items in the transaction.
Global Discount: Pressing this button moves
the cursor to the Global Discount field where you can enter the global
discount (if any) applied to the items in the transaction. The Global
Discount is expressed as a percentage. Whereas the Item Discount (F7)
applies only to a particular item, the Global Discount is a discount that
applies to the total, or sum of all of the items in the transaction.
![]() Payment: Pressing this key moves
the cursor to the first (or next available) line in the payment area in
the transaction footer. The payment area is used
in Sales, Sale Orders and Returns and is where you specify how the customer
is paying for merchandise.
Payment: Pressing this key moves
the cursor to the first (or next available) line in the payment area in
the transaction footer. The payment area is used
in Sales, Sale Orders and Returns and is where you specify how the customer
is paying for merchandise.
![]() PDT: Use this button when you
want to download item data from a Portable Data Terminal. Once you are
finished scanning items into the PDT, connect the PDT communication cable
to the computer and press F11. The PDT will then download the stored item
data into the Items Area of the transaction. For
more information on using a PDT, read the Count
Sheets section of the Physical Inventory
topic.
PDT: Use this button when you
want to download item data from a Portable Data Terminal. Once you are
finished scanning items into the PDT, connect the PDT communication cable
to the computer and press F11. The PDT will then download the stored item
data into the Items Area of the transaction. For
more information on using a PDT, read the Count
Sheets section of the Physical Inventory
topic.
![]() Print: Press this button when
you are finished with the transaction. When you press F12 the following
happens: the transaction is stored as a document
in the appropriate document catalog, the transaction is recorded in the
Kardex or Audit Table, and a paper copy of transaction is printer out.
In other words, once you press F12 there is no turning back: the transaction
can no longer be edited or deleted. The format of each transaction and
the printer it is is printed out on depends on the printer driver you
have configured in the Configure
Documents Menu, under the Configuration Menu in the Main Menu. XpertMart will not let you print (or save) a transaction until
every process within the transaction (such as having the right payment)
is done correctly.
Print: Press this button when
you are finished with the transaction. When you press F12 the following
happens: the transaction is stored as a document
in the appropriate document catalog, the transaction is recorded in the
Kardex or Audit Table, and a paper copy of transaction is printer out.
In other words, once you press F12 there is no turning back: the transaction
can no longer be edited or deleted. The format of each transaction and
the printer it is is printed out on depends on the printer driver you
have configured in the Configure
Documents Menu, under the Configuration Menu in the Main Menu. XpertMart will not let you print (or save) a transaction until
every process within the transaction (such as having the right payment)
is done correctly.
Transaction Header
The transaction header contains a set of fields with information about
the transaction taking place. Some of these fields vary depending on the
transaction you are doing, but you will always see at least three fields:
the Employee, the transaction Number (No) and the Date. These three pieces
of information are "stamped" onto the transaction by XpertMart and therefore the contents appear in gray, i.e. they
cannot be modified or edited. In some transactions, the time is also stamped
onto the transaction, in addition to the date. These fields are a critical
part of the audit trail that is created every time a transaction is made
and allow managers to trace which employee carried out the transaction
and hold them accountable.
Note that the Employee field refers to the last person who logged in to the system. In some transactions, such as an Invoice, there is a separate field for Sales Person, who may or may not be the same person who is logged in and carrying out the transaction, that is useful for tracking commissions.
The transaction number is a consecutive serial number automatically assigned by the system. The transaction number is always 8 digits long. The very first digit indicates the store where the transaction is being done: 10000008 indicates that the transaction is being done at store #1 whereas 70000244 indicates store #7.
When XpertMart is installed in a store with multiple workstations or points of sale, the Transaction Number assigned at each workstation is considered provisional until the end of the day when the system can consolidate all sales and assign permanent serial numbers. Note that every Document Type has its own number series, so that different Invoice Types will each have a 10000001 numbered document.
Below is a sample header from an Invoice:
![]()
The rest of the fields of the header are open fields and are to be defined
by the user, usually by selecting an option from a drop-down menue. These
fields might include the Price List in an Invoice, the mode of Transport
in an In Slip, the Purchase Order number in a Receipt, and the destination
Store in an Out Slip. In a few cases, these fields will also be automatically
filled in by XpertMart.
Customer/Vendor Subform
Directly below the header in the transaction screen is the Customer/Vendor
Subform. Recall that a subform is
an embedded catalog. This subform gives you the option to select either
a Customer or Vendor. If you consider that all transactions are either
adding or subtracting items to your inventory, this makes a lot of sense
since those items all have an origin (they come from a Vendor or, in the
case of Returns, from a Customer) and a destination (usually a Customer
but, in the case of a Return Receipt, a Vendor). The exception is In Slips
and Out Slips which involve moving items from one store to another. In
these cases, teh store is defined through a drop-down menu in the Header.
The Customer or Vendor subform is a Look-Up
by Example Menu which means that you can type in a search directly
into the name field. In the example below, the user has typed the letter
"J" into the Name field and all customers whose last name begin
with "J" appear. (Note that the Look-Up by Example Menu is case-sensitive).
![]()
The set of possible customers would be restricted to Elizabeth Jill and Margarita Jimenez if the user had entered "Ji" into the Name field. Once you select a customer from the Look-Up by Example Menu, the rest of the fields will be filled in by any data in the Customer Catalog, as shown below:
![]()
If the Customer or Vendor is not already in the Catalog, you can open the
Customer or Vendor catalog by pressing the zoom
button to the right and add their data then. When you are done, save
your changes and close the catalog. You will return to the transaction
screen with the Customer or Vendor data filled in.
Items Area
The Items Area is the heart of the transaction, it is where you specify
which items are being added
or subtracted from inventory. There are five ways to enter an item
into a transaction:
1) By entering the Item Number in the Number field;
2) By scanning the bar code of an item;
3) By opening the Items Catalog (by pressing F5) and selecting an item;
4) By opening the matrix of style (by moving the cursor over an item already
in the Items Area and pressing F4) and inputting a quantity in the cell
corresponding to an item; and,
5) By downloading item data from a PDT (by pressing F11).
Once you enter an item into the transaction screen by any of these five methods, XpertMart will automatically fill in other information about that item such as the Style it belongs to, its Color, Size, Second Size, and its Price. You can configure which of these attributes will appear in a transaction screen. To lear more, read the Simplifying the Transaction Screen topic.
Once you have entered an item, you then need to specify the quantity and the discount, if any. XpertMart will then calculate and display the Net Price (the price after the discount) and the Extended Price (the Net Price multiplied by the Item Quantity) automatically. Note that you can specify the discount as either a percentage or dollar quantity.
In the example below, the user has entered Item Number 144 and has specified an Item Quantity of 2 and a Discount of 10%:
![]()
You can configure XpertMart so that when you enter the same item into a transaction more than once, it is automatically grouped on one line and the Item Quantity is adjusted accordingly. For example, if you enter Item 144 with a quantity of 2 and three lines down you again enter Item 144 with a quantity of 1, rather than have Item 144 appear on two lines, you will see it appear on one line with an Item Quantity of 3.
If you need to delete an item from the Items Area, simply move the cursor over that item and press the <Del> or <Backspace> keys.
You can always look up the stock of an item while doing a transaction.
If you want to see the stock of a particular item, press <Alt> and
<F4> at the same time and the XpertMatrix for the entire style the item belongs to will open.
Alternatively,
press <Ctrl> and <F4> at the same time and a
small window will appear displaying the stock of only the item
you have selected, as shown below:
![]()
You can change the order in which the columns appear by clicking on a column and dragging it to the desired location on the screen. You can also adjust the width of any column by clicking on the edge of a column and moviing it to the desired width. In the example below, the order of the "Qty" column has been moved and the size of the "Style" and "Size" columns has been modified:
![]()
The changes you make to the on-screen display of the Items Area have
no impact on the way the transaction is printed since the format is predetermined
according to the printer driver you have selected in the Configure
Documents menu.
Transaction Footer
The footer of the transaction varies according to the type of transaction,
but at a Minimum includes a summary of the Items Area, including the total
Number of Items, the Total Price (in the case of Invoices, Sale Orders
and Retunrs) or Cost (in all other transactions) and any applicable Tax.
These fields appear in gray as they are automatically filled in by XpertMart.
Every transaction footer also includes a Notes area where there is no restriction on the quantity of text you can enter.
The other elemens of the footer vary according to the transaction but
can include payment fields in the case of a Sale (shown below), fields
to specify Delivery and Cancel dates in the case of a Purchase Order,
and fields to specify the invoice number and date of a vendor in a Receipt.
ice:
![]()
Documents
When you have finished a transaction and pressed F12,
a record of the transaction is stored in the system as a Document.
Each document is stored in a Catalog, along
with other Documents of the same type. You can open one of these Document
Catalogs from the Main Menu if you need to consult a prior transaction:
Once you've opened a Document Catalog, you can use the toolbar at the top of the catalog to find the document (or prior transaction) you are looking for. You can do a quick query or look-up by example in the date field to narrow your search to the transactions done a certain date.
Once you've found the document you are looking for you can always reprint
it (by pressing the ![]() button at the top). You can also
print out bar code labels for every item in the Items
Area of the document by pressing the
button at the top). You can also
print out bar code labels for every item in the Items
Area of the document by pressing the ![]() button).
button).
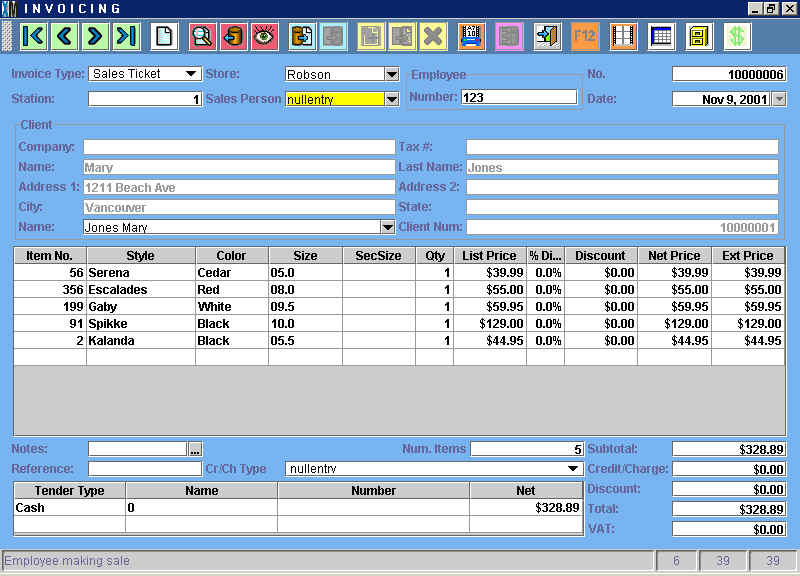
The following is an example of a transaction done November 9, 2001 that is now stored as a document in the Invoicing Catalog:
Copyright © 2002 XpertMart
* Return to Table of Contents*