Receipts
Chapter Topics
Configuration Options
Linking a Receipt to a Purchase Order
Items, Costs & Discounts
Vendor's Invoice Number
Vendor's Invoice Date
Payment Terms
Days Credit
Configuration Options
You have a choice in deciding how strict your level of control will be
when receiving merchandise. The choice is made through the configuration
settings found in the Receipts
tab of the Station
Configure menu. Refer to the Configuring
the Remote Station topic to learn more about these configuration
settings before reading this chapter.
At one extreme, you can choose to only allow Receipts to be made if there
is a corresponding Purchase Order to
receive the merchandise against. Only the items and quantities on the Purchase
Order will be allowed on the Receipt. This way the Purchase Order
acts like a gatekeeper and keeps unwanted items from reaching your warehouse/stores.
This level of control is necessary if you have unscrupulous vendors who
will try to unload merchandise on you that you have not ordered. (You would
be surprised to find out how many vendors actually do this! You can bet
that most vendors know which retailers have no control over their
receiving-- when they cannot fulfill an order, which retailer are they going
to send the wrong merchandise to? The one that closely tracks Receipts against
Purchase Orders or the one that doesn't use Purchase Orders?)
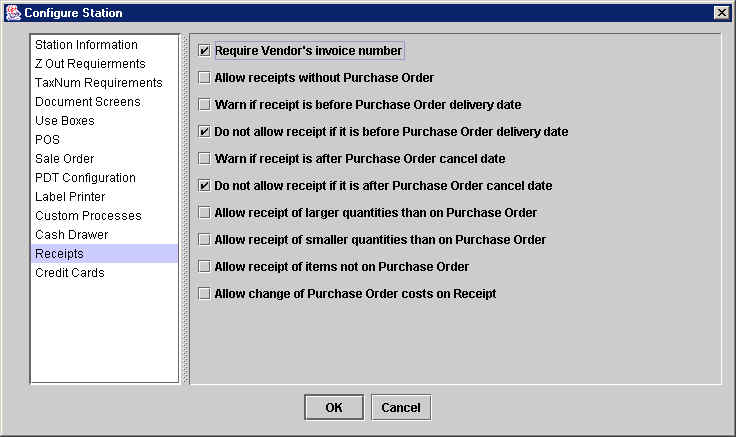
To ensure this strict level of control, make sure you do not select the
"Allow Receipts without
Purchase Orders" option. Your configuration settings would
look like this:
A second, intermediate option is to use Purchase
Orders but use them mainly for informative purposes. The information on
the Purchase Order will be helpful in filling out the Receipt but will not
restrict you when you differ. This level of control is ideal if you have managers
in the warehouse/stores that you can trust to use their own discretion when
receiving items you have not ordered from a vendor.
To setup this intermediate level of control, once again you would not select
the "Allow Receipts without
Purchase Order" option, but you would allow the Receipt to contains quantities, items and costs that are different
from those on the Purchase Order. Your configuration settings would
look like this:

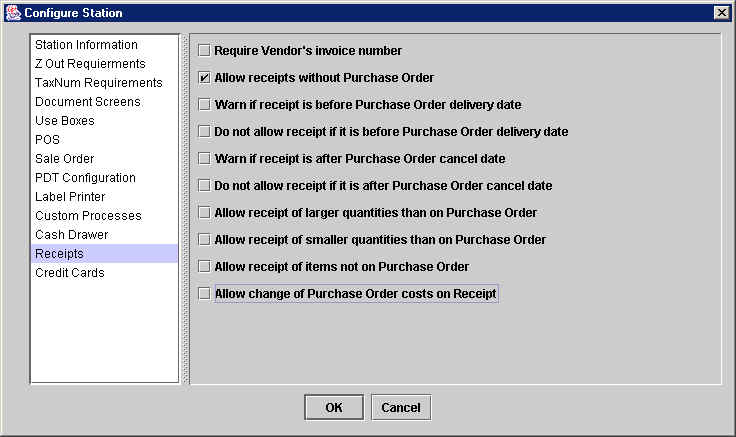
At the other extreme, you could allow receipts to be made without a prior
Purchase Order, effectively setting up a receiving system with little control.
If you do this, you are placing a lot of trust in your vendors and that the
invoices they send you match what you are expecting to receive.
To allow for this level of freedom, all you have to do is select the "Allow Receipts without Purchase
Order" option:
If you select this configuration, you will have no restrictions when making
a Receipt. In that case, the procedure for creating a Receipt is virtually
identical to that for creating a Purchase Order.
The rest of this chapter will address creating a Receipt that is linked
to a Purchase Order, i.e. assumes you have chosen one of the first two levels
of control previously discussed.
Linking a Receipt to a Purchase Order
Assuming you have chosen configuration settings
that require a Purchase Order before making
a Receipt, the way to link a Receipt to a specific Purchase Order is to enter
the Purchase Order number in the "Pur.Ord." field in the header. If you cannot
remember the Purchase Order number, go to the Documents>Purchase Orders
Catalog to find the one you are looking for.

Once you enter the Purchase Order number, XpertMart™
will automatically fill in the rest of the Receipt, except for the Vendor
Invoice and Invoice Date fields. Depending on the configuration settings,
you are then free to edit the values that XpertMart™
has filled-in.
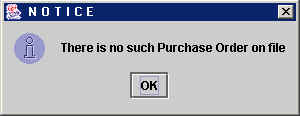
If you select a Purchase Order number that does not exist, you will see
this error message:
Also note that depending on the configuration, XpertMart™ will check to make sure the date of the Receipt (June
9, 2002 in the example above) falls between the Delivery Date and the Cancel Date.
Items, Costs & Discounts
When you have linked the Receipt to a Purchase Order, the items you ordered will
appear in the Items Area. The Order (Ord.) column shows the number of pieces
you ordered for each item. This number cannot be edited since it comes directly
from the Purchase Order. The Quantity (Qty.) column displays the number of
pieces you are receiving. As a default, XpertMart™
will automatically set this number to the number of pieces outstanding, i.e.
those that were ordered but have not been received yet. If your configuration allows,
you can edit these quantities if you are receiving greater or fewer pieces.
In the example below, the user orderd 2 pieces of Item #95 (the Black Rosy
Size 5.0 moccassin) but is only receiving one:

If your configuration
allows you to receive fewer quantities than were on the original Purchase Order, you can receive against a
P.O. more than once. In that case, the quantities you have already received
on prior Receipts will appear in the Received (Recvd) column. In the example
below, the user has already received one pair of Black Rosy Size 5.0 moccassins
and is now, the second time around, receiving another pair:

If your configuration
allows, you can also enter new items into the Items Area of the Receipt.
The Cost comes directly from the Purchase
Order and can only be edited if your configuration allows. Likewise, your
configuration must allow
changes to the cost for you to be able to edit the Discount column, or
for you to enter a Global Discount. The Net Cost for each item is recorded
in the Cost Audit Log and averaged with
the costs of prior receipts to yield the Inventory Cost. The Inventory Cost is
the average cost of an item that is used by XpertMart™ whenever it calculates the margin of an item for a given
Invoice. To learn more, refer to the Costs topic.
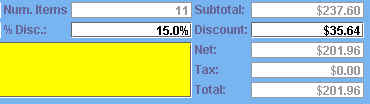
If there is a Global Discount ($35.64), this discount is spread across the
items in the Receipt and taken into account when recording the cost into the
Cost Audit Log. (Though this is not shown
on screen at the time).
Vendor's Invoice
If you set your configuration to require
a Vendor's Invoice Number, you cannot proceed without entering a number into
this field. Note that XpertMart™ cannot check to make
sure the invoice number you enter is correct (since there is no way you could
have this number when making a Purchase Order). However, it can make sure
the field is not left blank.

Vendor's Invoice Date
Enter the date on the vendor's invoice into this field. Most likely,
this date will be different than the date of the Receipt and the date of the
Purchase Order. Use the button to the right of the field to launch the XpertDate™ tool.

Payment Terms
This drop-down menu displays the contents of the Vendor Terms Catalog. Use it to select the
payment terms that the vendor is offering. Usually the payment terms are
either Cash on Delivery, Prepaid, Consignment or Credit.

Days Credit
The Days of Credit field is used when you select Credit as
the Payment Type. Enter the days of credit a vendor is offering inthis field.
Add the number of days in this field to the Vendor's
Invoice Date to determine when this account is payable.

Copyright © 2002 XpertMart
* Return
to Table of Contents*