Chapter Topics
General
Considerations
Configuring
the Remote
Station
Information
Z Out
Requirements
TaxNum
Requirements
Documents
Requirements
POS
Sale
Order
PDT
Configuration
Label
Printer
Custom
Processes
Cash
Drawer
Receipts
Configure
Documents
General
Considerations
To optimize the speed of the system many of
the configuration settings are saved in external files with a .ini extension,
which means that you must close and restart XpertMart™ for changes to take effect. Another important implication
is that these configuration settings are therefore saved separate from the
database. Therefore, if you transport the database to another computer you must
also copy these .ini files or many of the configuration settings will be lost.
Anytime you have one of the configuration menus open you can not execute any other tasks on XpertMart™ until the configuration menu has been closed. If for some reason you lose sight of the configuration window and you try to navigate other menus the program will behave as if it had frozen up. If this happens, press <ALT+Tab> to return to the configuration window and close it.
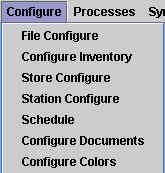
Configuring the Remote
The configuration options for the Remote are
fewer than at the Main. There
are only 6 submenus that appear in the Configure Menu at the Remote in the main
menu (shown below) since configuring Security, Inventory
and adding
a store can only be done at the Main. Schedule is covered in the
Synchronization topic. This chapter will cover Station
Configure and Configure
Documents.
Station Configure
This submenu is used to configure many of the settings behind processes at
the point of sale such as: Sale Orders (layaways) or the Daily Z Out Report, as
well as the functioning of peripherals such as a cash drawer or a portable data
terminal (PDT). This submenu is primarily used at a Remote and
would only be used at a Main if the
same computer functions as a remote. There are 11 tabs that appear listed on the
left under the Station Configure submenu; clicking on one of them will display
the configuration options in the window on the right.
Tab1: Station Information
This tab
contains information about the station being used. The station number is used to
distinguish transactions made on different POS stations when you have more than
one POS station per store. Note that there can be multiple stations within one
store; if there are 4 PCs on a network acting as registers (or "points of sale")
and a fifth PC in a back office, then there are 5 stations at that one store.
Each station should have a unique station number. While XpertMart™ assigns a consecutive number as a default station number, you
are free to use any station number. Some retailers use longer numbers (such as
152348) that have previously been registered with local tax authorities as the
station number.
XpertMart™ uses the station number when generating ticket serial numbers and for printing Z-Outs and certain specific reports as it is assumed that there is a separate printer for each station. If you are going to change the station number, be sure to check with the other users to ensure you are not duplicating a station number. In the example below, the user is at station number 17.
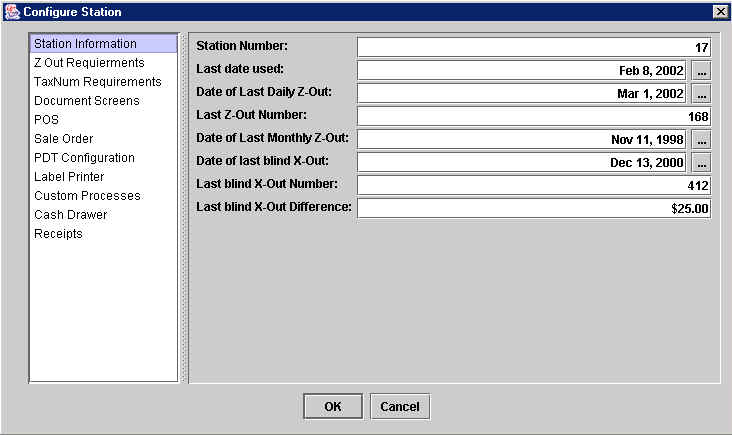
The last date used field dispays the last time a user logged into XpertMart™ to use this station (February 8, 2002 in the example above). The date acts as a safeguard: XpertMart™ does not allow you to make a transaction for any date earlier than the date shown. In the example above, the user cannot simply change the system date and time in the Operating System and then enter XpertMart™ to make a transaction for February 7th. If you try to make a transaction for an earlier date, XpertMart™ will display this error message:
![]()
This security mechanism is in place to make sure cashiers and other store personnel are not retroactively editing a prior's day sale. The date displayed in this field can be edited (assuming the user has the proper security clearance) by pressing the browse button to the right of the field.
The dates of the last Daily Z-Out and Monthly Z-Out are also displayed in this window. XpertMart™ can be configured (see the next tab: Z Out Requirements) to only allow transactions for the day immediately following the last Daily Z-Out. This is a way of "forcing" cashiers to run daily Z-Out reports since in some countries it is a requirement of the tax authorities to control all ticket sales with definite Z-Outs at the end of each day. In the example above, you would only be able to make a transaction if it were March 2, 2002 since the Date of Last Daily Z-Out is March 1st. If it were any other date, you would have to edit the date of the last Daily Z-Out (for example, if the store is closed on a Sunday, then you would have to move the date forward when opening on a Monday to begin making transactions). Note that whenever you run a Montly Z-Out, XpertMart™ automatically moves the Date of Last Daily Z-Out to coincide with the Date of Last Montly Z-Out. The serial number of the last Daily Z-Out is also stored and displayed in this window.
Similarly, the Date of the Last Blind X-Out and its serial number are displayed in the Station Information window. Additionally, the difference (if any) between the total amount reported and the amounts recorded from transactions in the last Blind X-Out is displayed. To learn more about the difference between Z-Out reports and X-Out Reports, read the Z-Out topic and the X-Out topic.
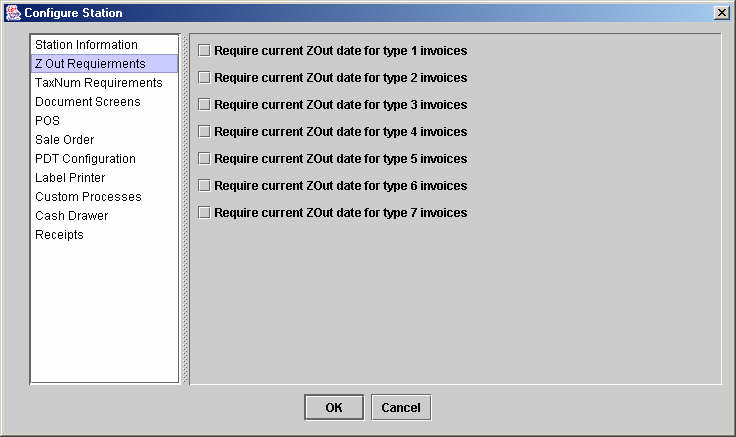
Tab 2: Z Out Requirements
Use this tab if
you want to make running a Daily Z-Out mandatory. This window lets you specify
if the system will require a current Z-Out date (meaning invoices can only be
made for the day immediately following the last Daily Z-Out displayed in the Station
Information tab) for up to seven invoice types. This gives you the
flexibility of requiring a current Z-Out date for only those invoices that meet
certain fiscal requirements versus those that do not need to comply with these
requirements, such as a layaway ticket or Sales Order.
The invoices types are are those found in the Invoice Types catalog as shown below:
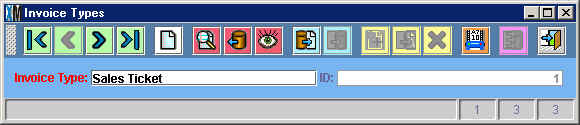
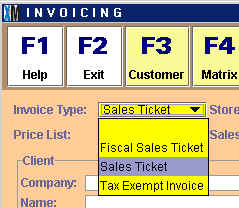
Type 1 refers to the registry in the Invoice Types catalog with an ID of 1 (Sales Ticket in the example above). Selecting the Require current ZOut date for type 1 invoices checkbox means that every time the user wants to make a sales transaction using a Sales Ticket as the Invoice Type, the Z-Out date must be current (i.e. the Date of the last Daily Z-Out must be exactly the day before today's date). The Invoice Type is chosen in the Invoicing screen at the point of sale using a drop-down menu as shown below:
If you select an Invoice type that you have previously configured to require a current Z-Out date, and the Z-Out date is not current, then you will receive an error message when you try to print a sales transaction, or invioce:

Unless you are in a country or tax jurisdiction that requires you to run daily Z-Out reports, you probably do not want to require current Z-Out dates as it can be inconvenient to require your cashiers to keep the Z-Out reports current and in some cases can slow down the time it takes to process the first sales transaction of the day. In that case, you want to leave all of the checkboxes unselected as shown below.
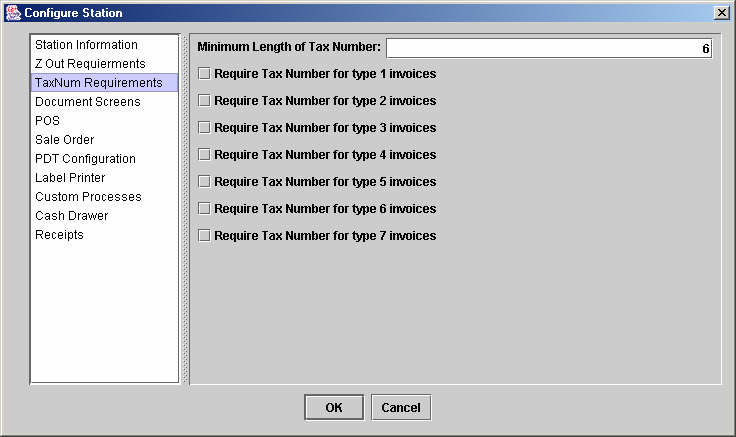
Tab 3: TaxNum Requirements
Some
countries or tax jurisdictions (particularly those that use a Value Added Tax or
VAT) require that customers have a valid Tax Number for them to receive a
certain type of invoice (usually one that breaks out the VAT from the total
price). If you are operating in one of those jurisdictions, then you can use
this window to require a Tax Number from any customer who is asking for a
certain type of invoice. As with the Z-Out
Requirement discussed earlier, this window gives you the flexibility to
require the customer number for only some Invoice
Types and not others.
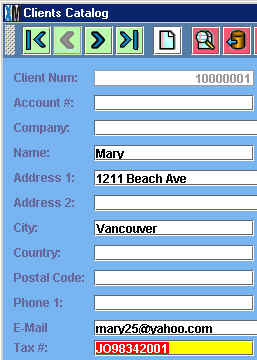
The Tax Number is a number that is assigned by the presiding tax-collecting authority and can be stored in the Client Catalog as shown below (highlighted in red):
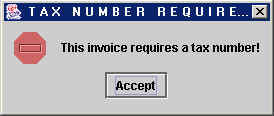
When you have configured XpertMart™ to require a Tax Number for a certain type of invoice, the customer must always have a Tax Number for the system to process the sales transaction. Otherwise you will see this error message when you try to print the Invoice:
You can make the system even more secure by specifying the Minimum Length of the Tax Number. This a way to keep customer's from giving a phony tax number at the point of sale. Usually the Tax Number has a standard format and therefore a minimum character length. While no system is fool-proof, this way any customer intent on deceit would at least have to come up with a convincing-enough Tax Number that is of the same format as legitimate ones. This way retailers have a measure of protection as they can show the tax authorities that they have a system in place to prevent fiscal fraud.
In the example below, the Minimum Length of the Tax Number is 6 characters. If the customer gives a tax number with 5 or less characters, you will see the same error message shown above. If you wish to disable this requirement, simply set the Minimum Length of Tax Number to 5.
Tab 4: Documents Screens
XpertMart™ gives you quite a bit of flexibility in configuring the
Graphical User Interface (GUI) or appearance of the system. The options in this
tab let you configure the appearance of screens when making transactions, or Documents.
The first two options at the top of the window let you configure whether the
Style Purchase Description and the Second Size are displayed in Document screens
such as Invoices and Receipts. If you would like these two style characteristics
displayed, then select the checkbox to the left of the fields.
This is a closeup of the details section of the Invoicing screen when you have selected to show the Style Purchase Description and the Second Size:

This is what it looks like when you don't show the Style Purchase Description or the Second Size:

As you can see, choosing to include the Style Purchase Description and the Second Size makes the screen appear more cluttered and leaves less room for other cells like Net Price and Discount. On the other hand, if a big part of your business is selling merchandise with second sizes (for exampe, men's suites) then you probably want to include one or both of these style characteristics on screen.
The Show prices with VAT option does not alter the appearance of the screen; rather, it determines whether the price that is shown includes the Value Added Tax (VAT) or not. Some countries require that all prices displayed include the VAT already while retailers obviously prefer to show prices without taxes to make it clear to customers how much goes to them and how much goes to government coffers.
The dimensions of the XpertMatrix™ are configurable. XpertMatrix™ is the Style/Size/Color/Second Size/Store matrix that
displays the stock of a style and is typically opened by pressing this
button: ![]() .
.
Width of Matrix titles is the size, measured in pixels, of the titles at the
top of the matrix: ![]()
Width of Matrix columns is the size of the of the invidiual columns in the
matrix: ![]()
Width of Matrix totals is the size of the Total column at the far right of
the matrix: 
The recommended sizes are 120 for the Matrix titels, 70 for the columns and
70 for the totals, as shown below. It is important to use the same width for
your columns as for your totals. 
If you select the Group identical items on the same line option, then all entries of the same item in a document will appear on one line. For example, if you are making an Out Slip and you enter a quantity of 2 for item #441 and further down in the Out Slip you enter a quantity of 1 for the same item (#441), then there will be a single line in the Out Slip showing a quantity of 3 for Item #441. Otherwise, if you do not select this option, then two separate lines will appear in the document, one showing a quantity of 2 and another a quantity of 1.
The last four options in the window are there to allow you to speed things up when doing Adjustments, Counts, Receipts and Slips--documents that usually carry a high volume of items. If the four checkboxes remain selected, then every time you scan a new item into one of these documents you have to also enter the quantity. If the checkboxes are unselected, however, then XpertMart™ will assume the quantity is 1 and will automatically move to the next line in the document. So if you were scanning 20 different items into a Count Sheet, for example, you probably would not want to select the Key in quantities on Counts checkbox. Otherwise you would have to interrupt the scanning after every item to enter a "1" in the quantity column.
Tab 5: POS
This window contains several
configuration options that impact the way a sales transaction is done at the
point of sale.
Use dual currencies: Select this option if you want to receive payment and give change in two currencies. This option is particularly useful in countries that have declared two currencies as legal tender (such as El Salvador and Ecuador that have officially dolarized) or stores in tourist regions that want to be able to accept two currencies (such as gift shops in Niagra falls that accept both US and Canadian dollars). If you are going to use this option, you need to make sure that the two currencies you want to use are in the first two registers of the Currency Catalog. The currency with ID = 1 in the Currency Catalog will be your base currency and the currency with ID = 2 will be the dual currency. In the example below, the Euro is the dual currency and has an exchange rate of 1.15 Euros to the US Dollar (which is in the first register, ID =1).
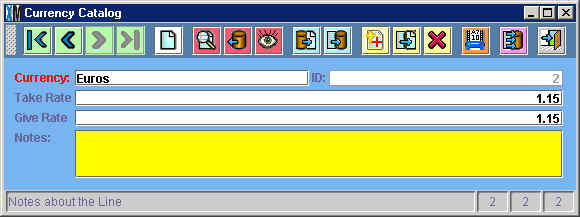
The rest of the registers in the Currency Catalog can be filled in normally and can be used to accept payment in foreign currency at the point of sale. However, only with the dual currency (ID = 2) can you receive payment and give change interchangeably with the base currency. (If you have any doubts as to which currency belong to ID 1 or ID 2, you can always use the XpertQuery™ function to check). When you select Use dual currencies, when you reach the payment stage in an Invoice, XpertMart™ will automatically caluclate the amount that remains to be paid in both currencies. You will notice that in the payment detail section at the foot of the Invoice there is now a new column called Currency where you can select either of the two currencies. When you enter an amount, XpertMart™ will convert the amount being paid into the base currency (using the Take Rate field in the Currency Catalog) and display it in the Net column. In the example below, the customer is paying $100 US Dollars which is a net of $100 US Dollars and is also paying $66.60 Euros and is a net of $57.91 US Dollars (based on the 1.15 Take Rate specified in the example above).

When you are ready to print the invoice and press <F12> you will see the XpertMultiChange™ window which displays the amount due in both currencies and the change to give in both currencies.
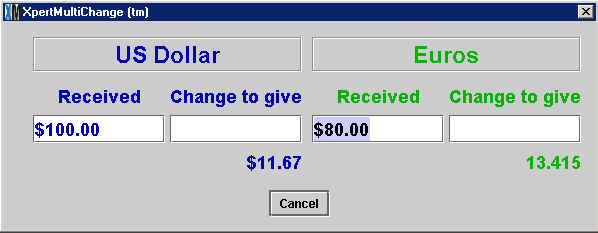
In the example above, the customer is handing the cashier $100 US Dollars and $80 Dollars and the cashier has the option of returning $11.67 US Dollars in change or $13.415 Euros in change.
Lookup credit card names from numbers: If you select this option, XpertMart™ will be able to identify the type of credit card a customer is using based on the credit card number entered at the point of sale. For this option to work, you need to fill in the Begin Range and End Range fields in the Credit Card catalog. In the example shown below, the Begin Range for American Express is 300000000000000 and the End Range is 399999999999999. This means that any credit card number falling between these two numbers will be automatically identified as an American Express card.
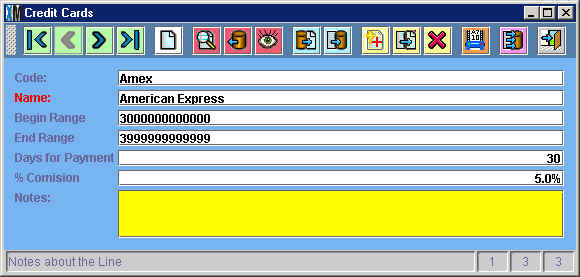
In the example below, the customer is paying with a credit card. When the cashier enters the number (3632546974004) and presses <Enter>, the words American Express will appear in the name field.

Looking up credit card names from numbers will save you time at the point of
sale and can curb credit card fraud.
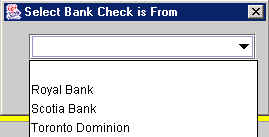
Capture bank names for checks: If you select
this option, you will be required to choose a Bank from a drop-down menu (shown
below) whenever you accept Checks as a Payment Type. If you do not select this
option, then no drop-down menu will appear and you do not have to capture any
additional information about the checks you are receiving. This will speed up
payment processing at the point of sale but widen the opportunities for
fraud.
Use cash as default payment: If you select this option, then XpertMart™ will use cash as the default Tender Type when you press <F10> in the Invoicing screen. If you do not select this option, then you will need to specify the Tender Type every time you make a transaction from the payment types catalogue. Selecting this option will save you time at the point of sale if most of your customers are paying cash.
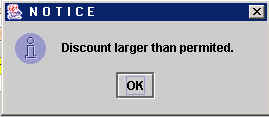
Limit item discounts: Select this option if you want to place a maximum limit on discounts that can be applied to invidual items. If you select this option, then you will receive this error message whenever you enter a discount larger than the percentage entered into the Maximum Item Discount field:
Limit global discounts: Select this option if you want to place a maximum limit on discounts that can be applied to the entire invoice (in addition to item discounts). If you select this option, then you will receive an error message whenever you enter a discount larger than the percentage entered into the Maximum Global Discount field.
Use discount reasons: If you select this option then cashiers must select a reason for giving a discount from a drop down menu. The contents of the drop down menu are taken from the Discount Reasons Catalog. Using this option can help you track why you are giving discounts at your stores and potentially help you crack down on unauthorized discounts.
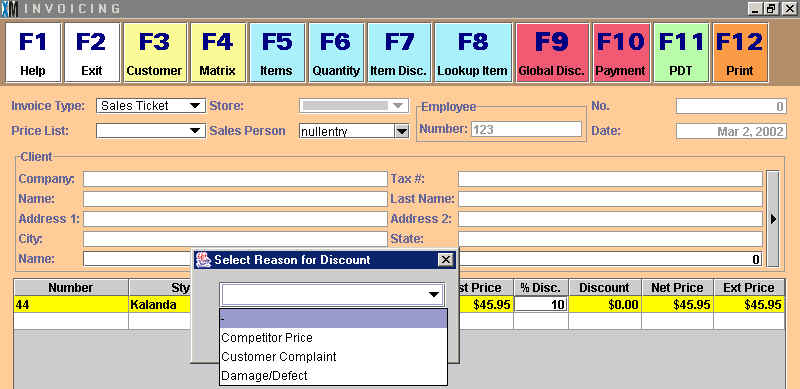
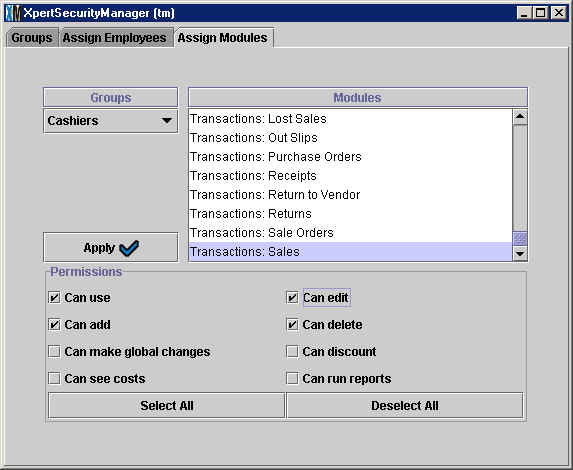
Allow managers to authorzie discounts: If you select this option then managers can authorize a discount at the point of sale even when the cashier does not have permission to do so. The ability to give discounts is controlled through the XpertSecurityManger™ (see Security topic for more details). In the example below, the Cashiers Employee Group do not have authorization to give a discount as the Can discount option has not been selected:
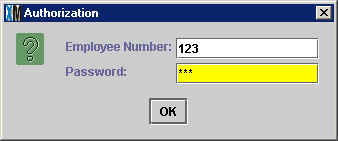
In this case, when the cashier tries to give a discount at the point of sale, an authorization screen will pop where a store manager (who does have permission in the XpertSecurtiyManager™ to give discounts) can enter his or her employee number and password to approve the discount as shown below:
Note that the previously configured Maximum Item Discount and Maximum Global Discount limits still apply. A manager will only be able to discount up to the maximum level permitted. Once a discount is approved, a cashier can always lower the discount but can never increase the discount. If the manager does not have permission to authorize the discount (or if he entered his employee number and password incorrectly), the following error message appears:

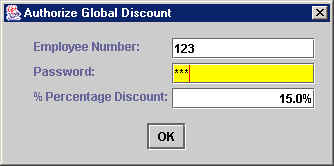
When authorizing global discounts, the authorization window includes a field to enter the desired global discount as shown below:
Use Zout date for documents: Use this option if you want to
keep a strict control over Daily Z-Out
reports. If you select this option, the date appearing on all documents will
automatically be the day after the Date
of Last Daily Z-Out. If the date of the last Daily Z-Out is March 1st, 2002,
then the date appearing on all documents such as invoices will automatically be
March 2nd, 2002. By selecting this option, you are forcing cashiers to stay
current with their Z-Out reports, otherwise they will not have the right date
showing up on their documents. This is an extreme step to take and most
retailers will want to preserve the flexibility of being able to make documents
on the fly without a prior Z-Out report in some cases.
Require sales clerk on invoices: This
option requires you to choose a sales clerk from the Sales Person drop-down menu
at the Invoice screen. Select this option if commissions are essential to your
business and you want to makes sure every single sale is credited to one of your
sales clerks. (Refer to the Commissions topic for further information). If you
select this option and try to make an Invoice without first selecting a Sales
Person, you will see this error message:

Allow changing employee on invoice: Selecting this option
allows a different user to Login in the
middle of a transaction. This
is useful if you need to switch to a user that has a higher Security clearance when
doing a transaction.
Assume logged in employee is sales
clerk: If you select this option, XpertMart™ will
automatically assume that the employee who is logged in is also the sales clerk
to whom the sale will be credited. When you select this option, the same
Employee number will appear in the Sales Person and Employee fields in the
Invoice screen, as shown below:

Note that the Sales Person field is not grayed out, i.e. you can still enter
a different Employee Number in this field.
Tab 6: Sale Order
If you are going to
be taking Sale Orders, or layaways, then you need to set the configurations in
this window. To begin with, you need to decide if you are going to deduct the
item from your stock on hand when you receive the first layaway payment or only
after receving full payment for the merchandise. The advantage of deducting the
item from stock after the first payment is that you eliminate the risk of
accidentally giving the merchandise to someone else. The disadvantage is that if
you do a physical inventory you run the risk of overcounting layaway items that
have been deducted from stock. Both of these problems can be easily resolved,
however, by taking care to store layaway items in a separate room or corner of
the warehouse. If you want items immediately deducted from inventory, then
select the checkbox to the left of Deduct from stock upon first making layaway.
The next decision you need to make is when the sale is registered: after the first layaway payment, when the final layaway payment has been made, or treat each layaway payment as its own sale. If you select the first option, Show sale upon first making layaway, then the sale will be filed in the Documents>Invoices Catalog even though you have yet to receive full payment for that sale. If many of your customers are defaulting on their layaway payments and you are having to cancel these sales, then this is not a good option to choose.
If you select the third option (shown below), then the sales is not recorded until you receive full payment. In the meantime, the transaction information is store in Documents>Sale Orders and is only moved to Documents>Invoices when there is no balance left to pay. (For more information, see the Sale Orders topic). This is the most conservative course as it eliminates the risk of counting sales that may not be completed, but requires more care when tallying-up the money received at the end of the day as some of it will not have a corresponding Invoice, but only a new payment entry in the Sale Order.
The middle option, Show sale upon each payment, treats every layaway payment as a sale and creates an Invoice for each payment. While this option makes it slightly easier to track your intake of money, it is not recommended to have Invoices for fractions of merchandise since it makes future inventory changes (such as a return) more complicated.
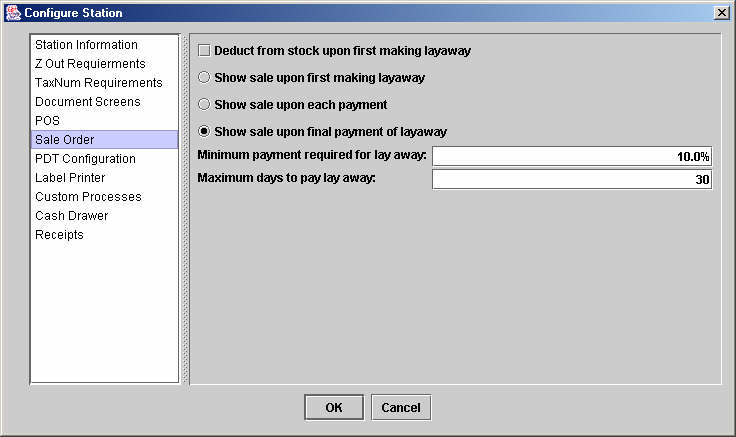
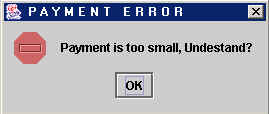
Finally, you need to specify the minimum payment required for a layaway (expressed as a percent of the total) and the maximum days to pay for a layaway. These are matters of store policy but a 10% minimum payment and a 30 day payment period are generally good benchmarks. If a customer tries to make an initial payment lower than the minimum, the system will display this error when you try to print the layaway ticket:
The value you enter in the Maximum days to pay layaway field is used to calculate an expiration date for the layaway which is displayed in each layaway found in the Documents>Sale Orders catalog. While XpertMart™ will allow you to receive a layaway payment that is after this expiration date (since more retailers are happy to make a sale), you can use this expiration date to periodically purge your Sale Orders by running a report showing layaways that have expired.
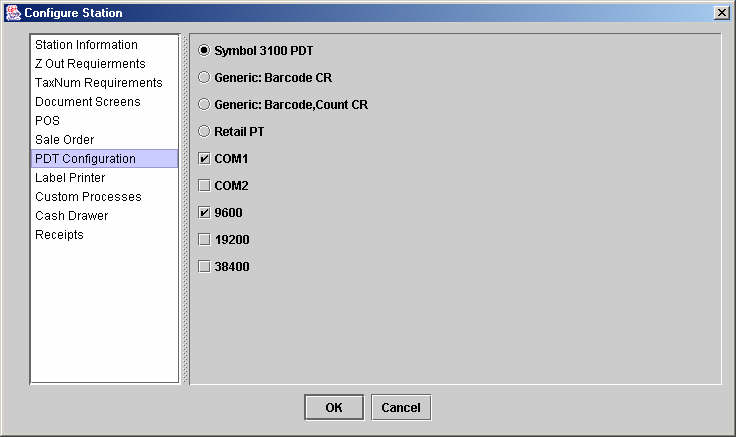
Tab 7: PDT Configuration
Use this tab to
define the characteristics of the Portable Data Terminal (PDT) you will be using
when counting large quantities of merchandise. The first four options are for
you to select the type of PDT you are using, ranging from the Symbol 3100 (the
most widely used PDT on the market) to more generic models. Contact your
XpertMart™ Dealer if you are unsure which option to select.
Next, you will need to select the communications port you will be plugging the PDT into to download data, as well as the transmission speed expressed in Bauds per second. Consult your PDT manufacturer's manual for this information.
In the example below, the user is using a Symbol 3100 PDT which plugs into the COM1 port and transmits data at 9600 Bauds per second.
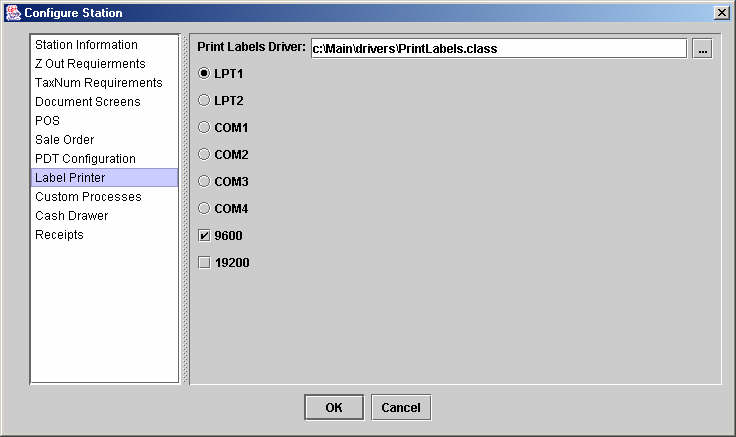
Tab 8: Label Printer
Use this tab to
configure your bar code label printer so that it can receive data from
XpertMart™. To begin with, you will need to specify the
printer driver you will be using. This is a file with a .class extension found
in your C:Main\Drivers
directory and usually contains the word "label" as part of its name. Contact
your XpertMart™ Dealer if you are unsure of which printer
driver to use for your model of bar code label printer.
Next, you will need to define which data port you will be plugging your label printer into. There are six possible option, though LPT1 is the most popular. You will also need to define the transmission speed, expressed in Bauds per second. Consult your laber printer manufacturer's manual for this information.
In the example below, the user is using the "PrintLabels.class" printer driver and the bar code label printer is plugging into the LPT1 port at a speed of 9600 Bauds per second.
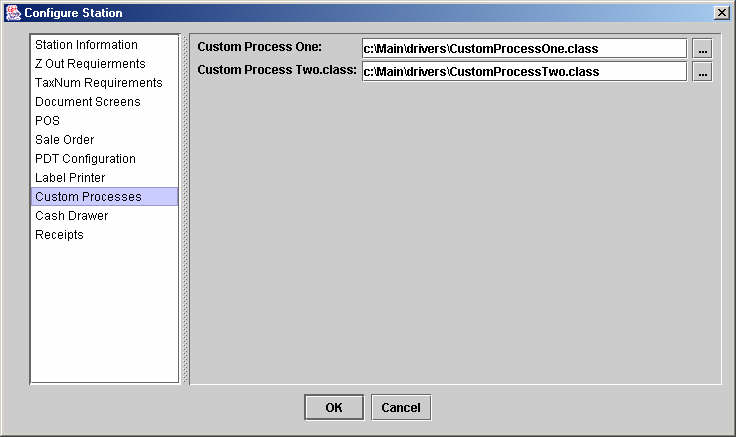
Tab 9: Custom Processes
Occasionally an
XpertMart™ customer requests a cutomized process which
requires printing an output to a point of sale ticket printer. (This is usually
because the customer is trying to replicate the fucntioning of old cash
registers with a modern computer system...but everyone is entitled to use the
software however they please!) In these cases this window is used to define the
printer driver the custom process will use. These printer drivers are designed
on a case by case basis at an additional charge. Contact your XpertMart™ Dealer if you are interested in your own custom process.
Otherwise, feel free to ignore this screen.
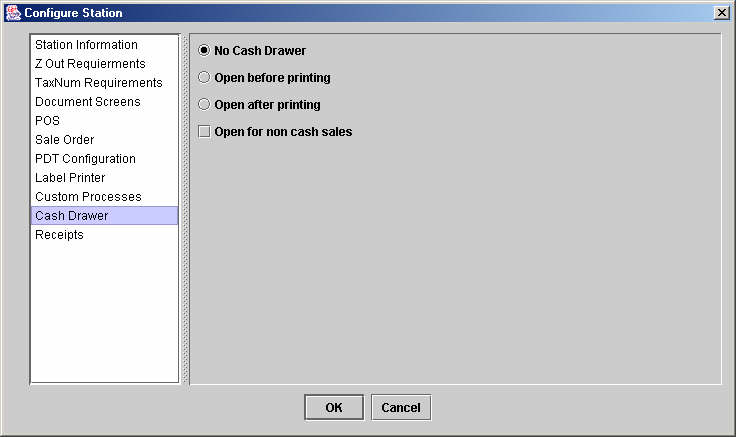
Tab 10: Cash Drawer
If you plan on using
an electronic cash drawer, you need to define whether you want the drawer to
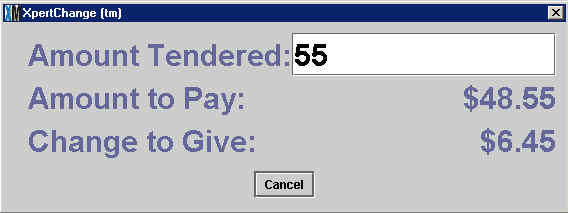
open before the sales ticket prints or after it begins printing. Normally when
you are ready to print a sales ticket and you press <F12> at the
Invoicing screen the XpertChange™ window (shown below)
appears displaying the total amount due. When you enter the amount tender and
press <Enter>, the change due will appear in the window. At this
point you can still edit the amount tendered or even press <Cancel>
to close the window and modify the transaction. When you press
<Enter> a second time, the sales ticket will begin printing, and
you can no longer modify the XpertChange™ window. When the
printing is done, the XpertChange™ window disappears.
If you select to Open before printing, then the cash drawer will open when the XpertChange™ window appears. This way the cashier can enter the amount tendered and still see the change he or she needs to make in the XpertChange™ window. When you press <Enter> the secoond time, the ticket will begin printing but you no longer need the XpertChange™ window since you've already made change.
If you select to open the cash drawer after printing the ticket, then the cash drawer will only open after the XpertChange™ window has appeared and you've pressed <Enter> for the second time. At this point you can no longer edit the amount tendered or the resulting change due. This option is more secure but is less flexible if you make a mistake entering the amount tendered. If you select this option, you need to pay more attention to the money being handed to you since the cash drawer only opens after the printing has begun.
As a security precaution, the cash drawer only opens for cash transactions. However, you can choose to have the cash drawer open for all transactions (by selecting the Open for non cash sales option) if, for example, you want to store checks or credit card stubs in the drawer. However, since this increases the opportunities for theft, using a media slot or an alternative storage space is recommended instead. The best approach is to have the cash drawer only open for cash sales.
If you are not using a cash drawer then select the No Cash Drawer option as shown below.
Tab 11: Receipts
The strictest form of
inventory control calls for only allowing the receiving of merchandise that has
previously ordered with a vendor. The options in this tab allow you to do just
that.
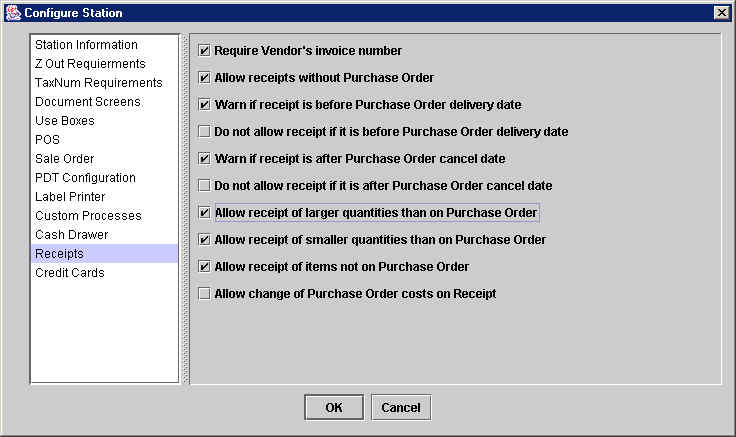
Require Vendor's invoice number: If
you select this option, then you can only print a Receipt if you have entered
the Vendor's invoice number in the required field, shown below: ![]()
If you do not enter the Vendor Invoice Number then you will see
this error message when you try to print: 
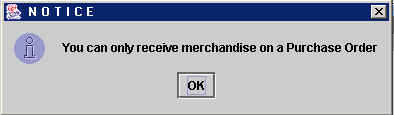
Allow Receipts without Purchase Order:
If you do not select this option, then you will only be able to start a new
Receipt once you have entered a valid Purchase Order in the required field,
shown below: ![]()
If
you do not enter a Purchase Order Number, then you will see this error message
and will not be able to continue until you enter a Purchas Order Number:
Furthermore, if the Purchase Order Number is not valid, you will
see this error message: 
Therefore, if what you are interested in is maximum control over the
merchandise being received in your warehouse, you should leave this option
unselected. Of course you lose the flexibility to receive new merchandise that
was not ordered, but it is usually worth the tradeoff to be able to keep a close
watch over your vendors and make sure they are only sending you the merchandise
you ordered.
Warn if receipts is before Purchase Order
delivery date: If you select this option, then you will see a window
warning every time you are creating a Receipt for merchandise on a date prior to
the delivery date specified in the Delivery Date (shown below) on the Purchase
Order. ![]()
The window that appears (shown below) is merely a warning and can be
bypassed by pressing <OK>. The window will only appear if you have
linked Receipts to Purchase orders by not selecting the Allow
Receipts without Purchase Orders configuration option.
Do not allow receipt if it is before Purchase Order delivery
date: If you select this option, then rather than seeing only a warning
window, you will see this error message which means you cannot proceed with the
Receipt: 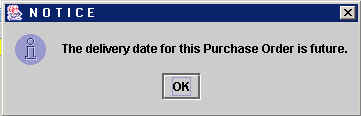
Usually receiving merchandise before the delivery date is merely
inconvenient and therefore a warning should be just fine. Most retailers will
want to be able to receive merchandise before the delivery date.
Normally you would chose to either have the system warn you if the date is
before the delivery date on the P.O. or to choose to not allow these receipts.
However, if you choose both options, you will first see the warning
and then see the error message indicating you cannot proceed further.
Warn if receipt is after Purchase Order cancel date: If
you select this option, then you will see a window warning every time you are
creating a Receipt for merchandise on a date after the cancel date specified in
the Delivery Date (shown below) on the Purchase Order. ![]()
The window that appears (shown below) is merely a warning and can be
bypassed by pressing <OK>. The window will only appear if you have
linked Receipts to Purchase orders by not selecting the Allow
Receipts without Purchase Orders configuration option. 
Do not allow receipt if it is after Purchase Order cancel date: If you select this option, then you will see an error message and cannot proceed with the Purchase Order because it is after the cancel date. Cancel dates are used to control seasonal merchandise (for example, to make sure the winter coats do not arrive in the spring) so it is usually a good idea to keep vendors under strict control. Most retailers will want to restrict Receipts if they are after the cancel date.
Allow receipt of larger quantities than on Purchase Order: If you select this option, then you can receive larger stock than what was originally on the Purchase Order. Note that you cannot receive items that are not on the original Purchase Order, but you can receive more of the items that are on the P.O. (for example, receving 6 instead of the original 4 you ordered). Retailers will probably want to give warehouse managers the discretion to receive additional stock of a particularly popular item they know will sell quickly. If you do not select this option, you cannot edit the quantity column in the Receipt.
Allow receipt of smaller quantities than on Purchase Order: If you select this option, then you can receive fewer items than were originally on the Purchase Order. You will most likely want to select this option since you can always receive against a Purchase Order multiple times. If you do not select this option, you cannot edit the quantity column in the Receipt.
Allow receipt of items not on Purchase Order: If you select this option, then you will be able to receive any item, regardless of whether it was on the Purchase Order. Selecting this option is not recommended as it leads to a loss of control over the merchandise entering your warehouse.
Allow change or Purchase Order costs on Receipt: If you select this option, then you will be able to enter a different cost for merchandise than the one on the original Purchase Order. Most retailers will want this flexibility to account for special circumstances that would change the cost such as special shipping charges, unusual taxes or sudden price increases not covered by an agreement with the vendor.
Configure Documents
Use this submenu to define the printing format XpertMart™ will use for the different document types. On the left side if
the screen you can see a list of all the document types: Invoice Format,
Receipt Format, Return Receipt Format, InSlip Format, OutSlip Format, Adjust
Format, Return Format, Count Format, Purchase Order Format, Cost Adjust Format,
SaleOrder Format, LostSale Format, ZOut Format, Document Printer Port.

The only exception is the last option, Document Printer Port. When you select Document Printer Port you will see on the right side a list of possible ports that your printer can be plugged into, and the speed at which data is transmitted, as shown in the example below.
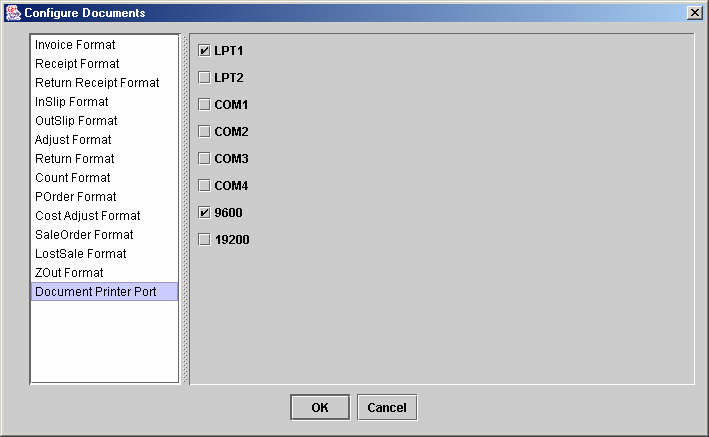
The default printer port is LPT1 and the default transmission speed 9600 Bauds per second. (Note that the Baud rate is applicable only used if you are using a serial port printer; otherwise you can just ignore the transmission speed). If you think your printer uses a different port or speed, consult documentation of your printer to determine the correct setting.
There are two basic printing format options for each of the document types listed on the left. These 2 options appear on the right side of the window when you select any of the document types listed on the left side of the window.
The first option is to use XpertReports™ format. These formats are designed the same way any report in XpertMart™ is designed using the Report Designer Tool Select this option if you wish to print the document in a standard windows type printer (typically 8 ½” by 11” paper) such as Cannon, Compaq, Hewlett Packard. The advantage of this format is that the design is a lot more flexible. Note that these formats are saved as reports and therefore have a .rpt extension after the file name. You can type the file in directly into the first field, click the button on the right to browse through the directories in your computer.
The second option is to use a pre-designed printer driver. These drivers are written in Java, have a .class extension and are used to interface with smaller ticket printers at the point of sale (usually on a 30” roll of paper) and such as the Zebra Eltron. The advantages of this option are that it is much cheaper to print on these rolls of paper (as the length of the paper varies according to the size of the transactions) and customers are more used to receiving documents such as Sale Tickets, Layaway Receipts in this format. The disadvantage is that these can not be edited or modify, except by customizing the actual Java code (offered as a special service to XpertMart™ customers).
NOTE: Typically it is recommended to use the .rpt printer format for documents that require the display of large amounts of information such as receipts and purchase orders, while the .class printer drivers are ideally suited for high volume transactions at the point of sale such as Invoices layaways and return.
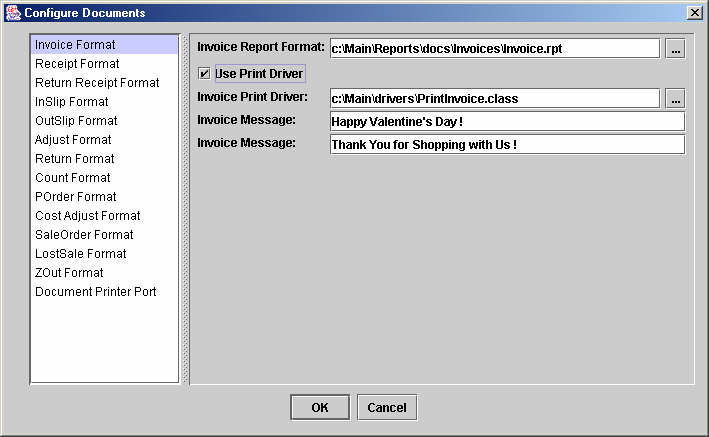
To use the Java printer driver, select the check box to the left of the “Select printer Driver” option and use the field below to specify the location of the driver. There are two additional fields that allow you to add a message at the bottom of the ticket being printed. These are open fields that can be used for seasonal greetings, promotions or other time sensitive information.
In the example below, the user has selected the Invoice.class printer driver located in the C:/Main/Drivers directory and has included the message Happy Valentine's Day" and "Thank You for Shopping with Us” at the bottom of each sales ticket.
Copyright © 2002 XpertMart