Chapter Topics
Overview
XpertQuery™ Toolbar
Database
Tables
Link
Fields
Select
Sort
SQL
Results
Using XpertQuery™ as a Merchandise
Selector
Overview
XpertMart™'s database is an open database which means
that you as the user can make direct queries to the database. While XpertMart™ comes with many tools that are retrieving and organizing
information from the database (reports, audit tables and the XpertMatrix™ are but three examples), you also have the power to access
the database yourself, request specific information and display it in the
order you want using the XpertQuery™ tool.
The Query by Example function, while
very useful, is limited to extracting data from a single database table.
Using XpertQuery™ you can extract data from as many
tables from the database as you'd like. (Every catalog
in XpertMart™ has a corresponding table in the
database). XpertQuery™ lets you consruct
these queries to the database using a graphical user interface.
You will use the XpertQuery™ tool throughout the
system in a variety of ways. If you are searching through a catalog and need
to employ a variety of search criteria that go beyond the scope of a simple
Query by Example then you can press the Query Button ![]() in the toolbar at the top of the catalog to open XpertQuery™ and conduct your search.
in the toolbar at the top of the catalog to open XpertQuery™ and conduct your search.
Any time you are running a process and giving XpertMart™ a set of instructions such as exporting data, making
mass changes to prices and costs,
or modifying large quantities of data using the Replace Where function, the XpertQuery™ screen will usually open up as the last step of the process.
This way you can use the XpertMart™ tool to select
subsets of your merchandise that the instructions only apply to, for
example, limiting the process to certain brands, departments or vendors.
You will also use the XpertQuery™ tool any
time you want to modify or create a new report.
Behind every report is a query to the database. You can view and modify this
query by pressing the Query button ![]() which will open up the XpertQuery™ screen.
which will open up the XpertQuery™ screen.
This chapter is only an introduction to the XpertQuery™
tool. To fully take advantage of all of the features included
in XpertQuery™ prior knowledge of SQL is essential.
Contact your XpertMart™ Authorized Dealer if
you are intersted in learning more about SQL and the advanced features in XpertQuery™.
The XpertQuery™ screen has a standard toolbar at
the top and eight tabs. Each of these components is discussed below.
XpertQuery™
Toolbar
The XpertQuery™ toolbar has the following nine components:
![]() New: Use this button to create a new query. When you press this button
all of the data you have in the Tables, Link, Fields, Select,
Sort, SQL and Results
tabs will be erased. However, the information in the Database
tab will remain the same.
New: Use this button to create a new query. When you press this button
all of the data you have in the Tables, Link, Fields, Select,
Sort, SQL and Results
tabs will be erased. However, the information in the Database
tab will remain the same.
![]() Open: Use this button to open a query that has previously been saved.
You can then modify the query or use it as it is.
Open: Use this button to open a query that has previously been saved.
You can then modify the query or use it as it is.
![]() Save: Use this button to save your query so that you can use it again
later. You will want to save any query you use repeatedly so that you do
not have to reenter the information every time. Queries files are saved with
a .qry extension.
Save: Use this button to save your query so that you can use it again
later. You will want to save any query you use repeatedly so that you do
not have to reenter the information every time. Queries files are saved with
a .qry extension.
![]() Save As: Use this button to save the query under a different name.
This option is particularly useful if you've modified a query and want to
save it without overwriting the original query.
Save As: Use this button to save the query under a different name.
This option is particularly useful if you've modified a query and want to
save it without overwriting the original query.
![]() Execute: When you press this button XpertMart™
will execute the query, i.e. it will send the query instructions to the database
and display the information you are requesting in the Results
tab. Executing a query is a lot like previewing the results. The actual query
does not take effect until you've pressed the <OK> button at
the bottom of the screen. You will want to execute the query any time you've
modified the query and want to see how the results change.
Execute: When you press this button XpertMart™
will execute the query, i.e. it will send the query instructions to the database
and display the information you are requesting in the Results
tab. Executing a query is a lot like previewing the results. The actual query
does not take effect until you've pressed the <OK> button at
the bottom of the screen. You will want to execute the query any time you've
modified the query and want to see how the results change.
![]() Maximum Rows: The value you enter here is the maximum number of rows
of data that will be displayed in the Results tab.
Usually you do not need to see every row of information, just enough to know
whether your query is producing the kind of information you expected before
you decide to press <OK>. If you need to see more rows at a
time, enter a larger number in this field.
Maximum Rows: The value you enter here is the maximum number of rows
of data that will be displayed in the Results tab.
Usually you do not need to see every row of information, just enough to know
whether your query is producing the kind of information you expected before
you decide to press <OK>. If you need to see more rows at a
time, enter a larger number in this field.
![]() Description: You can enter a description into this field that will
help you remember the contents or purpose of the query. Examples include:
"Items with Stock 0" or "May - July Sales".
Description: You can enter a description into this field that will
help you remember the contents or purpose of the query. Examples include:
"Items with Stock 0" or "May - July Sales".
![]() Maximize Screen: increases the size of the XpertQuery™ window to the full size of your screen.
Maximize Screen: increases the size of the XpertQuery™ window to the full size of your screen.
![]() About: Displays information about XpertQuery™.
About: Displays information about XpertQuery™.
Database
Each of the tabs in the XpertQuery™
get progressively more specific in the information you are wanting to retrieve
from the database. The first step, of course, is to define the database you
want to query. One of the advantages of the XpertQuery™
tool is that it allows you access and query multiple databases. (This way
the same query can be used on different databases). However, unless you are
an advanced user you will only be accessing one database, You will only need
to configure this screen once.
If you are creating a new database connection, press the <New>
key on the right to clear out the fields and enter your data. If you make
a mistake, you can always press the <Delete> key to start over.
Once you have filled in the five fields, press <Connect> to
establish a connection to the database. You will know you are connected when
you see the Tables tab full of information. If you
failed to connect this tab will remain blank.
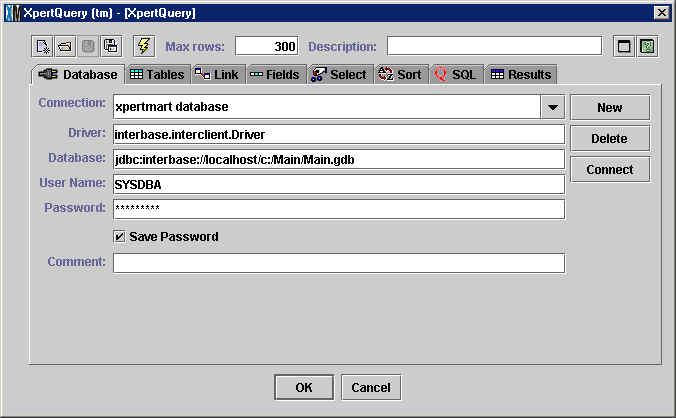
Connection: Enter a name or alias you want to use for this particular
connection. If you've saved more than one connection, press the arrow key
to the right and the connection names will appear in a drop-down menu you
can select from.
Driver: Specify the driver used (usually a Java class file) to
access the database. If you are using InterBase the driver is "interbase.interclient.driver."
If you are using a different database manager check the documentation for
the right driver to use.
Database: Enter the URL that the system needs to follow to locate
the database you are trying to access. NOTE: there is no restore button if
you make a mistake entering this information and need to go back to what
was saved before. Cut and paste the URL you are using into a text pad before
making any changes so that you at least have a backup. The URL will vary
depending on whether you are on a network or not but will usually end in
"c:/Main/Main.gdb".
User Name: Enter the user name you registered with the database manager
when you first setup the database. The default value is SYSDBA.
Password: Enter the password you registered with the database manager
when you first setup the database. (If you followed our instructions during the Installation the password is "masterkey").
Save Password: If you select this checkbox then the password will
be stored along with the information in the other fields. Otherwise when
you choose this particular database connection you will need to re-enter
the password.
Comment: Use this to enter a description that will help you remember
the database you are connecting to, for example, "Southwest Apparel" or "Pharmacies".
Tables
Once you've made a connection to a database the next step is to pick the
tables you want to query or extract information from. On the left side of
the Tables tab you will see a list of every table included in the database
you are connected to. Every catalog in XpertMart™ has
a corresponding table in the database. The information you enter into the
Styles catalog is entered into the "STYLES" table; the contents of the Taxes
Catalog are stored in the "TAXES" table, and so on. You will also see some
tables that XpertMart™ creates to store internal
information used to run the system that is not always viewable by the user
but (keeping with our open database philosophy) can also be exploited using
XpertQuery™.
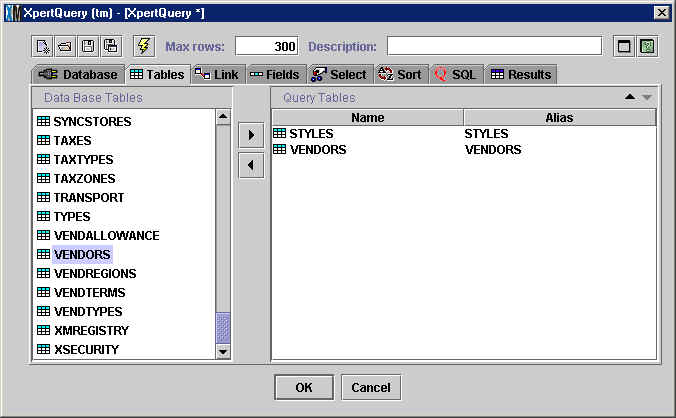
Most likely you will not need to use every table in the database in your
query. To access a table, select the table from the list on the left (it
will appear highlighted in blue) and click on the Add button ![]() . The Table will now appear on the right side of the screen, under "Query
Tables." To remove a Table, select the table you want to remove and click
on the Remove button
. The Table will now appear on the right side of the screen, under "Query
Tables." To remove a Table, select the table you want to remove and click
on the Remove button ![]() .
.
Note that sometimes you will need to include a "bridge"
table in your query. A bridge table is a table you are not acessing for information
but is needed to bridge two tables that are not linked together. For example,
suppose you are querying the database for all items
listed by vendor. The items table does not include
vendor information. However, items are related to styles
that do have vendor information. So in this case you would want to include
the STYLES table along with the VENDORS and ITEMS table to be able to link
items to vendors. To learn more, see the Relational Nature of the Data topic.
Use the arrow keys in the top right hand corner to change the order of
the tables. Click on the up button ![]() to move a table up in the order and the down button
to move a table up in the order and the down button ![]() to move it down. Whenever you change the order of the tables you are directly
affecting the SQL statement that XpertQuery™ is creating, so make sure there is a reason you are moving
the tables around and that there is still a logical flow to the order. The
order you create for your table will determine the way the tables are displayed
in the Link tab.
to move it down. Whenever you change the order of the tables you are directly
affecting the SQL statement that XpertQuery™ is creating, so make sure there is a reason you are moving
the tables around and that there is still a logical flow to the order. The
order you create for your table will determine the way the tables are displayed
in the Link tab.
In the example above the user has chosen to access the VENDORS and STYLES
tables for his query.
Link
The next step in building your query is establishing the relationship between
the tables you have selected to access. Tables are linked to each other through
a common field. XpertQuery™ will automatically display
the links between the tables. Make sure that all tables are linked together.
If you see a table floating alone with no links to another table, you may
need to go back to the Tables tab and insert a bridge table. If you want to change the flow of the links
you can click on one of the tables and change its position on the screen.
You can also go back to the Tables tab and change the order of the tables
there.

Advanced users can click on a link and delete it by pressing <Delete>
or change the link type by pressing the <Options...> key. If
you've made a mistake and need to revert back, press the <Smart Linking>
key and XpertQuery™ will restablish all links for
your.
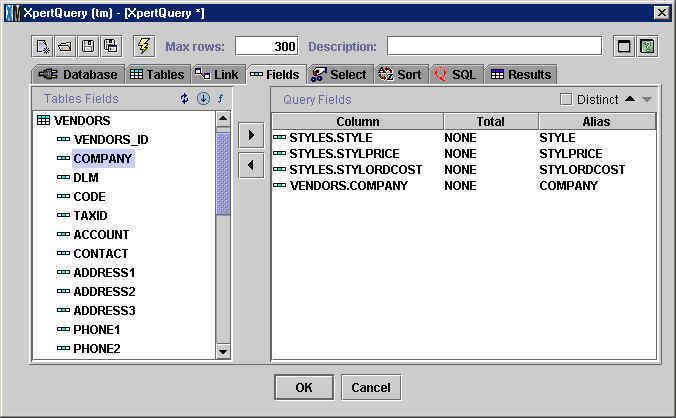
Fields
Once the relationship between the tables you have selected is established
you can pick the fields from each table you want to use in your query. When
you double-click on a table name on the right side of the screen a list of
all available fields will appear. To add a field to your query, select the
field and click on the Add button ![]() . The fields you add to your query will appear on the right side of the screen
under the "Query Fields" heading. You can remove a field or change the order
of fields using the appropriate keys.
. The fields you add to your query will appear on the right side of the screen
under the "Query Fields" heading. You can remove a field or change the order
of fields using the appropriate keys.
In the example below the user is accessing the Style name, Style List
Price, Style Order Cost and Vendor name fields.
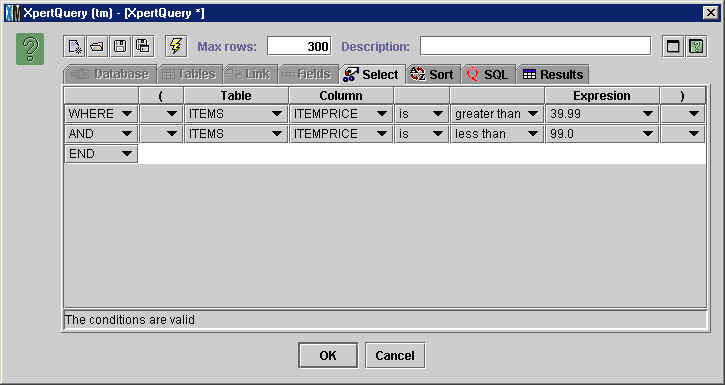
Select
The Select tab lets you define search criteria you can use to filter out
certain records from the fields you've selected. Use this tab to refine a
query using boolean logic.
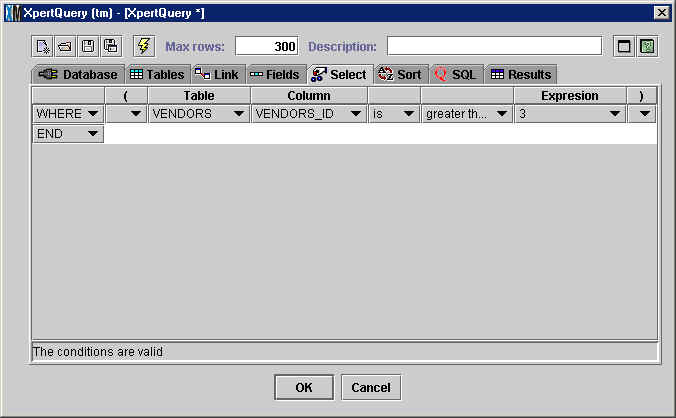
Click on the "WHERE" button to open a drop-down menu logical operators
you can choose from. If you are using more than one criteria, you can use
an "AND" operator to make the criteria inclusive; otherwise use the "OR"
operator. If you want to remove a criterion, click on "DELETE."

When you click on the "Table" button you will see a list of tables that
you have previously selected in the Tables tab. Find the table you want and
click on the "Column" button to find the right field.
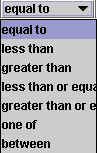
Next, click on the "is" button to pick one of two binary operators:

Now click on the "greater than" button to select the filtering criteria
you want to use:
Finally, click on the "Expression" button to select the parameter you want to use in your filter. The "Expression" button will open a drop-down menu with all of the values stored in the field you have selected.
In the example above, the user has selected to exclude all vendors whose
Vendors_ID is greater than 3. The Vendors_ID field is the internally generated
consecutive serial number assigned to all vendors in the vendors in the Vendors Catalog and corresponds to the position
the record holds in the table. Hence the vendor with Vendors_ID 3 is the
third vendor to appear in the Vendors Catalog.
Note that you can also use paraenthesis to build ever more complex search
criteria.
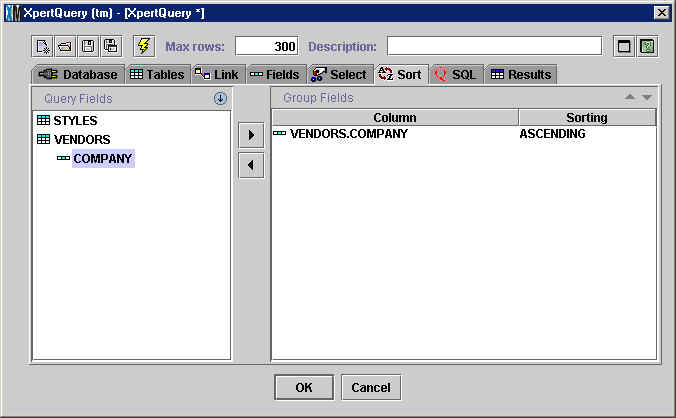
Sort
The last step in building your query is to define any sort criteria you may
want to use. The sort criteria determines the order in which the results
of your query are displayed. XpertQuery™ will
order the results from top to bottom by the fields you select and add to
the right side of the screen (under "Group Fields"). Click on the "Sorting"
button to determine whether you want data to appear in ascending or descending
order.
If you use more than one field to sort your results XpertQuery™ will first use the top-most field appear under the "Group
Fields" heading and use it to sort the data and then will use the second
field to order the data within the structure created by the first field,
and so on. For exmaple, the first sorting might order all results alphabetically
from A to Z and the second sorting might order all of the data within a letter
by price.
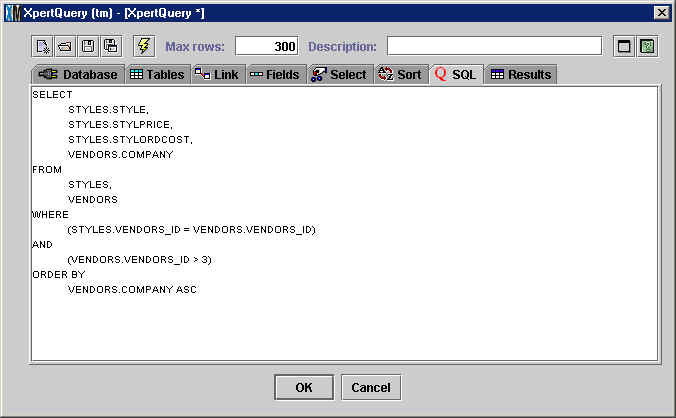
SQL
Structured Query Language (SQL) is a standard language used by the vast majority
of database programs to send instructions to a database. All queries to the
database are made through SQL statements in the same way that all instructions
to your computer are actually made through Machine Language in 1s and Os.
As you work with the Tables, Link,
Fields, Select and Sort tabs what you are actually doing is creating SQL statements.
XpertQuery™ takes the instructions you entered in
these tabs and translates them into SQL.
The SQL tab displays the SQL statement that you have been building in
your query. The SQL statement cannot be edited directly, you must return
to one of the prior tabs if you wish to make a modification.
And to think that in the "good old days" you would have had to enter these
SQL statements by hand!
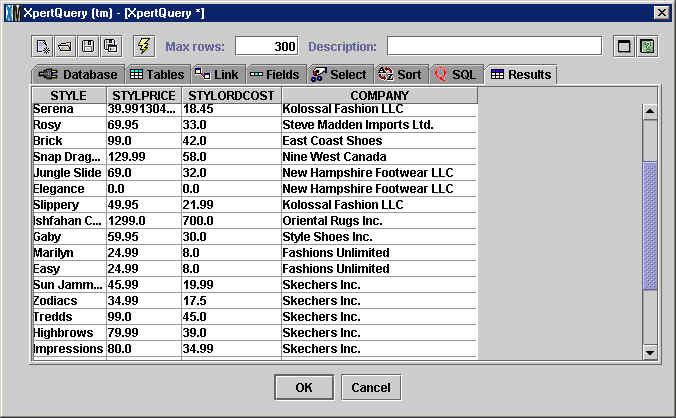
Results
This tab displays the results of you query once you have clicked on the Execute button ![]() in the toolbar at the top. You can click on a column of data to move it
to a different location or resize it.
in the toolbar at the top. You can click on a column of data to move it
to a different location or resize it.
Using XpertQuery™ as
a Merchandise Selector
When you run certain processes in XpertMart™
screen such as exporting data, making mass
changes to prices and costs, or modifying large quantities of data using
the Replace Where function, the
XpertQuery™ screen will usually open up as the last
step of the process.
When this happens you will notice that the Database, Tables, Link and
Fields tabs are grayed out and cannot edit the information in them. This
is because XpertMart™ has automatically
filled these in depending on the context in which you find yourself using the
XpertQuery™ tool. If you are using XpertQuery™ to filter merchandise after running the Mass Changes
to Prices function, XpertMart™ already knows you are
using the PRICES table, and so on.
If you want the change to apply to all of your data all you have to do
is press <OK> without entering any Selecting
criteria. Otherwise, you can use the Select Tab to filter our merchandise
and have the changes only apply to a subset of your merchandise. When you
are done entering your criteria, press <OK> and XpertMart™ will proceed with the process under way.
Copyright © 2002 XpertMart