Accounts Receivable
Chapter Topics
Introduction
Clients Catalog
AR Catalogs
AR Transactions
AR Documents
AR Processes
AR at the Point of Sale
Receiving AR Payments at the POS
AR Reports
Introduction
XpertMart™’s
Accounts Receivable (AR) module gives you all of the tools you need
to manage your sales on credit with your customers. To begin with, the
module
can be used as a stand-alone program to manage credit accounts without
ever
interacting with the Point of Sale. In
addition, the AR module can also
be used
as a fully integrated part of XpertMart’s Point of Sale.
XpertMart™’s AR module
resides on the Main in the Multi-Store Edition and can be included in
the
Single-Store Edition. In a multi-store setup the Remote Stations only
interact
with the AR module through the Point of Sale.
Clients
Catalog
The AR module uses the
same Client Catalog to store all of the
data of credit account
customers. There
are a few fields and one toolbar button used especially for AR:

The first field is
Credit Limit. At the Main Station
this field is editable and used to
put the
customer’s maximum credit limit. The second field is Balance, which is
not an
editable field. The AR Module will automatically update this field with
the
amount owed by the client. The third filed is Days Credit. This field
can be
edited at the Main station and is used to enter the maximum number of
days the
customer has to pay for the purchases bought on credit. In transactions
made at
the Point of Sale the Due Date will automatically appear as the Days
Credit
added to the current date of the transaction. The Days Behind field
displays
the days that have passed since the balance was due.
The Client
Catalog also includes a special button to open the AR Audit Log. The
button looks like the yellow Kardex
button with a green dollar sign on
it as shown below:

When you click on this button a new window will open with the AR Audit
Log for the custome you are looking at, as shown here:
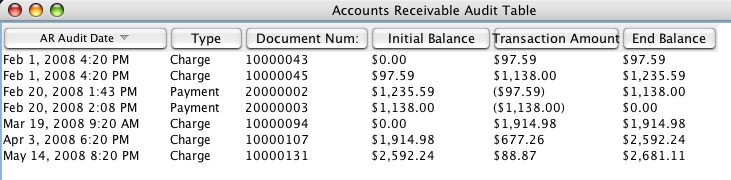
The AR Audit Log gives a complete transaction history for a customer's
credit account. It includes the date and time in which a transactions
was made, the type of transaction which was made, the unique document
number for the transaction followed by the starting balance prior to
the transaction, the amount of the transaction and finally the ending
balance after the transaction is accounted.
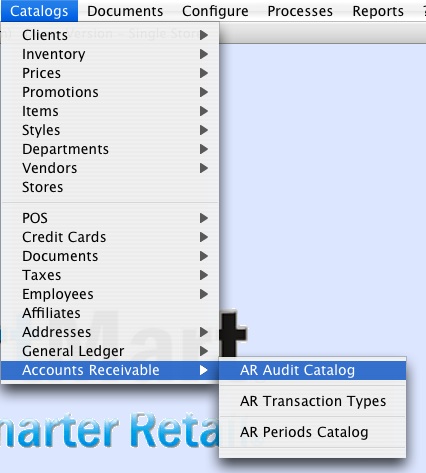
AR Catalogs
The data which appears in the AR Audit Log is stored in the AR
Audit Catalog. This catalog can be oepend
by going to
Catalogs>Accounts Receivable>AR Audit Catalog as shown below:
When you select this option, the AR Audit Catalog will open up, as
shown below:
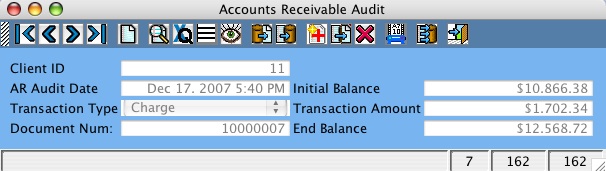
As can be seen in this image, this catalog has the same data found in
AR Audit Log. Perhaps the main reason for using the AR Audit Catalog is
to run the reports associated with this
catalog.
The names given to the different Accounts Receivable transactions may
vary from company to company. Therefore, the user can name these
transactions as desired in the AR Transaction Types Catalog. This
catalog can be opened by going to Catalogs>Accounts Receivable>AR
Transaction Types, as shown below:
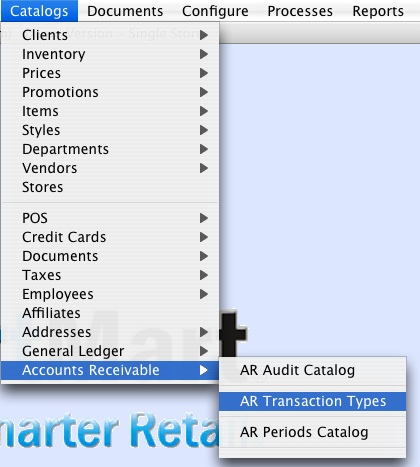
Once you select this option the AR Transaction Types Catalog will open.
The catalog includes a field where you can assign a name as well as an
internal ID number that is not editable.
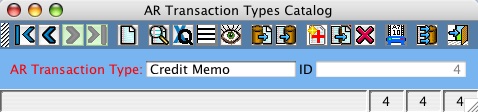
XpertMart™
uses
Transaction Type ID = 1 as a charge or something that was sold on
credit and for which payment is still due. You can give this
Transaction Type whatever name you wish but XpertMart™
will assume it is a charge. Transaction Type ID = 2 is used as a
payment against a balance that is due. Transaction Type ID =3 is used a
debit memo. These are used for charges that do not arise from normal
sales. For example, debit memos can be used for surcharges if a check
is returned, for a late fee or special interest charge. The last
Transaction Type is ID = 4 and is used for
credit memos which are used to credit an account and reduce the amount
owed outside of taking in a payment. For example, if you offer a
discount for quick payment, you would want to use Transaction Type ID =
4. As mentioned before, you can use whichever names you'd like for
these transaction typeswithout affecting the underlying functionality
just described. At present, only four transaction types are used.
A central feature of the Accounts Receivable module is clasifying debts
by due date and the time that has lapsed since then. XpertMart™
allows you to define the lenght of time periods you wish to use to
track overdue payments. Normally the periods used are: 0 - 30 days, 30
- 59 DAYS, 60 - 89 dayns and over 90 days. To define these periods, use
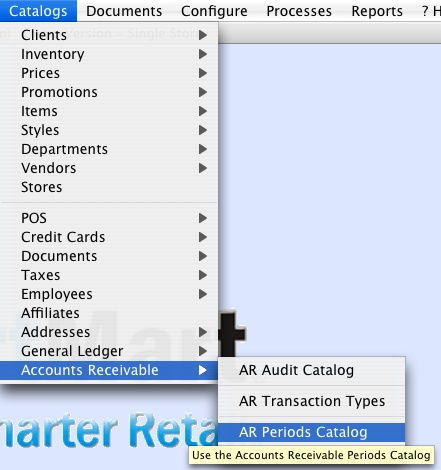
the AR Periods Catalog. To open this catalog, go to
Catalogs>Accounts Receivable>AR Periods, as shown below:
Once you select this option, the AR Periods Catalog will open, as shown
below:
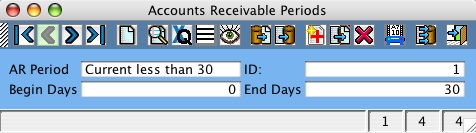
Use the first field for the name you want to use
for the period. You
can use whichever name you like. Then select how many days past due
mark the beginning of hte period and how many days past due mark the
end of the period. As can be seen in the image above, you must have an
initial period that starts with zero days past due. This initial period
is for accounts that ar considered current. You can use the number of
days you'd like, but the important thing is not to skip any days. For
example, if one period ends with 30 days then the next period must
begin with 31 days. Also, you must enter the periods you want to use in
order such that Period ID = 1 is used for current accounts, Period ID =
2 is used for accounts that are more than one day past due, and so on.
The AR Aging Report will used these periods to
display overdue accounts.
The last entry in the AR Periods Catalog is for all delincuent accounts
over "x" days past due. For example, if the final period runs to 120
days, then you must add another entry in the catalog which begins with
121 days past due and runs to 9,999 days past due. This period could be
called "More than 120 Days" for example.
AR Transactions
All four transaction types in the AR module
can be processed manually.
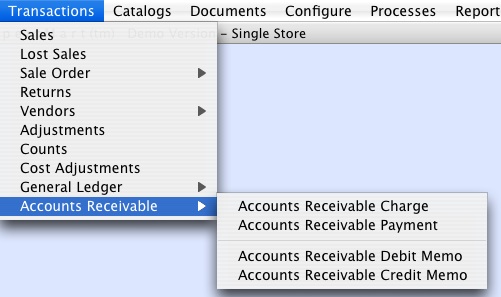
To make any one of these transaction types, go to Transactions>Accounts
Receivable, as shown
below:
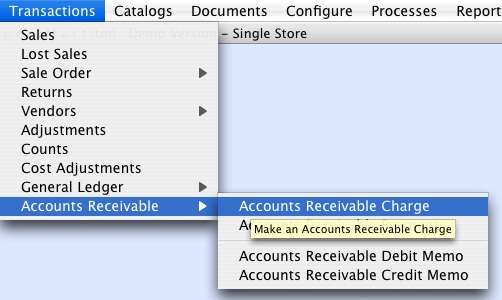
The first type of AR Transaction is a Charge which gets recorded as a
balance that needs to be paid at a future date. To make a Charge
transaction, go to Transactions>Accounts
Receivable>Accounts
Receivable Charge, as shown below:
Once you select this option, a new transaction screen will open up, as
shown below:
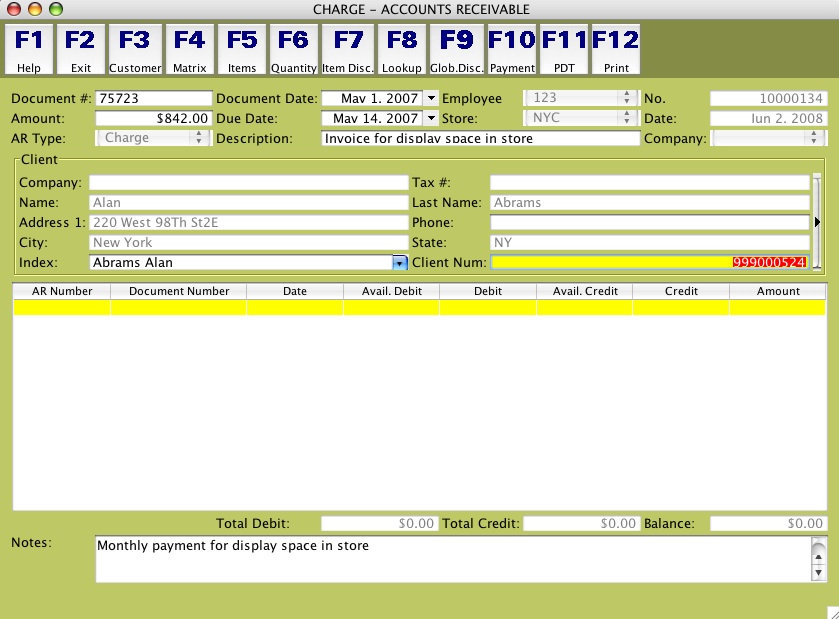
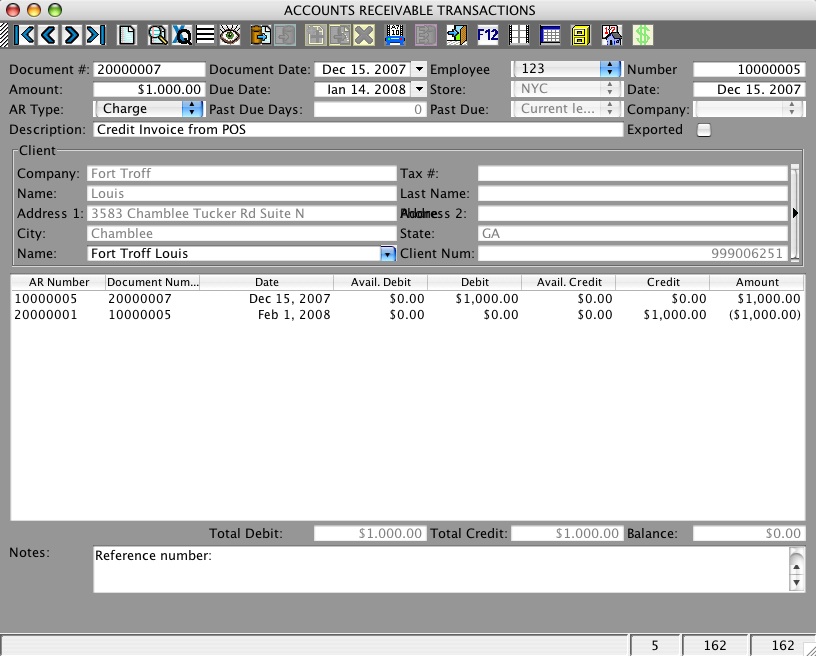
There are a number of fields in which to enter data. The Document #
field refers to the number of the document which generated the Charge
such as the number of the invoice which was sold on credit. The
Document Date refers to the date of the document which generated the
charge. This date may be different than the date of the Charge itself.
The Employee field is non-editable and is filled in automatically with
the Employee Number of whoever
is logged in at the time. The No. field
is the unique document number for this charge transaction. This number
is generated automatically by the system and runs sequentially starting
with 10,000,000.
On the second line of the transaction screen is the Amount field which
is where you enter the amount that is being charged. The Due Date field
is where you enter the date on which the amount being charged is due
for payment. The Store field displays the
store number where the charge
is being made and is filled-in automatically by the system and is not
editable. If you are making the charge at the Main then this field is
left blank. The Date field displays the date of when the charge is
being made (today's date) and is not editable.
On the third line, the AR Type field displays the name for the
transaction type you entered into the AR
Transaction Types Catalog with
an ID = 1. This field is not editable. The Description field is an open
field where you can enter a description for the charge being processed.
The Client field works the
same way it does in an Invoicing screen.
You
can do a Lookup by Example by
Last Name to enter the client for which
the Charge is being processed.
The next section details the AR transactions and documents which are
used to pay this charge. The Total Debit, Total Credit and Balance
fields reflect the totals of all transactions listed in this section.
The Balance field displays the total amount of the charge minus any
credits and debits which have been applied. This transaction details
section is explained below.
Lastly, the Notes field allows you to enter an explanation for the
charge being process or include special instructions.
If after entering all of the relevent information pertaining to a
charge in the fields described above you wish to appy any open credits
or positive balances, you can do so simply by pressing the Payment <F10> button.
When you press <F10> the
system will first check to see if the charge transaction has all the
required information. The system will first check to see that you've
entered a Client. If you have not specified a client you will see this
error message:
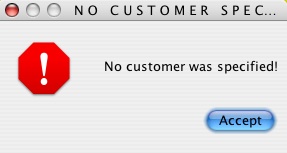
If the client has not been specified you need to do so before
proceeding. Next, the system will check to make sure the amount entered
is greater than zero. If no amount has been entered in the Amount
field, you will see this error message:
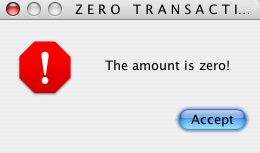
If you have not entered an amount fo the Charge you will need to do so
before proceeding. Next, the system will prompt you with this window
asking if you 'd like to apply any open credits automatically or
manually:
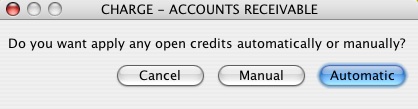
At this point you need to decide if you'd like to apply any open
credits yourself of let the system do it. If you are not ready to
decide, press <Cancel>.
Whenever XpertMart™
automatically applies open credits it will always apply these to the
oldest document first and, if there's still a positive balance left,
will then apply it to the second oldest document and so on in order. If
the balance of the open credit is less than the total amount due on a
document then XpertMart™
will apply the full credit and leave the remaining balance as pending
to be paid.
If on the other hand you elect to apply open credits manually then you
can decide the amounts you wish to apply to the documents of your
choosing.
Below is a sample of how XpertMart™
applied an open credit automatically:

The first thing to notice ist aht XpertMart™
will add a line which registers the current transaction being
processed. In the image above, the first line refers to AR Transaction
number 10000014 and the amount being charged is $300.
The second line shows that XpertMart™
found document number 20000001 which has an open credit of $17.50 which
has not yet been applied to any prior document so XpertMart™
is applying it now. That's why it shows up under the Credit column.
The image below, on the other hand, shows what happens if you tell XpertMart™
you want to apply the credits manually:

In this case XpertMart™
also finds the open credit of $17.50 from document 200000001 which this
client has in their favor. Since this credit has not been used before, XpertMart™
places it in the Available Credit column so that the user knows it's
available. If you wish to use this credit then you have to manually
enter the amount ($17.50) in the Credit column. Or you can choose to
only use a portion of this credit and enter it in the Credit column.
To save and
print these changes you need to click <F12>.
Note that if
before you press <F12>
you change the amounts or enter a different client then XpertMart™ will not save any of the
transaction detail. You must press <F12>
for your transaction detail to be saved.
Just as when you press <F10>
to commit a Charge, XpertMart™
will check to see that you've specified a client and have entered an
aount before printing. XpertMart™
will also check to see that you've specified a Document Number and will
display an error notice if you have not.
If all of the
infromation is complete (client, amount and document number) then XpertMart™
proceeds with the transaction. If after applying open credits the
Charge still has an active balance then XpertMart™
will ask you if you'd like it to apply any open credits to the
document. These would be any open credits you had previously
not applied. If you'd like XpertMart™
to apply these automatically, then click <Apply>. If you'd like to
leave the balance as pending to be paid, then click <Don't Apply>. If you
decide you don't wish to save and print the transaction then you can
click <Cancel> and the
transaction screen will clear out.
The second
type of AR transaction you can make is a Payment. To do this, go to
Transactions>Accounts Receivable>Accounts Receivable Payment.
This will open a new transaction window, as shown below:
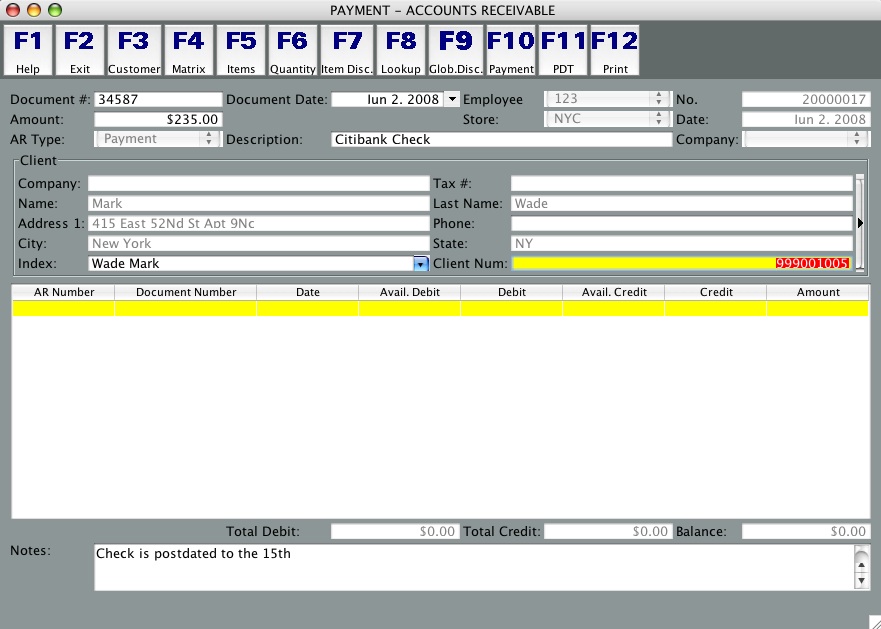
As can be seen above, the fields that need to be filled out are the
same as when making a Charge transaction. The
only difference is that
the amount will be credited to the customer's balance instead of
debited. All AR Payment documents begin with document number
20,000,000. When looking at the AR Audit Log you can tell just by
looking at the document number which transactions are Payments (start
with 2) and which are Charges (start with 1).
The <F10> Payment button
works the same way only instead of applying credits you will be
applying debits. This is because you will be choosing which open
balances to apply this payment against.
The <F12> button works
the same as before and is used to save and print the transaction. None
of the payments are applied until you actually press <F12>.
The third AR transaction type you can make are Debit Memos. These are
used to register a charge to a client's account for something that is
not a merchandise sale. To make one, go to Transactions>Accounts
Receivable>Accounts Receivable Debit Memo, as shown below:
Once you select this option, a new transaction window will open, as
shown below:
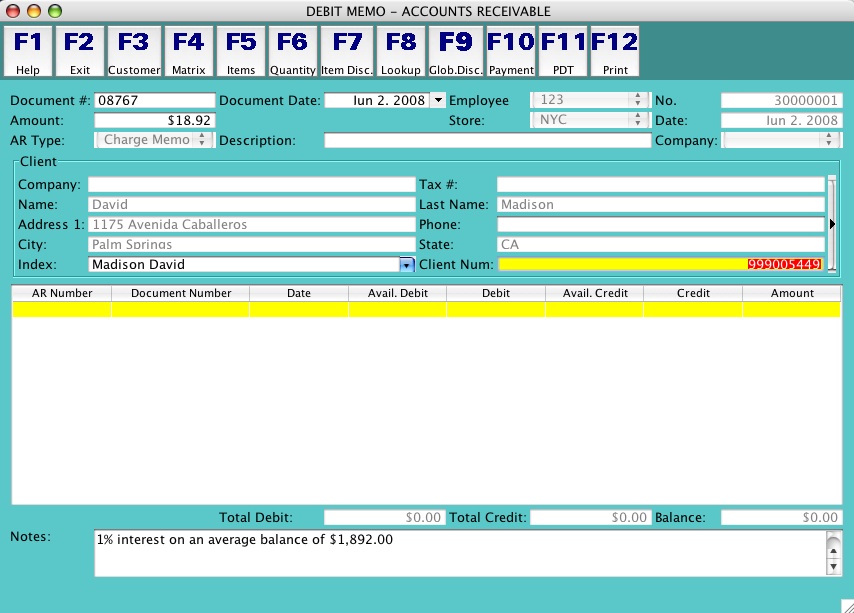
As seen with Charges and Payments,
the fields to fill out are the same
and the <F12> and <F12> keys work the same way. In fact, a
Debit Memo works exactly like a Charge does, the only difference being
the document number which starts with 30,000,000.
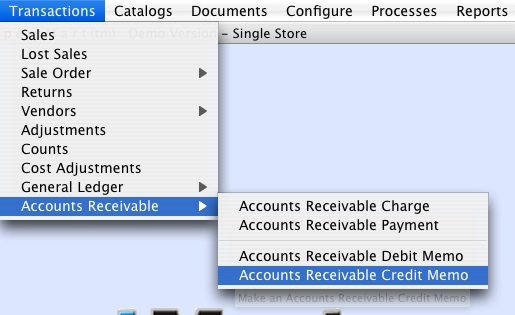
The final AR transaction type are Credit Memos. These are used to
reduce the total balance due for any reason other than a payment. To
make one, go to Transactions>Accounts Receivable>Accounts
Receivable Credit Memo, as shown below:
Once you select this option, a new transaction window will open, as
shown below:
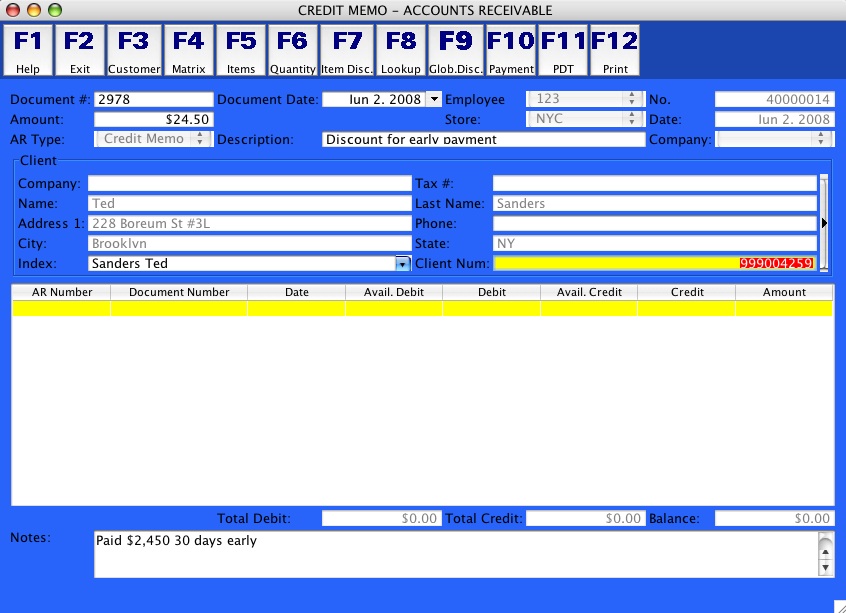
As
seen with Charges and Payments, the fields to fill out are the same and
the <F12> and <F12> keys work the same way. In fact, a
Crebit Memo works exactly like a Payment does, the only difference
being
the document number which starts with 40,000,000.
The printing format
for each of the four AR transaction types can
be set by going to Configure>Configure Documents>AR Transaction
Format.
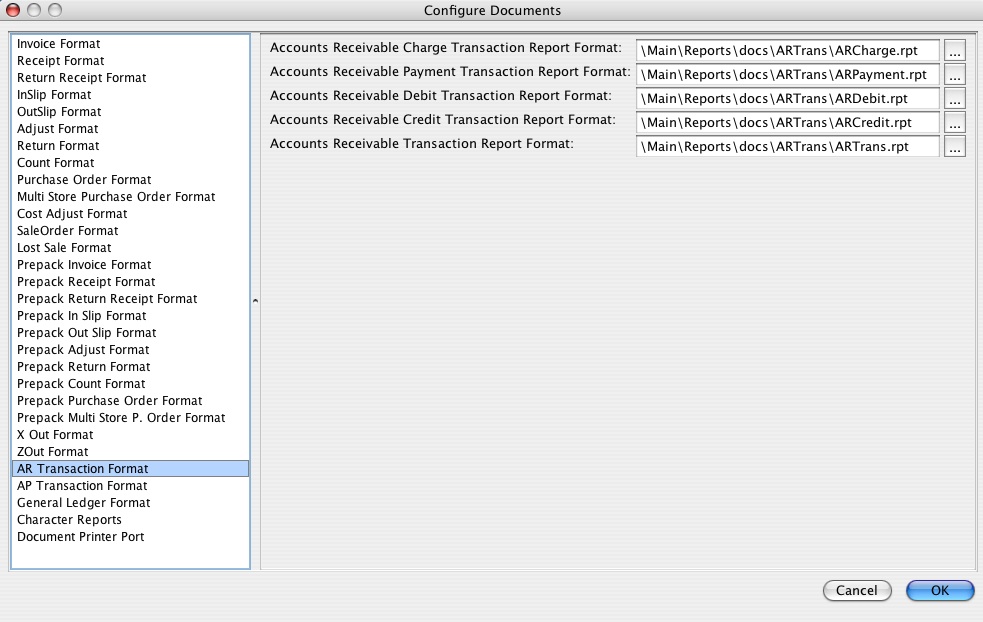
Select the report format you want to use for each transaction type. The
default formats are shown above.
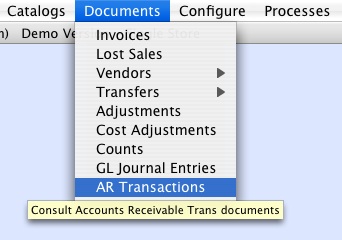
AR Documents
All AR Transactions get stored as Documents. These documents can
be
found under Documents>AR Transactions, as shown below:
Once you select this option, a Catalog of previous AR Transactions
opens up, as shown below:
All four AR Transaction Types are found here.
You can use all of XpertMart™'s usual
Catalog and Search
functions to find the data you're looking for.
The AR Documents screen has two addiitional fileds that the AR
Transaction screen does not have. The Past Due Days field displays
how
many days past due is the balance. The number of days past due is based
on the last time you ran the process to calculate days past due. The
Past Due field displays the AR Period the
balance falls under.
The AR Transactions catalog also includes a Payment
button you can use
to apply payments to open charges (or vice-versa). The Payment button
has a dollar sign on it and looks like this:
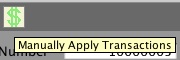
When you
press the button, XpertMart™ will
check to see if the balance on the transaction you are looking at is
zero. If the balance is zero then it is no longer necessary to apply
any payments, in which case you'll see this notice:
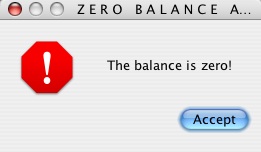
After displaying this message XpertMart™
will not do anything further since the transaction does not have any
open balances. If on the other hand there is an open balance then
XpertMart™ will check to see if the
client in question has any open credits or any payments that have not
yet been applied. If the client does not have any open credits or
payments waiting to be applied, you will see this notice:
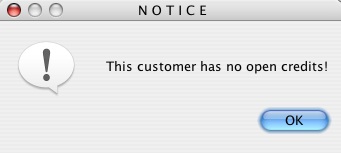
After
displaying this message XpertMart™
will not do anything further since the transaction does not have any
open balances.
If the balance is greater than zero and the client does in fact have
open credits then XpertMart™ will
proceed to ask you if
you'd like the open credits applied automatically or manually, the same
way it does in an AR Transaction screen when you press <F10>.
You will see this dialogue window:
The functionality here is the same as described earlier when using the
<F10> Payment button in a Transaction
screen. The only difference
is that instead of pressing <F12> to save the changes and print,
in the Documents screen you will press the Payment button on the
toolbar a second time to commit the changes.
When you press the Payment button a second time the system will ask you
to confirm that you want to commit these changes to the Document you
are looking at.
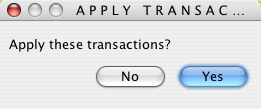
Press <Yes> to commit
these changes to the Document. If you press <No> the credits will
not be applied.
Note that the example above dealt with applying open credits to Charges
and Debit Memos but the procedure is exactly the same for apply open
debits to Payments and Credit Memos.
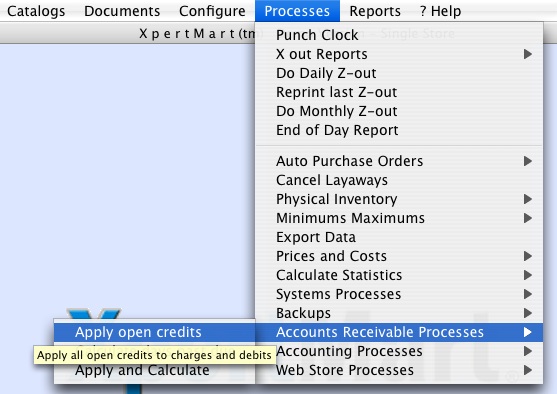
AR Processes
There are two processes you should run regularly to keep your Accounts
Receivable up to date. These two processes are found under
Processes>Accounts Recevable Processes, as shown below:
As previously mentioned, XpertMart™
can automatically apply open credits by
taking any open credit and
applying it to the oldest open debit or charge document and working its
way formard. If you'd like XpertMart™ to
do this for every single client where there is an open credit then you
can select Processes>Accounts Receivable Processes>Apply open
credits, as shown below:
Once you select this option, a dialogue window will appear notifying
you that XpertMart™ is applying
the open credits.

When the dialogue window closes it means the system is done applying
open credits.
The second process consists of calculating how many days past due every
balance is and under which AR Period the charge
falls under. To do
this, go to Proceses>Accounts Receivable Processes>Calculate days
past due, as shown below:

When you select this option a dialogue window will appear
notifying you that the system is calculating the days past due. When
the dialogue window closes it means the system is done calculating days
past due. Note that the number of
days past due is based on the last date you ran the Calculate days past
due process so it is important to run this processes before running any
AR Reports.
The last option in the Accounts Receivable Processes menu is to run
both processes at the same time.
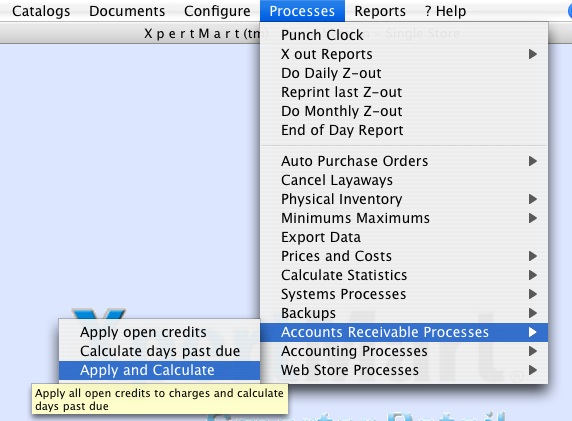
When you
select this option XpertMart™
will first apply all open credits and will then calculate days past
due. This way if after applying an open credit a charge now has a
balance of zero it will show zero days past due and the account will be
considered current.
This concludes the overview of Accounts Receivable as a stand-alone
module in XpertMart™. We will now
see how AR integrates into the Point of Sale.
AR at the Point of Sale
Once you've setup the three AR Catalogs then
you are ready to begin
selling on credit at the point of sale.
You need to setup one
configuration setting at the Main
in order for credit sales at the POS
to be automatically applied to a client's
account through the AR
module. To set this up, go to Configure>Accounts Receivable
Configure, as shown below:
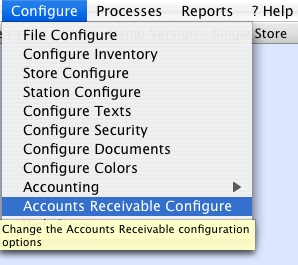
When you select this option the Configure Accounts Receivable window
opens up, as seen below:

The first configuration option on the left-side menu is Accounts
Receivable Posting. If you check the box that says "Automatically apply
charges and payments from POS" then the system will automatically
update each client's records in the AR Module. If you don't check this
option then all charges and payments made at the POS are left open for
you to apply later at the Main using the AR Module. If you're going to
be applying charges and payments automatically at the Main anyway, you
might as well go ahead and select this configuration option now.
The second configuration option is called Credit Balances.

If you select the "Increase credit balance when purchases are paid via
credit" box then each client's available credit will adjust dynamically
as payments are made and open credits are applied.
To sell on credit at the point of sale
all you need to do is select
"Credit" as the Tender Type, as
shown below:
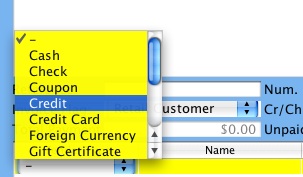
Note that Credit must be Payment Type ID = 7 when you setup the Payment
Types Catalog. Refer to the Required
Entries topic for further
informaiton.
When you select Credit as the tender type XpertMart™
will first
check to see if you've entered a Client
in the Invoice. If you have
left the Client field blank, XpertMart™ will
not let you use Credit as a tender type.
Next, XpertMart™
will check that the Client you've selected has available credit greater
than the amount being charged in the Invoice. Available credit is
calculated as the Credit Limit you entered in
the Client Catalog minus
any open charges and debits that have not yet been paid.
If you are using XpertMart™'s
Single Store Edition then any sale made on credit will automatically be
applied at that moment to the AR Modlule. If you are using the
Multi-Store Edition then all sales made using the Credit tender type
will be applied to the AR Module after a synchronization
cycle.
XpertMart™ will record
the Invoice number as the Document number in the AR Transaction. In the
Notes field of the AR Transaction, XpertMart™ will
insert the Invoice's reference field. The AR Module will record
a Due Date equal to the date of the Invoice
plus the Days Credit you've
previously assigned in the Client Catalog.
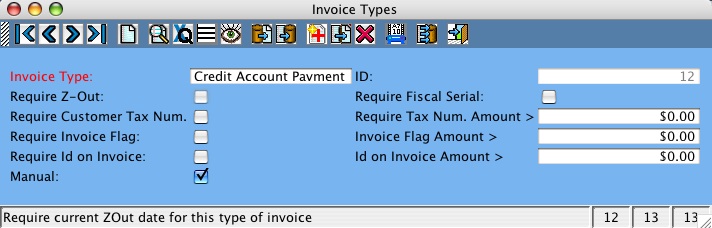
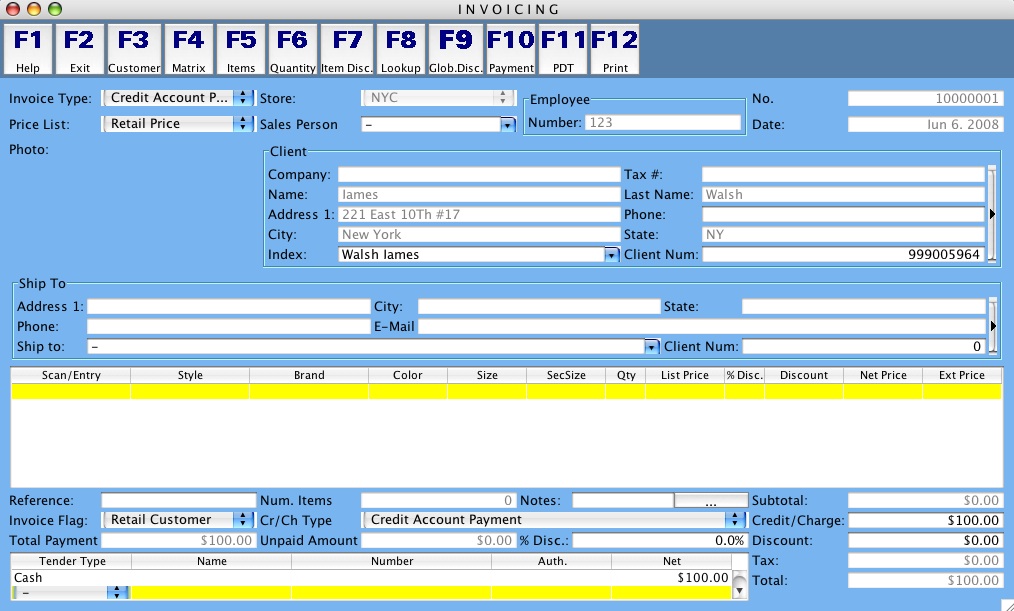
Receiving AR Payments at the POS
You can also receive payments towards a clients AR balance at the point of sale. To be able to do this you
first have to create new entries in two catalogs. First, create an
Invoice Type with ID = 12 called "Credit Account Payment" in the
Invoice Types Catalog which is found under Catalogs>Document
Types>Invoice Types.
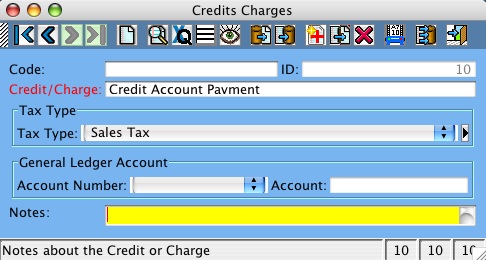
Next, create a Credit/Charge type with ID = 10 called "Credit Account
Payment" in the Credits Charges Catalog which is found under
Catalogs>POS>Credits/Charges.
When you're in an Invoicing screen if you
pick Invoice Type ID=12 (Credit Account Payment) then XpertMart™
will
automatically fill in Credit/Charge Type ID = 10 int he Cr/Ch Type
drop-down menu. In the Creidt/Charge field, enter the amount the client
is paying. Obviously you also need to enter a ame in the Client field
and you must specify the Tender Type being used to make the payment. In
the example below, the Client is making a $100 payment towards his AR
balance and is paying cash.
XpertMart™ will check to
see that all required data has been entered. If you have not specified
a Client, you will see this error notice:
You must specify a Client in order to continue. Likewise, XpertMart™
will check to
see that you are using Credit/Charge Type ID = 10. If you are not, you
will also see an error notice and you will have to change the entry in
the Cr/Ch Type drop-down
menu to Credit Account Payment.
As with selling on credit at te point of sale, if you are using XpertMart™'s
Single Store Edition then any payments made at the point of sale will
instantly be applied to the AR Module. If you are using XpertMart™'s Multi Store Edition then
they will be applied after a full synchornization
cycle.
XpertMart™ will record
the Invoice number as the Document number in the AR Transaction. In the
Notes field of the AR Transaction, XpertMart™ will
insert the Invoice's reference field.
AR Reports
The AR Module includes several reports you
can use to manage your client's credit accounts. These are found by
going to Documents>AR Transactions and clicking on the Reports button. Most of these reports
are also found in the Clients Catalog.
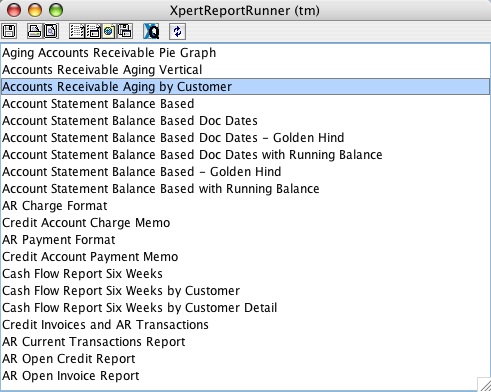
The "Account Statement Balance Based with Running Balance" report will
produce Balance Statements for each client showing all activity and the
resulting balance for a given date range. The "Accounts Receivable
Aging Vertical" report will show all the overdue balances grouped
by AR Transaction Period.
Copyright © 2008 Dinari Systems LLC